GT550 Cafe project
Moderators: oldjapanesebikes, H2RICK, diamondj, Suzsmokeyallan
-
oldjapanesebikes

- Moto GP
- Posts: 3229
- Joined: Sat Feb 07, 2009 12:43 am
- Country: Canada
- Suzuki 2-Strokes: GT750(Jx3,L,M,A,B),T500
- Location: Ontario
- Contact:
Re: GT550 Cafe project
That really is nice work 
Ian
If at first you don't succeed, just get a bigger hammer !
If at first you don't succeed, just get a bigger hammer !
-
Suzukidave
- Moto GP
- Posts: 3980
- Joined: Fri Oct 24, 2008 5:55 pm
- Country: US
- Suzuki 2-Strokes: GT750 x2 97 -1200 Bandit 86 GSXR1100
- Location: Lancaster Pa.
Re: GT550 Cafe project
Great job on the chambers all right a tip you may have already thought about but if not .. be sure not to solid bolt the pipe hangers to the frame as they will stress crack .
the older i get the faster i was
-
imquattro
- To the on ramp
- Posts: 239
- Joined: Tue Jul 19, 2011 9:26 pm
- Country: USA
- Suzuki 2-Strokes: 72/74 GT550
- Location: Muncy PA
Re: GT550 Cafe project
Oh? How do you suggest hanging them? Ive looked at a lot of examples and have mostly seen direct bolt (solid) attachment?Suzukidave wrote:...be sure not to solid bolt the pipe hangers to the frame as they will stress crack .
Ideas? Pictures? I'm all ears.
-
Suzukidave
- Moto GP
- Posts: 3980
- Joined: Fri Oct 24, 2008 5:55 pm
- Country: US
- Suzuki 2-Strokes: GT750 x2 97 -1200 Bandit 86 GSXR1100
- Location: Lancaster Pa.
Re: GT550 Cafe project
If you are hanging the chambers from the stock frame points there are rubber dampers already there but still you have to use care to bolt the hangers to these points so they float on the rubber dampers . All it takes is some small washers on either side to space it so the hanger doesnt really bolt up solid to the frame .
the older i get the faster i was
-
ja-moo
- Yeah Man, the Interstate
- Posts: 554
- Joined: Wed Apr 01, 2009 11:47 pm
- Location: NM USA
- Contact:
Re: GT550 Cafe project
Or you can open up the mount hole for a rubber grommet, with a steel insert. And sooner or later, the hard mount pipes will crack.........
Visiting from the "K" camp...........
-
imquattro
- To the on ramp
- Posts: 239
- Joined: Tue Jul 19, 2011 9:26 pm
- Country: USA
- Suzuki 2-Strokes: 72/74 GT550
- Location: Muncy PA
Re: GT550 Cafe project
Thanks for the heads up. I'll see what I can do. I'm obviously not using the factory mounts so some modifications will have to be made to the tabs I am using.
Again, thanks for the preventive wisdom.
Again, thanks for the preventive wisdom.
-
imquattro
- To the on ramp
- Posts: 239
- Joined: Tue Jul 19, 2011 9:26 pm
- Country: USA
- Suzuki 2-Strokes: 72/74 GT550
- Location: Muncy PA
Re: GT550 Cafe project
As per Suzukidave & ja-moo, I opened up the mounting tabs to accept a grommet & bushing.

I then hung the pipes by the head flanges, wiped them down w/ brake clean and applied 3+ liberal coats of Mop n Glo, allowing time to dry between coats.


After 3 coats... doesn't look any different, but I did notice some of the welded seams yellowed a bit, reacting I assume to the water in the product. Once dry, the pipes are slick smooth to the touch and shiny.

Off came the center stand... Sad. I may try to make it work with the pipes in the future. The kick stand went on, with a 10mm spacer between it and the frame, to help remove some of the lean.
After they dried, I removed the head flanges and painted them with VHT silver 2000F paint. After a couple coats and some time under a heat gun, we installed them on the pipes and carefully mounted them.


Also finished the final sand of the tank. We then poured in some Marine Clean and sloshed it around for a while, then dumped i out.... Tar water & rust flakes.
I continued to rinse until the water was clear and flake free. I had already shook a chain around the inside prior to the knee dents (a WHILE ago) so most of the rust was removed already.
After drying the tank w/ the heat gun for a while I let it cool and when cool, sealed off the bottom and seal coated the inside with POR15. (add container to tank, slowly roll tank around to all angles a bunch of times to coat every inch of the inside, then drain out.) Once that drained out, the tank was wiped down with paint prep and primed. Once primed, the imperfections were addressed (but not shown in last tank picture) (pin holes in filler & such -small discrepancies that are seen after priming.)


Just after primer, before addressing imperfections.
Also today, we welded the rear brake cable holder to the frame, attached the cable to the lever, adjusted the pedal/brake, and fabricated a bracket for the rear brake switch -thats activated by the brake lever.
I then hung the pipes by the head flanges, wiped them down w/ brake clean and applied 3+ liberal coats of Mop n Glo, allowing time to dry between coats.
After 3 coats... doesn't look any different, but I did notice some of the welded seams yellowed a bit, reacting I assume to the water in the product. Once dry, the pipes are slick smooth to the touch and shiny.
Off came the center stand... Sad. I may try to make it work with the pipes in the future. The kick stand went on, with a 10mm spacer between it and the frame, to help remove some of the lean.
After they dried, I removed the head flanges and painted them with VHT silver 2000F paint. After a couple coats and some time under a heat gun, we installed them on the pipes and carefully mounted them.
Also finished the final sand of the tank. We then poured in some Marine Clean and sloshed it around for a while, then dumped i out.... Tar water & rust flakes.
I continued to rinse until the water was clear and flake free. I had already shook a chain around the inside prior to the knee dents (a WHILE ago) so most of the rust was removed already.
After drying the tank w/ the heat gun for a while I let it cool and when cool, sealed off the bottom and seal coated the inside with POR15. (add container to tank, slowly roll tank around to all angles a bunch of times to coat every inch of the inside, then drain out.) Once that drained out, the tank was wiped down with paint prep and primed. Once primed, the imperfections were addressed (but not shown in last tank picture) (pin holes in filler & such -small discrepancies that are seen after priming.)
Just after primer, before addressing imperfections.
Also today, we welded the rear brake cable holder to the frame, attached the cable to the lever, adjusted the pedal/brake, and fabricated a bracket for the rear brake switch -thats activated by the brake lever.
-
Suzukidave
- Moto GP
- Posts: 3980
- Joined: Fri Oct 24, 2008 5:55 pm
- Country: US
- Suzuki 2-Strokes: GT750 x2 97 -1200 Bandit 86 GSXR1100
- Location: Lancaster Pa.
Re: GT550 Cafe project
I wouldnt be surprised if you got a few requests for copys of your chambers your and the shop guys project GT550 is coming along very nice .
the older i get the faster i was
-
imquattro
- To the on ramp
- Posts: 239
- Joined: Tue Jul 19, 2011 9:26 pm
- Country: USA
- Suzuki 2-Strokes: 72/74 GT550
- Location: Muncy PA
Re: GT550 Cafe project
So here's what the baffles looked like prior to being wrapped. They've also been coated with VHT ("Flame Proof" Silver) but simply to reduce rust. The O-rings on the end are from the original setup, so I'm assuming they're pretty high-temp and should be good at the end of the system.
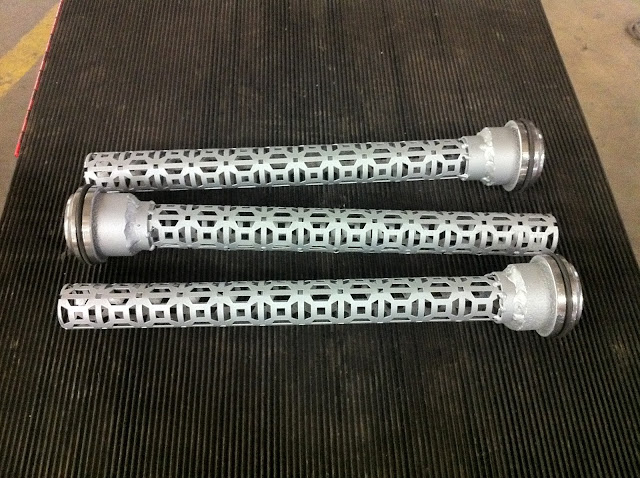
After crawling through the interwebs researching baffle material(s), I decided upon fiberglass mat & cloth. For $11 from Walmart, I was able to do all three baffles. I also used the stainless steel wire to secure the baffle material.

I wanted the cloth to be on the inside & outside of the pipe when finished, with the mat trippled over in the middle.
So here's one down:

All three, with o-rings installed, fit inside quite snuggly.
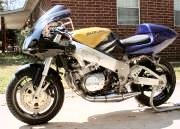
Here's how it sits prior to electrical system clean up:

Here's after:


And with the rear turn signals installed:


I also added a stop for the front forks to prevent them from turning the grips into the tank.

After crawling through the interwebs researching baffle material(s), I decided upon fiberglass mat & cloth. For $11 from Walmart, I was able to do all three baffles. I also used the stainless steel wire to secure the baffle material.
I wanted the cloth to be on the inside & outside of the pipe when finished, with the mat trippled over in the middle.
So here's one down:
All three, with o-rings installed, fit inside quite snuggly.
Here's how it sits prior to electrical system clean up:
Here's after:
And with the rear turn signals installed:
I also added a stop for the front forks to prevent them from turning the grips into the tank.
-
imquattro
- To the on ramp
- Posts: 239
- Joined: Tue Jul 19, 2011 9:26 pm
- Country: USA
- Suzuki 2-Strokes: 72/74 GT550
- Location: Muncy PA
Re: GT550 Cafe project
Getting Started....
I'm prepping to start the bike soon and was wondering if you-all could give me some tips on the startup of a reassembled engine/carbs...
What's the default setting for the air screws? (Remember, I'm +2 on the mains & +1 on the pilots). The throttle valves were set as per the manual (pg 35/37), the oil pump was set to the marks as per page 39.
I'll be adding some contrasting colored oil to the tank to verify oil feed to/from the pump.
Any other tips are welcome!
-
Coyote

- Moto GP
- Posts: 3404
- Joined: Tue Oct 21, 2008 2:41 pm
- Country: USA
- Suzuki 2-Strokes: GT550x2, GT750, GS1000
- Location: Tulsa, Oklahoma
Re: GT550 Cafe project
Stock air screw setting for the 74 motor you are using is 1 1/2 turns out. I like to avoid putting fuel in the tank right away (first start). Instead I use a camera tripod with a spare oil tank hanging from it, and of course a length of hose. I use 30/1 premix just to be on the safe side, till I make sure there are no issues and the pump is working.
After everything proves to be OK, ditch the dummy tank and add fuel the the tank on the bike. Ethanol free if you can find it.
After everything proves to be OK, ditch the dummy tank and add fuel the the tank on the bike. Ethanol free if you can find it.
I was born with nothing and still have most of it left.
.
1978 GS1000C
1976 GT550 ongoing money pit.
.
1978 GS1000C
1976 GT550 ongoing money pit.
-
imquattro
- To the on ramp
- Posts: 239
- Joined: Tue Jul 19, 2011 9:26 pm
- Country: USA
- Suzuki 2-Strokes: 72/74 GT550
- Location: Muncy PA
Re: GT550 Cafe project
Thank you! All set relating to the carbs as instructed. Oil pump is confirmed working (cranking over w/ jump box).
Couple things:
Petcock leaks fuel like a sieve through the air hole on outward side of the diaphragm....
Took apart and the diaphram's holed & goopy.
What's the replacement petcock again? One off a GSX? or a Kawa diaphragm???
BUT! Got it running!!! (Vid(s) posted when I'm in wifi upload range).
First one the student didn't focus it... but you get the idea:
https://picasaweb.google.com/lh/photo/0 ... directlink

https://picasaweb.google.com/lh/photo/6 ... directlink

These pipes are LOUD -even with the baffles in!!
Second item for suggestions:
No spark on RIGHT plug. Help?
I'm a bit out of the "points age" but we swapped out the coil packs for the spare set, same deal, no spark on RIGHT cylinder.
We do see ONE spark just as the bike shuts off.
Help?
Thanks! Vids posting soon!
Couple things:
Petcock leaks fuel like a sieve through the air hole on outward side of the diaphragm....
Took apart and the diaphram's holed & goopy.
What's the replacement petcock again? One off a GSX? or a Kawa diaphragm???
BUT! Got it running!!! (Vid(s) posted when I'm in wifi upload range).
First one the student didn't focus it...
https://picasaweb.google.com/lh/photo/0 ... directlink
https://picasaweb.google.com/lh/photo/6 ... directlink
These pipes are LOUD -even with the baffles in!!
Second item for suggestions:
No spark on RIGHT plug. Help?
I'm a bit out of the "points age" but we swapped out the coil packs for the spare set, same deal, no spark on RIGHT cylinder.
We do see ONE spark just as the bike shuts off.
Help?
Thanks! Vids posting soon!
-
Coyote
- Moto GP
- Posts: 3404
- Joined: Tue Oct 21, 2008 2:41 pm
- Country: USA
- Suzuki 2-Strokes: GT550x2, GT750, GS1000
- Location: Tulsa, Oklahoma
Re: GT550 Cafe project
Check that you are not shorted at the points/condenser pigtails. Hook an ohmmeter to the stationary point and the moving point. Ignition OFF. Open the points manually and see if it's breaking continuity. If that seems OK, try another condenser from the 72. Bound to be something simple. SOUNDS GOOD!!!!!!No spark on RIGHT plug. Help?
p.s. Sorry about the diaphragm. I thought it looked good when I sent it to you. Don't have the cross reference you need. Someone else will have to chime in there.
I was born with nothing and still have most of it left.
.
1978 GS1000C
1976 GT550 ongoing money pit.
.
1978 GS1000C
1976 GT550 ongoing money pit.
-
imquattro
- To the on ramp
- Posts: 239
- Joined: Tue Jul 19, 2011 9:26 pm
- Country: USA
- Suzuki 2-Strokes: 72/74 GT550
- Location: Muncy PA
Re: GT550 Cafe project
Thanks Chris. The points are opening, I can visually see that. I will try the condesor tomorrow.
Are the video links working?
Are the video links working?
-
r3tro74
- On the main road
- Posts: 131
- Joined: Wed Feb 08, 2012 10:25 am
- Country: USA
- Suzuki 2-Strokes: 74 GT550
- Location: Michigan
Re: GT550 Cafe project
Yes, the video links are working. (not on my phone, but work fine on the home PC). What a great feeling that must be to hear it run after all that work. A little fine tuning and finishing up and you'll be on the road in no time!
You stated that you get one spark as the bike shuts off- Maybee that coil is getting powered continously and the points/condenser/wiring are never breaking the circuit. When the bike shuts off, the electrical system shuting down finally breaks the circuit and you get the one spark?
You stated that you get one spark as the bike shuts off- Maybee that coil is getting powered continously and the points/condenser/wiring are never breaking the circuit. When the bike shuts off, the electrical system shuting down finally breaks the circuit and you get the one spark?
1974 Suzuki GT550
1983 Honda XL250
2002 Yamaha Bear Tracker
1959 Lone Star Malibu
1983 Honda XL250
2002 Yamaha Bear Tracker
1959 Lone Star Malibu
