No worries. I have those vent 'Ts' on my 550. I have no hoses on the T. They just point down. I have no idea where the OEM hoses routed to. I assume under the tank somewhere. Also I have no idea why the vents are coupled together with hoses between the carbs. I guess they are there to create some sort of balance. So those hoses are present on mt carbs, but the 'Ts' go nowhere.
So yours being snipped off will pose no problems as long as the hole is open to the outside air.
Does anyone know where the original vent hoses were routed to?
GT550 budget build
Moderators: oldjapanesebikes, H2RICK, diamondj, Suzsmokeyallan
-
Coyote

- Moto GP
- Posts: 3404
- Joined: Tue Oct 21, 2008 2:41 pm
- Country: USA
- Suzuki 2-Strokes: GT550x2, GT750, GS1000
- Location: Tulsa, Oklahoma
Re: GT550 budget build
I was born with nothing and still have most of it left.
.
1978 GS1000C
1976 GT550 ongoing money pit.
.
1978 GS1000C
1976 GT550 ongoing money pit.
-
yeadon_m
- Road race school
- Posts: 792
- Joined: Sun Aug 05, 2012 1:18 am
- Country: UK
- Suzuki 2-Strokes: GT380B, GT550B, GT750A, GSX1400
Re: GT550 budget build
Yes, the two air venting T-hoses trailed rearwards and went down the hole at the rearmost end of the crankcase! as did the three float bowl overflow hoses.....
-
Cragdog
- To the on ramp
- Posts: 267
- Joined: Mon Oct 14, 2013 2:25 pm
- Country: USA
- Suzuki 2-Strokes: GT550L, PE250B, RM250N
- Location: Southern California
Re: GT550 budget build
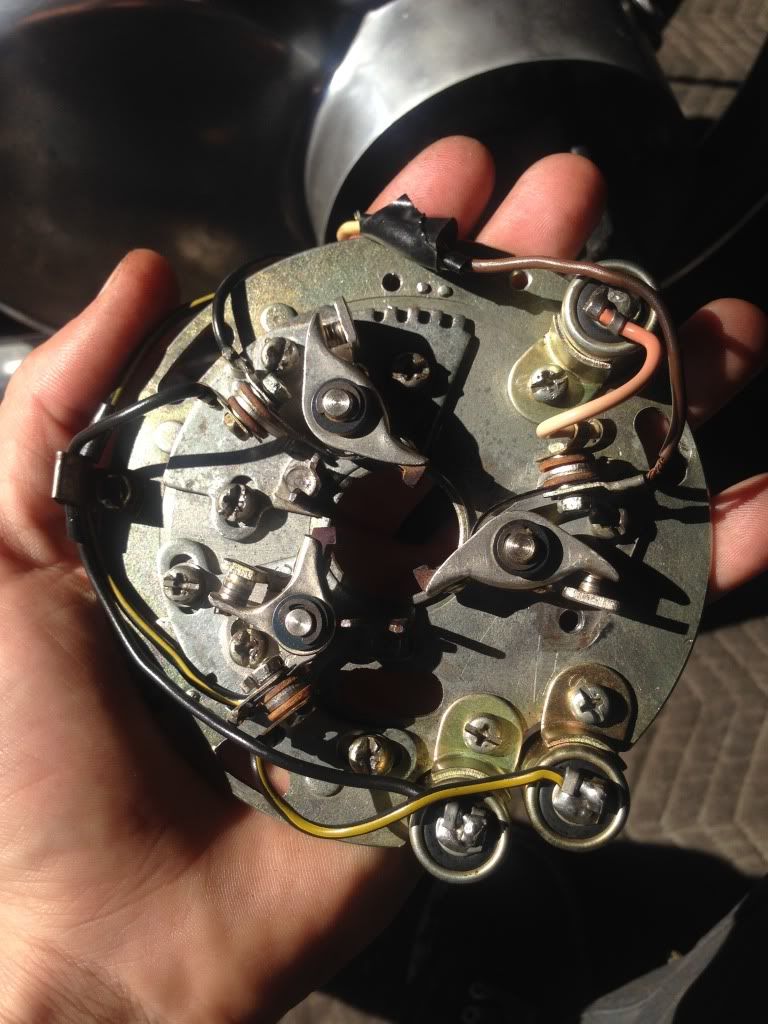
So I have been busy with other projects, but I am getting closer to my first start with this ride. I have pretty much everything connected to the wiring harness and got my ignition switch and key recently. When I flipped the key on, I can hear a "click" sound coming from either the started solenoid or the regulator?? Didn't have the carburetors dust boots still or exhaust hooked up so I didn't try to turn it over yet, but I am assuming this sound is an indication that something is wrong in the wiring? If anyone has any suggestions about where to start I'm all ears.
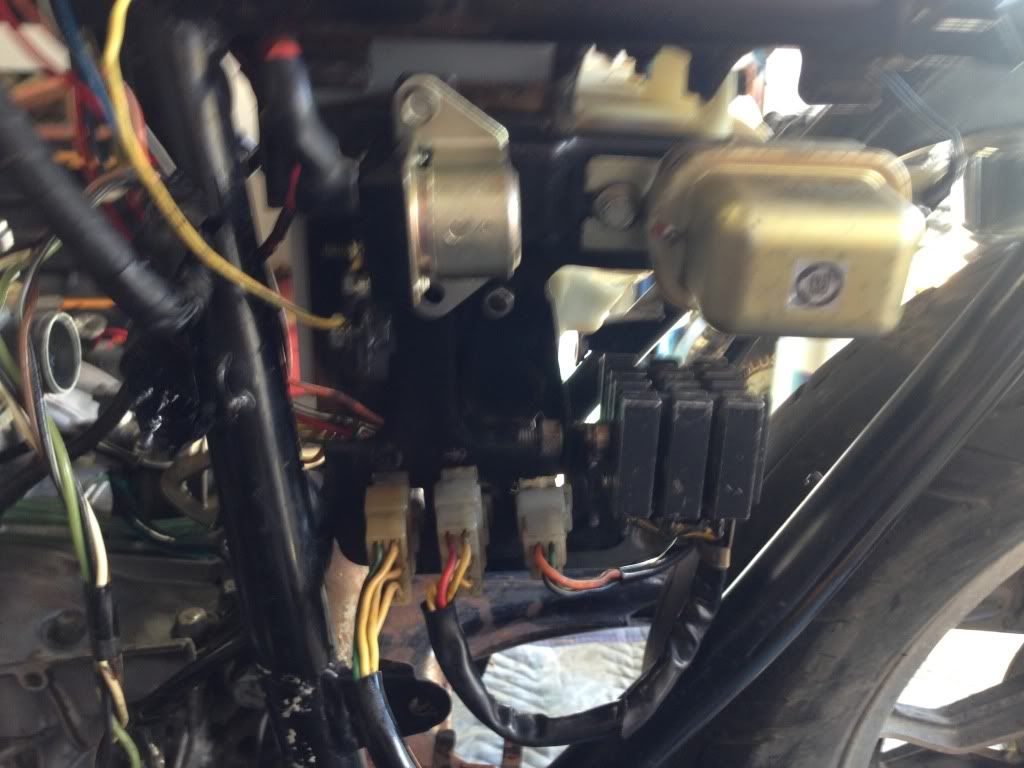
Sorry for the fuzzy picture, it's the only one I had on hand.. Top left and top right are the parts where sound comes from.
Thanks!
Sorry for the fuzzy picture, it's the only one I had on hand.. Top left and top right are the parts where sound comes from.
Thanks!
-
Coyote
- Moto GP
- Posts: 3404
- Joined: Tue Oct 21, 2008 2:41 pm
- Country: USA
- Suzuki 2-Strokes: GT550x2, GT750, GS1000
- Location: Tulsa, Oklahoma
Re: GT550 budget build
That click sound is 100% normal. Mine does the same thing. I'm not certain but I think it's the voltage regulator. Worry when you don't hear that click!.
I was born with nothing and still have most of it left.
.
1978 GS1000C
1976 GT550 ongoing money pit.
.
1978 GS1000C
1976 GT550 ongoing money pit.
-
Cragdog
- To the on ramp
- Posts: 267
- Joined: Mon Oct 14, 2013 2:25 pm
- Country: USA
- Suzuki 2-Strokes: GT550L, PE250B, RM250N
- Location: Southern California
Re: GT550 budget build
Okay, awesome. Thank you for the reply Coyote!
So just to list off a few things I need to do before I try to start her up for the first time:
1. Carburetor dust boots. (I'm not going to worry about the rocker arm boots for now.)
2. Cap of vacuum fuel hose.
3. Filters. (unipods should be at my house by the time I get home)
4. Need to clean off liquid gasket on the clutch case and install proper gasket from complete set I ordered.
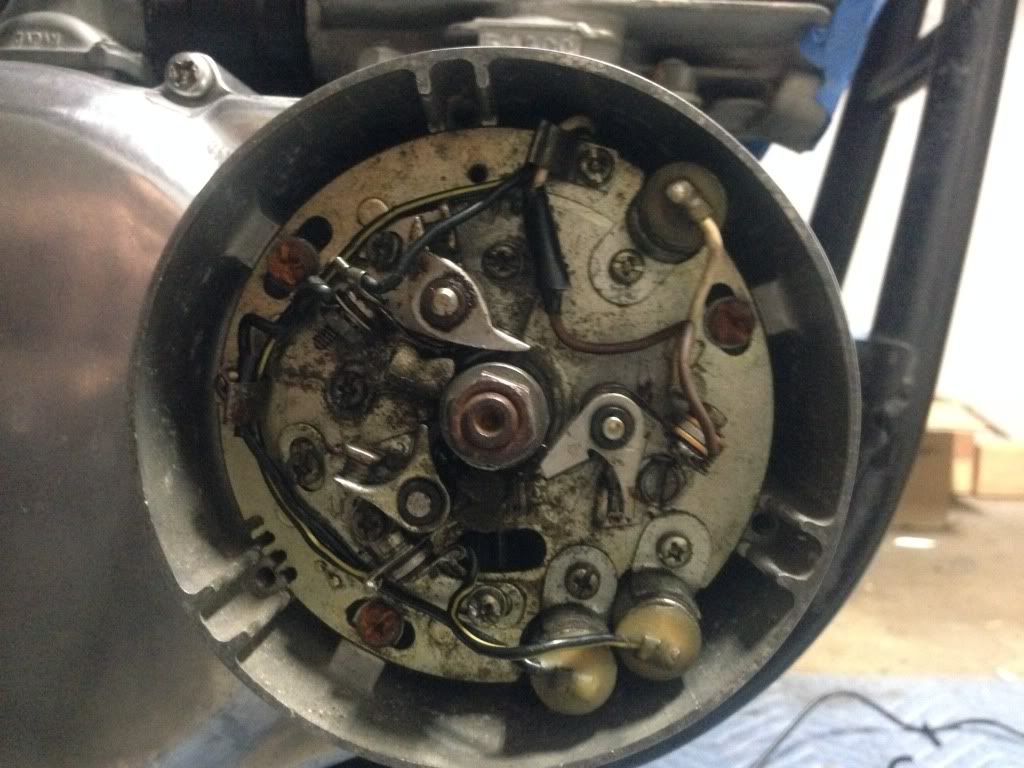
5. Install new points, old ones still on, rusty, worried about arcing:
6. Put exhaust back on, do not have the replacement gaskets, going to try and seal em up best I can. (want expansion chambers when I can afford..)
7. cap off SRIS at cylinder end. (Crankcase end already capped)
8..... Anybody think of anything I'm missing?
Thanks for viewing!
So just to list off a few things I need to do before I try to start her up for the first time:
1. Carburetor dust boots. (I'm not going to worry about the rocker arm boots for now.)
2. Cap of vacuum fuel hose.
3. Filters. (unipods should be at my house by the time I get home)
4. Need to clean off liquid gasket on the clutch case and install proper gasket from complete set I ordered.
5. Install new points, old ones still on, rusty, worried about arcing:
6. Put exhaust back on, do not have the replacement gaskets, going to try and seal em up best I can. (want expansion chambers when I can afford..)
7. cap off SRIS at cylinder end. (Crankcase end already capped)
8..... Anybody think of anything I'm missing?
Thanks for viewing!
-
Suzukidave

- Moto GP
- Posts: 3980
- Joined: Fri Oct 24, 2008 5:55 pm
- Country: US
- Suzuki 2-Strokes: GT750 x2 97 -1200 Bandit 86 GSXR1100
- Location: Lancaster Pa.
Re: GT550 budget build
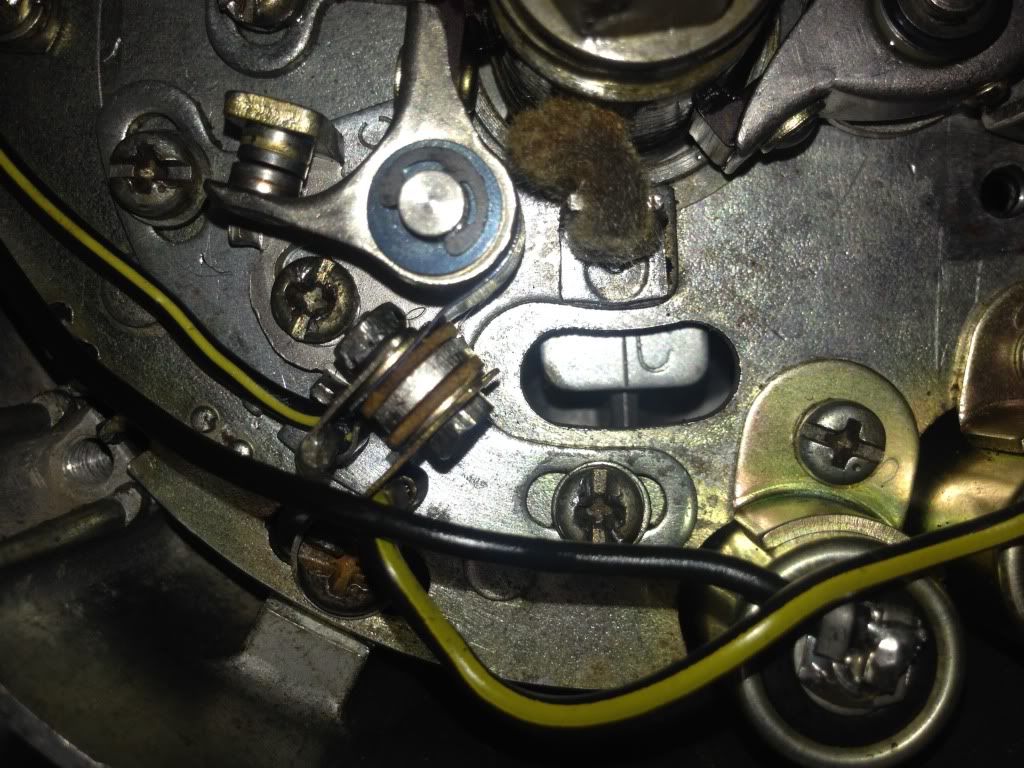
Its a good thing to oil the felt pad to keep the points cam slippery 
the older i get the faster i was
-
Cragdog
- To the on ramp
- Posts: 267
- Joined: Mon Oct 14, 2013 2:25 pm
- Country: USA
- Suzuki 2-Strokes: GT550L, PE250B, RM250N
- Location: Southern California
Re: GT550 budget build
Thanks Dave, are those replaceable? Didn't notice them in the parts catalog.. Mine look a little deformed.Suzukidave wrote:Its a good thing to oil the felt pad to keep the points cam slippery
-
Suzukidave
- Moto GP
- Posts: 3980
- Joined: Fri Oct 24, 2008 5:55 pm
- Country: US
- Suzuki 2-Strokes: GT750 x2 97 -1200 Bandit 86 GSXR1100
- Location: Lancaster Pa.
Re: GT550 budget build
That small felt piece really isnt too fancy , just make sure it touches the points cam and put a couple of drops of engine oil on it and your good to go . If the points cam is rusty at all it would be a good idea to polish it up a bit with a 3m pad as rust will eat the rubbing blocks on the nice new points you are going to install .
the older i get the faster i was
-
yeadon_m
- Road race school
- Posts: 792
- Joined: Sun Aug 05, 2012 1:18 am
- Country: UK
- Suzuki 2-Strokes: GT380B, GT550B, GT750A, GSX1400
Re: GT550 budget build
If that little felt pad no longer touches the points cam, you can bend open the wire clamp that holds it, take it off and clean it up with carb cleaner, oil / grease it, and pop it back in a tad closer to the cam, then pinch close the clamp. Then the felt will outlive all of us 
Mike
Mike
-
Cragdog
- To the on ramp
- Posts: 267
- Joined: Mon Oct 14, 2013 2:25 pm
- Country: USA
- Suzuki 2-Strokes: GT550L, PE250B, RM250N
- Location: Southern California
Re: GT550 budget build
So I realized when replacing my points, that they weren't fitting on the timing plate correctly and I was getting really frustrated.. Turns out I ordered the denso points when I am running the Kokusan system. So I am going to order those. I tried to start the bike with the old points on there, but didn't have any luck. Everything seemed to be hooked up correctly, but I could tell it wasn't getting any spark, just didn't sound right.. So I have two sets of old coils, I swapped them out and still same result. So now I'm hunting down electrical phantoms. Wish me luck..
-
Cragdog
- To the on ramp
- Posts: 267
- Joined: Mon Oct 14, 2013 2:25 pm
- Country: USA
- Suzuki 2-Strokes: GT550L, PE250B, RM250N
- Location: Southern California
Re: GT550 budget build
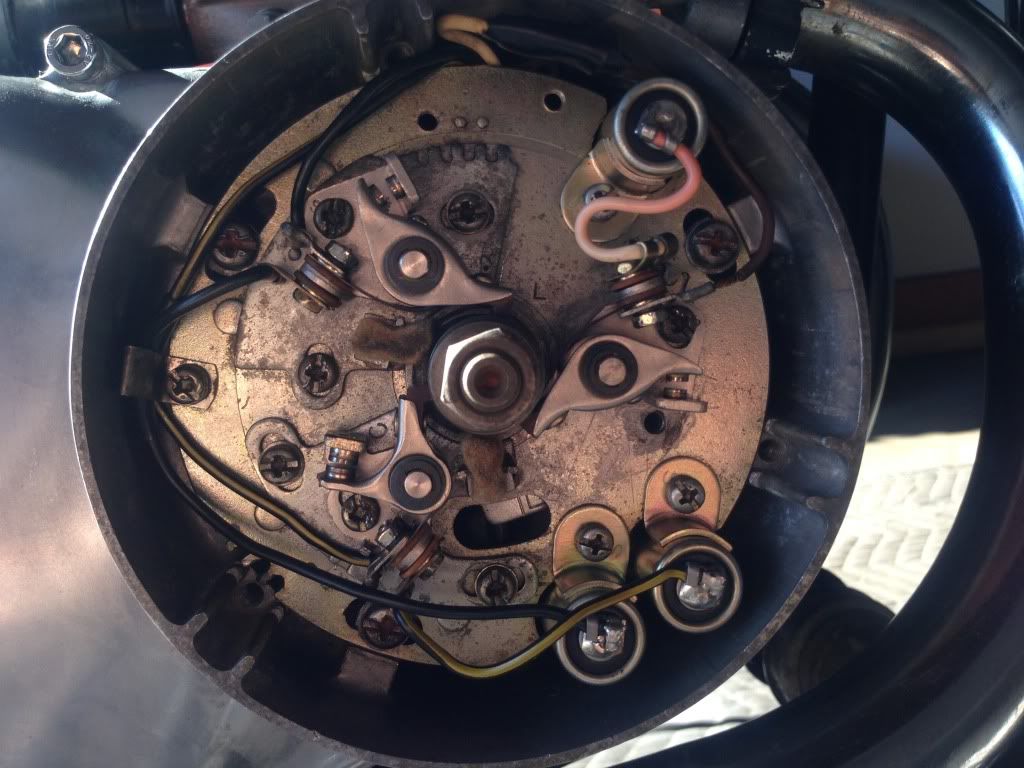
Okay so I got my new points and condensers today for the Kokusan system. 
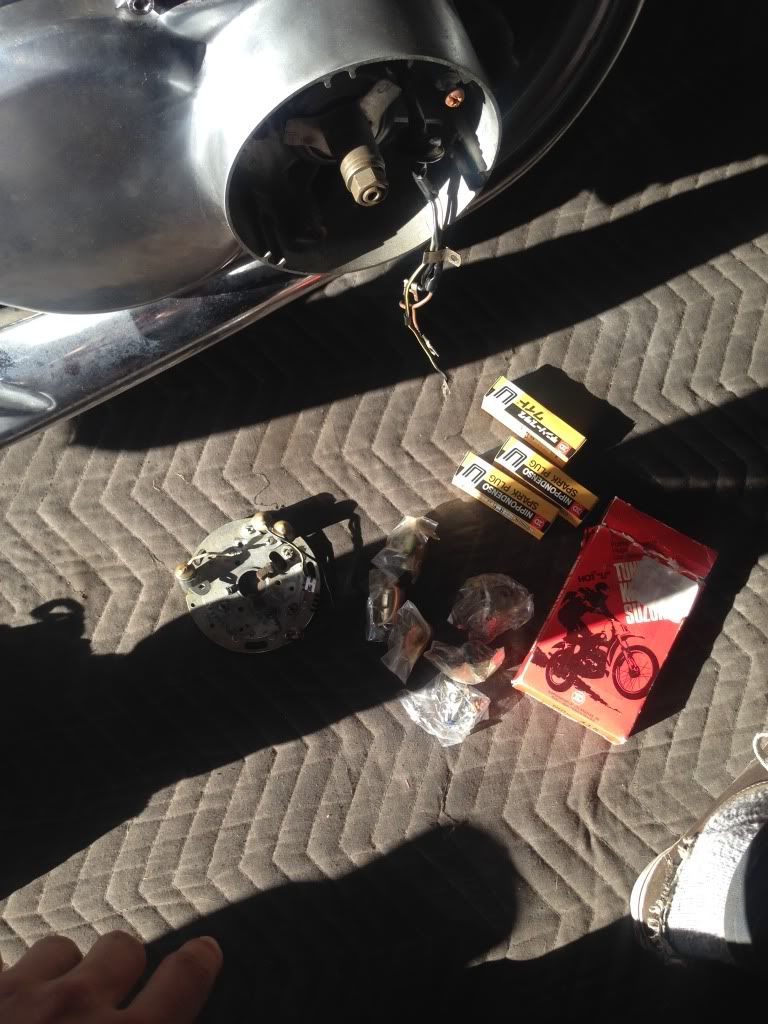
Here is the rebuilt timing plate:
 g
g
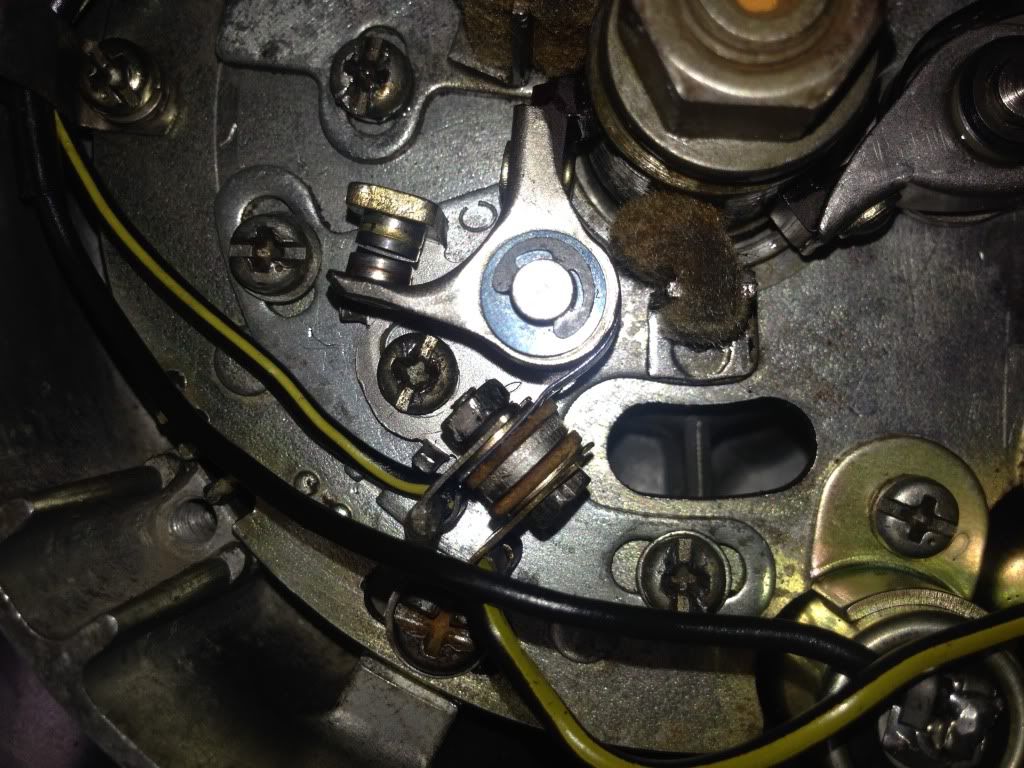
I could use some help with timing and the point gap. The manual states to find the widest point at which the point is open and adjust the point so that you achieve a 0.014" (0.35mm) gap and then tighten the point screw. My question is should the widest position of the point correspond with the timing mark for the cylinder? For instance, when gaping the center point, it seems that it continues to get slightly wider beyond the "C" mark on the timing hole.. Is this normal? Because my gut feeling was that it should be at its widest exactly when "C" was at the timing mark through the viewing hole. Thanks for the help all you gurus, this is my first time messing with points so I want to make sure I have it down pat.
Here is the rebuilt timing plate:
gI could use some help with timing and the point gap. The manual states to find the widest point at which the point is open and adjust the point so that you achieve a 0.014" (0.35mm) gap and then tighten the point screw. My question is should the widest position of the point correspond with the timing mark for the cylinder? For instance, when gaping the center point, it seems that it continues to get slightly wider beyond the "C" mark on the timing hole.. Is this normal? Because my gut feeling was that it should be at its widest exactly when "C" was at the timing mark through the viewing hole. Thanks for the help all you gurus, this is my first time messing with points so I want to make sure I have it down pat.
-
Suzukidave
- Moto GP
- Posts: 3980
- Joined: Fri Oct 24, 2008 5:55 pm
- Country: US
- Suzuki 2-Strokes: GT750 x2 97 -1200 Bandit 86 GSXR1100
- Location: Lancaster Pa.
Re: GT550 budget build
When the timing marks line up the point that goes with it should just be opening , like you think the points cam should be its high point to set the gap . A buzz box or light bulb are handy to set the point when it just opens as its hard to tell just looking at it and this setting can be even more refined later when you start the engine with a timing light . Start with the "left " cylinder point first as its hard mounted to the base plate .
the older i get the faster i was
-
Coyote
- Moto GP
- Posts: 3404
- Joined: Tue Oct 21, 2008 2:41 pm
- Country: USA
- Suzuki 2-Strokes: GT550x2, GT750, GS1000
- Location: Tulsa, Oklahoma
Re: GT550 budget build
Don't confuse point gap with timing. You set the gap on all 3 sets of points to the highest point on the cam. THEN you set the timing. That's when the 'window' comes into play. Not before Consider it 2 separate set ups because that's what it is. Gaps first, timing second.
As Dave mentioned, you will need an ohm meter or some other way to tell when the points just open. You can't see it. I converted a cheap flashlight to set mine. Light is always on and goes off when the points open. This is done with the ignition off.
I have never tried this method, but they say if you tune an old transistor radio to static (put the radio on the seat or close by) and the radio will 'pop' when the points open. This method requires the ignition to be on. I do mine with the ignition off. Less chance of shorting something out.
You mentioned no spark. Was the battery fully charged and in place?. These bikes don't have a magneto and require a fully charged battery to start.
I was born with nothing and still have most of it left.
.
1978 GS1000C
1976 GT550 ongoing money pit.
.
1978 GS1000C
1976 GT550 ongoing money pit.
-
ConnerVT

- Novice racer
- Posts: 963
- Joined: Wed Jan 18, 2012 8:01 pm
- Country: USA
- Suzuki 2-Strokes: T500R (now), T500M (40 yrs ago)
- Location: North of Albany, NY
Re: GT550 budget build
Dave and Coyote are correct - The timing mark is where the points just begin opening, and is (after a short delay, for the charged field in the coil collapses) when the spark plug fires. The point gap affects the dwell time, which is something you rarely hear discussed.
Dwell time is the time that the points are closed, which is when power is applied to the coils, and they build up a charged field in the primary side of the coil. At a fixed voltage, a coil is designed to become fully charged after a certain amount of time.
RPM affects the amount of time that the coil gets to charge. It has half as much time to charge when going from 2000 RPM to 4000 RPM, only 25% of the time from 2000 to 8000 RPM, in a fixed ignition point system.
Setting the point gap adjusts how long the dwell time is. Bigger gap = shorter dwell time = less time to charge the coil.
So why not set the point gap as small as possible? Because the coil takes a little time for the the charged field to collapse, energize the secondary field of the coil, and fire the spark plug. If the point gap is too small, power would be applied back to the coil before the spark plug fired. The factory recommended gap creates a dwell time that falls in the range where the engine should run correctly within the recommended RPM range.
-
Cragdog
- To the on ramp
- Posts: 267
- Joined: Mon Oct 14, 2013 2:25 pm
- Country: USA
- Suzuki 2-Strokes: GT550L, PE250B, RM250N
- Location: Southern California
Re: GT550 budget build
Does anybody have any good info on how to isolate the electrical system so that I can crank the motor? i.e. battery-->key switch-->coils-->points or a simplified wiring diagram?
I'm having trouble figuring out the problem, I have a new battery, I've cleaned the coils pretty well, new points and condensers, I have some lights at the gauges, but when I try to kick it over (electric start button not working) it sounds empty like its not getting spark.. I checked for spark at the left cylinder while kicking it over (that was a challenge) and did see spark jump from the screwdriver to the engine soooo I'm a little confused.. I tried kicking it like 15 times then the battery was getting too weak so I gave up and put the battery on a trickle charger.
Could it be my starter button issue? I opened up the right hand controls and it is missing some pieces like the spring and plate that holds it all together, but the wiring looks fine and the kill switch seems fine too. If the kill switch is in "run" and I have power to the gauges where could my problem be? I need some help here because I am not confident in my electrical detection skills, I've learned quite a bit, but I'm still such a noob!
