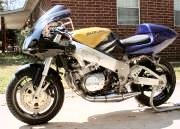
I didnt mean the comment to be a knock to your project as i think your doing a dang good job to be working on a budget too . I just noticed the wear marks on the forks and they looked really close to the headlight so i thought i might commentimquattro wrote:I'm 160lbs and don't believe I'll ever ride it in a manner that will fully compress the suspension.Suzukidave wrote:I am a bit wondering about contact with the headlight at full compression tho ?
Does that happen much for you?
GT550 Cafe project
Moderators: oldjapanesebikes, H2RICK, diamondj, Suzsmokeyallan
-
Suzukidave
- Moto GP
- Posts: 3980
- Joined: Fri Oct 24, 2008 5:55 pm
- Country: US
- Suzuki 2-Strokes: GT750 x2 97 -1200 Bandit 86 GSXR1100
- Location: Lancaster Pa.
Re: GT550 Cafe project
the older i get the faster i was
-
tz375

- Moto GP
- Posts: 6213
- Joined: Mon Nov 03, 2008 10:47 am
- Location: Illinois
Re: GT550 Cafe project
imquattro wrote:I'm 160lbs and don't believe I'll ever ride it in a manner that will fully compress the suspension.Suzukidave wrote:I am a bit wondering about contact with the headlight at full compression tho ?
Does that happen much for you?
Yes it can happen. We regularly use all the available when braking really hard. Your weight is only one factor and a bigger one is how hard the bike is braking or how deep the pothole is - or both.
You absolutely must check that you have sufficient clearance. For one of us to make that potential mistake is bad enough, but you are teaching young impressionable minds and the burden of responsibility is far higher. So let's say one of your young students gets to ride the bike and some old lady in a Volvo pulls out of a driveway and your guy grabs the brakes and the front wheel catches on the lamp. What happens then? In all probability, the bike rotates around the front wheel and catapults your young trainee head first into said Volvo.
The question is not whether that's likely, but if it is possible. If it's possible, it needs to be fixed.
Not a risk that one wants to take. All it takes is a check to confirm that it's safe and there's enough clearance.
-
imquattro
- To the on ramp
- Posts: 239
- Joined: Tue Jul 19, 2011 9:26 pm
- Country: USA
- Suzuki 2-Strokes: 72/74 GT550
- Location: Muncy PA
Re: GT550 Cafe project
[/quote] I didnt mean the comment to be a knock to your project as i think your doing a dang good job to be working on a budget too . I just noticed the wear marks on the forks and they looked really close to the headlight so i thought i might comment  [/quote]
Better safe than sorry! I also looked at the wear marks and saw that if the forks DID compress that far the fender would interfere with the light.
As Tz375 mentions, there are impressionable minds around, and while they WILL NOT be riding this bike, they should be aware of the issues/concequences concerning the interference of parts.
All that being said, i still do not believe I have or will ride in such a fashion that would precipitate that much fork travel -even with PA roads.
Good suggestions guys, thanks.
-
imquattro
- To the on ramp
- Posts: 239
- Joined: Tue Jul 19, 2011 9:26 pm
- Country: USA
- Suzuki 2-Strokes: 72/74 GT550
- Location: Muncy PA
Re: GT550 Cafe project
Well...
I sucked it up and bit the bullet. Now's the time to fix the kick start prior to later....
So I instructed a set of students to pull the motor out of the frame and to open her back up -using the bolt/nut removal sequence.


As some of you may be following, the kick starter lever was not returning from the down position.
Here's what I found:

The spring was NOT in the detent/hole and the washer was clearly not positioned properly.
Here's how it SHOULD look:

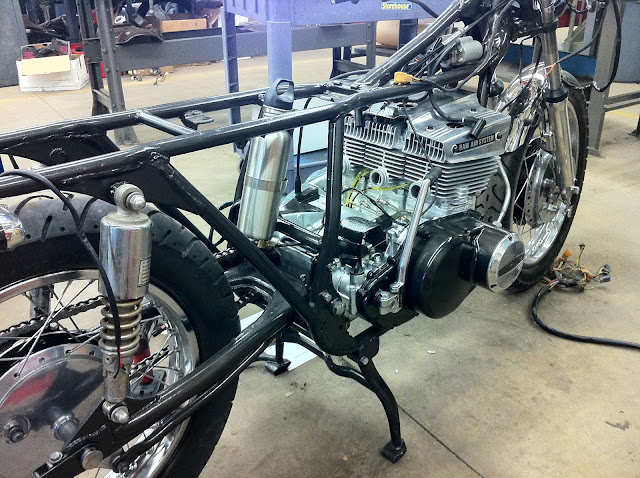
While apart, I decided to change the engine color scheme a bit. The silver paint on the aluminum, while high temp paint and quite durable, is prone to scuffing when touched. The side covers were already showing dull spots due to the many times being manipulated in & out of the frame. So I sprayed them w/ frame matching hammered black. The polished covers will offset them nicely I think. The rest of the engine will remain silver.

Also, not pictured directly, but you can see the grips and levers are attached. I had to modify the throttle grip barrel to accept the new grips.
Here's the factory throttle barrel with the rubber removed. It's longer than the new grip, and also has a flange near the cable stays that's incompatible with most replacement grips.

So I first removed the flange:
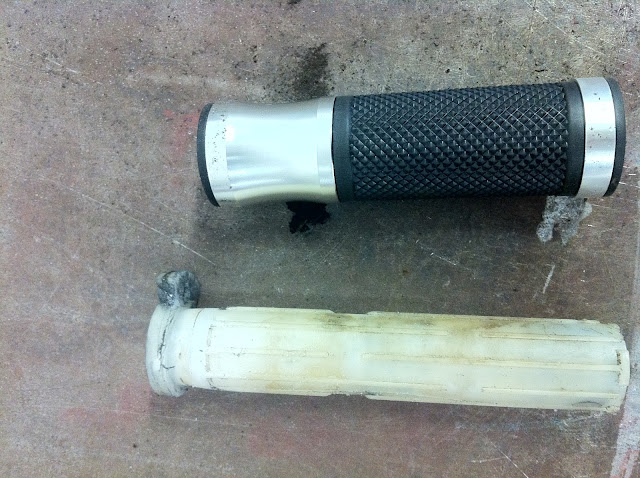
Then shortened the barrel up.

I realized that after making the above pictured barrel perfect to fit the new grip, that it was from the '72. Sigh....
So I grabbed the '74's (with the dual throttle cables) and matched it....
Then (not pictured) I removed all the ribs around the barrel. Then and only then, would the grip barely slid on -even with rubber lube (from our tire machine, slickest rubber lube I've ever used. -keep your jokes to yourself).
I also shortened the throttle cables (both) 3".
(Sorry no pictures) I did this by first measuring the required length from lock to lock + some. Determined that 3" was a safe amount to remove. Then I crossed the threshold of no-return. I cut the keeper off the end.
I then slid off the angled part that threads into the twist grip housing.
Then I marked the black casing down 3" from the end and carefully cut through JUST the outer casing w/ a cutoff wheel.
I then removed the black casing and cut the liner off too.
I then measured 3" down from the keeper (added to the cut end temporarily for proper length) and cut the cable.
I reassembled the angled tube back onto the cable.
The next part was an interesting experience.
I tried drilling out the old cable from the keeper. No luck even with a cobalt bit. The bit just wanted to walk to drill the softer surrounding material.
So then I thought, why use the keeper over? why not just make one?
I took a piece of aluminum rod, same diameter as the keepers (1/4"ish) and cut two sections (one for each cable I was shortening) that matched in length the old keepers.
I then drilled them, counter sinking one end w/ a bigger bit.
After pushing the new keeper onto the cable, I cleaned the cable end up in the wire wheel side of the grinder.
I splayed the last 1/8 of the cable out, applied JBweld to the cable and pulled it almost all the way through the keeper.
The I let it set for a day.
Super strong, and for the throttle where there's not much tension on the cable ends, it's perfect.
I reassembled the grips with their new shorter cables onto the bike and their perfect.
Here's the previous picture, zoomed in. It's all I have of them for right now.

I sucked it up and bit the bullet. Now's the time to fix the kick start prior to later....
So I instructed a set of students to pull the motor out of the frame and to open her back up -using the bolt/nut removal sequence.
As some of you may be following, the kick starter lever was not returning from the down position.
Here's what I found:
The spring was NOT in the detent/hole and the washer was clearly not positioned properly.
Here's how it SHOULD look:
While apart, I decided to change the engine color scheme a bit. The silver paint on the aluminum, while high temp paint and quite durable, is prone to scuffing when touched. The side covers were already showing dull spots due to the many times being manipulated in & out of the frame. So I sprayed them w/ frame matching hammered black. The polished covers will offset them nicely I think. The rest of the engine will remain silver.
Also, not pictured directly, but you can see the grips and levers are attached. I had to modify the throttle grip barrel to accept the new grips.
Here's the factory throttle barrel with the rubber removed. It's longer than the new grip, and also has a flange near the cable stays that's incompatible with most replacement grips.
So I first removed the flange:
Then shortened the barrel up.
I realized that after making the above pictured barrel perfect to fit the new grip, that it was from the '72.
So I grabbed the '74's (with the dual throttle cables) and matched it....
Then (not pictured) I removed all the ribs around the barrel. Then and only then, would the grip barely slid on -even with rubber lube (from our tire machine, slickest rubber lube I've ever used. -keep your jokes to yourself).
I also shortened the throttle cables (both) 3".
(Sorry no pictures) I did this by first measuring the required length from lock to lock + some. Determined that 3" was a safe amount to remove. Then I crossed the threshold of no-return. I cut the keeper off the end.
I then slid off the angled part that threads into the twist grip housing.
Then I marked the black casing down 3" from the end and carefully cut through JUST the outer casing w/ a cutoff wheel.
I then removed the black casing and cut the liner off too.
I then measured 3" down from the keeper (added to the cut end temporarily for proper length) and cut the cable.
I reassembled the angled tube back onto the cable.
The next part was an interesting experience.
I tried drilling out the old cable from the keeper. No luck even with a cobalt bit. The bit just wanted to walk to drill the softer surrounding material.
So then I thought, why use the keeper over? why not just make one?
I took a piece of aluminum rod, same diameter as the keepers (1/4"ish) and cut two sections (one for each cable I was shortening) that matched in length the old keepers.
I then drilled them, counter sinking one end w/ a bigger bit.
After pushing the new keeper onto the cable, I cleaned the cable end up in the wire wheel side of the grinder.
I splayed the last 1/8 of the cable out, applied JBweld to the cable and pulled it almost all the way through the keeper.
The I let it set for a day.
Super strong, and for the throttle where there's not much tension on the cable ends, it's perfect.
I reassembled the grips with their new shorter cables onto the bike and their perfect.
Here's the previous picture, zoomed in. It's all I have of them for right now.
-
Suzukidave
- Moto GP
- Posts: 3980
- Joined: Fri Oct 24, 2008 5:55 pm
- Country: US
- Suzuki 2-Strokes: GT750 x2 97 -1200 Bandit 86 GSXR1100
- Location: Lancaster Pa.
Re: GT550 Cafe project
Its something how a project can evolve even this far into it .. working on my 3rd custom GT i know all about it and i have the boxes of purchased , unused parts to prove it 
the older i get the faster i was
-
ja-moo
- Yeah Man, the Interstate
- Posts: 554
- Joined: Wed Apr 01, 2009 11:47 pm
- Location: NM USA
- Contact:
Re: GT550 Cafe project
I thought you were going to put on real bars? 
Visiting from the "K" camp...........
-
imquattro
- To the on ramp
- Posts: 239
- Joined: Tue Jul 19, 2011 9:26 pm
- Country: USA
- Suzuki 2-Strokes: 72/74 GT550
- Location: Muncy PA
Re: GT550 Cafe project
I may, just not in the budget right now.ja-moo wrote:I thought you were going to put on real bars?
But actually, and this has bothered me for a while now since the first person who commented about them, whats wrong with the using the bar thats there now? Who dictates that when dropping the grips or going for a cafe racer look you must get new bars. What happened to ingenutiy? Has that been replaced by fitting into a mold? where's the cafe racer rubric that says you can't just use the bars you have? Sure they may hit the tank as it sits, but that's fixable w/ some stops on the neck/triple tree -I can deal with that.
While I may seem like a hypocrite saying that to me the bars don't matter to me while pursuing the cafe racer look, the bars really aren't that important to me.
Just saying, and sorry for seeming to lash back at anyone who has a difference with my opinions, just that I've been around on enough forum boards to see a trend that if you're going against the status quo, you're doing it wrong. I guess I'm too cheap and they say that necessity is the mother of invention...
:shrug:
No worrys.
-
Coyote

- Moto GP
- Posts: 3404
- Joined: Tue Oct 21, 2008 2:41 pm
- Country: USA
- Suzuki 2-Strokes: GT550x2, GT750, GS1000
- Location: Tulsa, Oklahoma
Re: GT550 Cafe project
I have this set of drag bars I would be glad to donate to the project. They are dead flat but can be angled down to 'almost' look like clip-ons. 27.5" tip to tip. Most of the paint removed from the right end so the throttle tube would operate smoothly. Some paint removed from left end for ground That didn't work because the center section is still painted (no horn). I wound up using an external ground wire that comes from the horn, up the bars with the rest of the wires and the bare end pinched between the left switch clam shells.

I was born with nothing and still have most of it left.
.
1978 GS1000C
1976 GT550 ongoing money pit.
.
1978 GS1000C
1976 GT550 ongoing money pit.
-
imquattro
- To the on ramp
- Posts: 239
- Joined: Tue Jul 19, 2011 9:26 pm
- Country: USA
- Suzuki 2-Strokes: 72/74 GT550
- Location: Muncy PA
Re: GT550 Cafe project
YGM! Cool! Thanks!
-
ja-moo
- Yeah Man, the Interstate
- Posts: 554
- Joined: Wed Apr 01, 2009 11:47 pm
- Location: NM USA
- Contact:
Re: GT550 Cafe project
I totally understand this is a "budget" build, as it is a school project. So there are constraints you just have to deal with. And we each have an idea on how to do things, and the "look" we want.imquattro wrote:
I may, just not in the budget right now.
But actually, and this has bothered me for a while now since the first person who commented about them, whats wrong with the using the bar thats there now? Who dictates that when dropping the grips or going for a cafe racer look you must get new bars. What happened to ingenutiy? Has that been replaced by fitting into a mold? where's the cafe racer rubric that says you can't just use the bars you have? Sure they may hit the tank as it sits, but that's fixable w/ some stops on the neck/triple tree -I can deal with that.
While I may seem like a hypocrite saying that to me the bars don't matter to me while pursuing the cafe racer look, the bars really aren't that important to me.
Just saying, and sorry for seeming to lash back at anyone who has a difference with my opinions, just that I've been around on enough forum boards to see a trend that if you're going against the status quo, you're doing it wrong. I guess I'm too cheap and they say that necessity is the mother of invention...
:shrug:
No worrys.
And as you said, you have been on many boards, so you know there will always be opinions. Just posting your project on a message board is basically "asking" for opinions. So you have to understand some will, and some won't like some things you do with your project. The couple of times someone questioned your "decision" you got defensive. The guys are just trying to help from what I have seen. No one is trying to corner you into a "cookie cutter" build.
There are some things that have become "universal". (good or bad) Flipped stock bars are just the epitomy of "cheap", or "I don't care what the bike looks like". That's why you never see them on nice bikes. It's like showing up at a car show with a Cobra replica, with 20.00 plastic chrome wheel covers from Auto Zone. No matter how nice everything else is on the car, guess what everyone will be talking about?
It would be different if it was a 800.00 dollar part, as it just doesn't fit the budget. But a 20.00 part just screams "Scrooge was a spend thrift".
I'm glad you are getting some bars that with enhance and not detract from your project.
Visiting from the "K" camp...........
-
imquattro
- To the on ramp
- Posts: 239
- Joined: Tue Jul 19, 2011 9:26 pm
- Country: USA
- Suzuki 2-Strokes: 72/74 GT550
- Location: Muncy PA
Re: GT550 Cafe project
lol"Scrooge was a spend thrift".
-
imquattro
- To the on ramp
- Posts: 239
- Joined: Tue Jul 19, 2011 9:26 pm
- Country: USA
- Suzuki 2-Strokes: 72/74 GT550
- Location: Muncy PA
Re: GT550 Cafe project
Oil tank time.
I'm going with the easiest alternative to fabbing a tank, MacGyver style:
I'm using a stainless water bottle, a left over closet shelf bracket, a 1/4"x1/8" brass 90° compression fitting, 1/8" nylon tubing, and a 2.5" stainless t-bolt clamp.

We lined up the fitting to the cap then drilled a hole in the bottom edge of the bottle because the bottle will be tilted. The hole is just smaller than the fitting.

We then slotted the fitting to allow oil to still flow to the last drop -and it will never, under my watch, get this low!

We then trimmed down the bracket, stripped it, found the centerline of the bike for it's placement, and after matching the angle of the frame, tacked it into place. (camera angle makes it look skewed but it's center & straight)

Painted to match:


After cleaning the bottle out of any/all drilling debris, we applied JB Kwik epoxy to the fitting's threads and screwed it in, aligning it to face forward.
After curing, it's in place with the line attached & holding oil drip free:

I think I'm going to go with a different color oil to start to visually see (as someone TZ? mentioned) that the system is bled out and functional.
Oh, and the engine, since out, got a new paint scheme. Kick start fixed, gear oil in, oil line from tank bled, SRIS working.
Needs a SUZUKI decal on the points cover.
Carbs on, not hooked up yet.

I'm still waiting on the fuel tank to create the seat, which will have to make provisions for the oil tank's cap (will be modified w/ breather).
I'm going with the easiest alternative to fabbing a tank, MacGyver style:
I'm using a stainless water bottle, a left over closet shelf bracket, a 1/4"x1/8" brass 90° compression fitting, 1/8" nylon tubing, and a 2.5" stainless t-bolt clamp.
We lined up the fitting to the cap then drilled a hole in the bottom edge of the bottle because the bottle will be tilted. The hole is just smaller than the fitting.
We then slotted the fitting to allow oil to still flow to the last drop -and it will never, under my watch, get this low!
We then trimmed down the bracket, stripped it, found the centerline of the bike for it's placement, and after matching the angle of the frame, tacked it into place. (camera angle makes it look skewed but it's center & straight)
Painted to match:
After cleaning the bottle out of any/all drilling debris, we applied JB Kwik epoxy to the fitting's threads and screwed it in, aligning it to face forward.
After curing, it's in place with the line attached & holding oil drip free:
I think I'm going to go with a different color oil to start to visually see (as someone TZ? mentioned) that the system is bled out and functional.
Oh, and the engine, since out, got a new paint scheme. Kick start fixed, gear oil in, oil line from tank bled, SRIS working.
Needs a SUZUKI decal on the points cover.
Carbs on, not hooked up yet.
I'm still waiting on the fuel tank to create the seat, which will have to make provisions for the oil tank's cap (will be modified w/ breather).
-
r3tro74
- On the main road
- Posts: 131
- Joined: Wed Feb 08, 2012 10:25 am
- Country: USA
- Suzuki 2-Strokes: 74 GT550
- Location: Michigan
Re: GT550 Cafe project
Well that looks a heck of a lot better than the plastic oil jug it came with!
You wrote earlier about disasembling your SRIS check valves. How did you get them apart? I was tinkering with mine and it looks like the internal to the engine side has a piece that presses or screws in?
I also found a possible replacement screen. I found the white screen in the pic in my junk drawer. I know it is a GM automatic transmission shift solonoid screen that snaps into the valve body spacer plate, but I don't remember what model trans it came out of. I.ve been out of the broken car business for a few years now. I would guess a late 90's GM 4 cylinder car with a 3T40. I have to go up to the dealer next week, so I'll find out. It almost fits- would need to open up the hole in the screen slightly. Not sure of the temperature of the lower crankcase. Maybee best just to leave them off anyway just thought I'd throw it out there.
You do not have the required permissions to view the files attached to this post.
1974 Suzuki GT550
1983 Honda XL250
2002 Yamaha Bear Tracker
1959 Lone Star Malibu
1983 Honda XL250
2002 Yamaha Bear Tracker
1959 Lone Star Malibu
-
imquattro
- To the on ramp
- Posts: 239
- Joined: Tue Jul 19, 2011 9:26 pm
- Country: USA
- Suzuki 2-Strokes: 72/74 GT550
- Location: Muncy PA
Re: GT550 Cafe project
Thanks!r3tro74 wrote:Well that looks a heck of a lot better than the plastic oil jug it came with!.
I clamped the hex head GENTLY in a vise. Just enough to hold it while pulling and twisting the other end (the smooth part below the threads) with a set of pliers -grab carefully, its brass. It's an interference press fit.r3tro74 wrote:You wrote earlier about disasembling your SRIS check valves. How did you get them apart? !.
DO THIS vertically as the spring & ball will fall out. Watch for it!
Hope that helps!
-
Coyote
- Moto GP
- Posts: 3404
- Joined: Tue Oct 21, 2008 2:41 pm
- Country: USA
- Suzuki 2-Strokes: GT550x2, GT750, GS1000
- Location: Tulsa, Oklahoma
Re: GT550 Cafe project
Paint the OT blue. Then you can tell everyone its nitrous. 
I was born with nothing and still have most of it left.
.
1978 GS1000C
1976 GT550 ongoing money pit.
.
1978 GS1000C
1976 GT550 ongoing money pit.
