GT550 Cafe project
Moderators: oldjapanesebikes, H2RICK, diamondj, Suzsmokeyallan
-
Suzukidave
- Moto GP
- Posts: 3980
- Joined: Fri Oct 24, 2008 5:55 pm
- Country: US
- Suzuki 2-Strokes: GT750 x2 97 -1200 Bandit 86 GSXR1100
- Location: Lancaster Pa.
Re: GT550 Cafe project
Doesnt it feel good when you get to start putting all the nice clean parts together 
the older i get the faster i was
-
Coyote

- Moto GP
- Posts: 3404
- Joined: Tue Oct 21, 2008 2:41 pm
- Country: USA
- Suzuki 2-Strokes: GT550x2, GT750, GS1000
- Location: Tulsa, Oklahoma
Re: GT550 Cafe project
Not for certain, but you might have tank interference with the stock bars flipped. I don't think you will like the riding position either. I started out with flat drag bars. Awkward, especially at low speed. I wound up using a set with a 1" rise and it was a 100% improvement. My back was happier too.
Do you know how to shorten cables? Obviously, they are going to be way long like that.
Do you know how to shorten cables? Obviously, they are going to be way long like that.
I was born with nothing and still have most of it left.
.
1978 GS1000C
1976 GT550 ongoing money pit.
.
1978 GS1000C
1976 GT550 ongoing money pit.
-
imquattro
- To the on ramp
- Posts: 239
- Joined: Tue Jul 19, 2011 9:26 pm
- Country: USA
- Suzuki 2-Strokes: 72/74 GT550
- Location: Muncy PA
Re: GT550 Cafe project
Good point with the tank.
IF I HAD A TANK to work with! Yelling here, as my tank is still indisposed and a sore subject w/ the body guy.
I understand it won't be a comfortable position, but the longest rides I'll be doing are 15-20 minutes? so comfort isn't a main concern. I think if it were, I would have stayed with the upright riding position.
Cafe styling, from what I gather, wasn't about comfort, but going as fast as you could for as little $ as possible. I'm not interested in going fast, but the look is what I'm after, and the minimalistic budget too.
I dont want the bars to interfere with the tank for sure, especially after going through getting it made, so thanks for the heads up on that.
How do you shorten cables? Is is a DIY job? I assume they can be sent out or purchased shorter, but could you shed some light on that?
-
Coyote
- Moto GP
- Posts: 3404
- Joined: Tue Oct 21, 2008 2:41 pm
- Country: USA
- Suzuki 2-Strokes: GT550x2, GT750, GS1000
- Location: Tulsa, Oklahoma
Re: GT550 Cafe project
http://www.youtube.com/watch?v=axGTa0SvXjE" onclick="window.open(this.href);return false;
I was born with nothing and still have most of it left.
.
1978 GS1000C
1976 GT550 ongoing money pit.
.
1978 GS1000C
1976 GT550 ongoing money pit.
-
tz375

- Moto GP
- Posts: 6213
- Joined: Mon Nov 03, 2008 10:47 am
- Location: Illinois
Re: GT550 Cafe project
The original Cafe scene was all about getting the best parts on your bike. Of course many of us were, or still are, resource constrained so we couldn't always do it in one go.
The difference back then was those were the bikes we rode usually as daily transporation, so we modified them a bit at a time usually.For example, my first bike was a POS Francis Barnett and I had zero funds, so teh home made hump seat and bad paint job were first. low bars and rearsets (always go together) were next and last was engine tuning and an expansion chamber.
The next bike I built from bits. I can't remember what part I got first, but I think it was a bottom end. As I collected parts, I bought a fiberglass manx style tank, swept back pipes, hot cams, high comp pistons, twin chopped monoblocks etc.
The idea was partly about looks but was really about getting them most effective performance out of the bikes we had. Low bars and the right cables and controls and foot levers were as much about usability or function as they were about a look. What mattered to us was street cred and we got that from what was under the hood and attention to details that made them easier to ride fast.
We still lusted after a Dunstall Norton or Dresda Triton but the look was only part of it. The guy that bought the fancy parts and kept a stock motor was not well regarded as the guy who built a bike that went like stink and looked almost stock. And teh only people we wanted to impress were the guys that knew what they were doing.
But that was then in a different time in a different culture.
This time around in this culture, looks are more important, but a bike is a series of interdependent systems and the way to get the most fun , and safely, is with a bike that's well thought out and works perfectly. That includes ergonomics.
That's my opinion. Your mileage may vary.
-
ja-moo
- Yeah Man, the Interstate
- Posts: 554
- Joined: Wed Apr 01, 2009 11:47 pm
- Location: NM USA
- Contact:
Re: GT550 Cafe project
Bars are usually aroun 20-30 bucks. Some nice clubmans or low rise superbike bars would be good.
The "flipped" stock bars is usually frowned upon as someone that doesn't have a clue or is just plain cheap!........LOL
The "flipped" stock bars is usually frowned upon as someone that doesn't have a clue or is just plain cheap!........LOL
Visiting from the "K" camp...........
-
imquattro
- To the on ramp
- Posts: 239
- Joined: Tue Jul 19, 2011 9:26 pm
- Country: USA
- Suzuki 2-Strokes: 72/74 GT550
- Location: Muncy PA
Re: GT550 Cafe project
Yep, hear ya. It's all I had at the time, I'm not keeping it that way.
-
imquattro
- To the on ramp
- Posts: 239
- Joined: Tue Jul 19, 2011 9:26 pm
- Country: USA
- Suzuki 2-Strokes: 72/74 GT550
- Location: Muncy PA
Re: GT550 Cafe project
Well, there was discussion regarding the weight of the oil & battery being a concern if placed too high. I'm assuming that both/all are located behind the seat in the "inspirational" picture, but maybe its running a battery delete system and it's only the oil tank.
Either way, I'm not sure the weight, and I'm guessing it's 10-15 lbs worth will really be a problem, I'll just pretend I "gained weight" and riding.
I'm working on an oil tank solution with nothing to show for it yet. I'd like to place it under the rear of the seat, so the seat must be made to accommodate it (size wise), and yet I'd like to see how the seat turns out to see what I can fit under it...
Catch 22...
It'll work out.
-
imquattro
- To the on ramp
- Posts: 239
- Joined: Tue Jul 19, 2011 9:26 pm
- Country: USA
- Suzuki 2-Strokes: 72/74 GT550
- Location: Muncy PA
Re: GT550 Cafe project
I got the gauge faces back today.
Looking pretty good.
They had an issue the first time around, as the girl who set them up on the paper re-sized them to 3" instead of 3.2" (or 82mm) and so the first batch, which I picked up Friday, were all shrunk uniformly too much.
I took them back today, showed them the files & their size ratios, and they fixed them, free of charge, as they should
I had both types made ('72 and newer).

After wiping the old gauge with as solution of 50% rubbing alcohol, the decal is applied. It's a perfect fit.
The dark areas in the needle, screw, and right edge, are just shadows.

Here's the older set with new faces:

I have a couple extra sets in each generation, if anyone is interested.... lemme know $10 a set with free postage within CONUS.
Paypal preferred.
Looking pretty good.
They had an issue the first time around, as the girl who set them up on the paper re-sized them to 3" instead of 3.2" (or 82mm) and so the first batch, which I picked up Friday, were all shrunk uniformly too much.
I took them back today, showed them the files & their size ratios, and they fixed them, free of charge, as they should
I had both types made ('72 and newer).
After wiping the old gauge with as solution of 50% rubbing alcohol, the decal is applied. It's a perfect fit.
The dark areas in the needle, screw, and right edge, are just shadows.
Here's the older set with new faces:
I have a couple extra sets in each generation, if anyone is interested.... lemme know $10 a set with free postage within CONUS.
Paypal preferred.
-
imquattro
- To the on ramp
- Posts: 239
- Joined: Tue Jul 19, 2011 9:26 pm
- Country: USA
- Suzuki 2-Strokes: 72/74 GT550
- Location: Muncy PA
Re: GT550 Cafe project
Started cleaning the fuel petcock.
I have two of them, the 72's and the 74's and they're both a bit different.
The main differences between the two, and I'm sorry I didn't take a comparison photo, are that the 74's has 2 vacuum lines running to it, and it's larger.
We started by pulling the bowl off the 74's.

The screens are intact but nasty.

The diaphragm was in decent shape, but had rust and debris behind it.

The fuel level selector (ON or RESERVE) leaked, and when removed was found to be crudded up.

Here's the 74 in full disassembly:

Here's a peek up the bottom:

Here's what was washed out of it:

This is the 72's petcock:

Nice and simple.

We pulled the bowl and found this:

YIKES!
The rest wasn't photo'd but everything was tossed into the carb. cleaner solution.
We'll see how it turns out.
Question: because I'm running the '74's motor, do I HAVE to use the '74's petcock? It's bigger and I want to use the smaller one. I read on another post regarding the vent tubes off the 74's carbs not being necessary -just so long as their not plugged.
Can I use the 72's petcock and leave the vent lines uncapped on the carbs?
I have two of them, the 72's and the 74's and they're both a bit different.
The main differences between the two, and I'm sorry I didn't take a comparison photo, are that the 74's has 2 vacuum lines running to it, and it's larger.
We started by pulling the bowl off the 74's.
The screens are intact but nasty.
The diaphragm was in decent shape, but had rust and debris behind it.
The fuel level selector (ON or RESERVE) leaked, and when removed was found to be crudded up.
Here's the 74 in full disassembly:
Here's a peek up the bottom:
Here's what was washed out of it:
This is the 72's petcock:
Nice and simple.
We pulled the bowl and found this:
YIKES!
The rest wasn't photo'd but everything was tossed into the carb. cleaner solution.
We'll see how it turns out.
Question: because I'm running the '74's motor, do I HAVE to use the '74's petcock? It's bigger and I want to use the smaller one. I read on another post regarding the vent tubes off the 74's carbs not being necessary -just so long as their not plugged.
Can I use the 72's petcock and leave the vent lines uncapped on the carbs?
-
Coyote
- Moto GP
- Posts: 3404
- Joined: Tue Oct 21, 2008 2:41 pm
- Country: USA
- Suzuki 2-Strokes: GT550x2, GT750, GS1000
- Location: Tulsa, Oklahoma
Re: GT550 Cafe project
You have them reversed. The early one had 3 separate fuel outlets (one to each carb) and has a pentagon shaped back. So what you are calling the 72 IS the 74. You mentioned 2 vacuum lines???? There should be only one. One vacuum line that gets its source from the center carb. One fuel outlet that goes to the distribution tee at the center carb.
I would like a set of the later style gauge faces. Please PM me the account to pay via PayPal. Thanks!
I would like a set of the later style gauge faces. Please PM me the account to pay via PayPal. Thanks!
I was born with nothing and still have most of it left.
.
1978 GS1000C
1976 GT550 ongoing money pit.
.
1978 GS1000C
1976 GT550 ongoing money pit.
-
imquattro
- To the on ramp
- Posts: 239
- Joined: Tue Jul 19, 2011 9:26 pm
- Country: USA
- Suzuki 2-Strokes: 72/74 GT550
- Location: Muncy PA
Re: GT550 Cafe project
You know, that makes sense! I looked back through my pictures and sure enough you were correct! Can't trust memory sometimes. thanks for clearing that up!
-
imquattro
- To the on ramp
- Posts: 239
- Joined: Tue Jul 19, 2011 9:26 pm
- Country: USA
- Suzuki 2-Strokes: 72/74 GT550
- Location: Muncy PA
Re: GT550 Cafe project
I've been working on the gauges and if you remember, the PO of the '74 poked the old fogged lenses out w/ a screwdriver.
The gauges housing had rough edges and the guts needed gone over.
So, a while back, we disassembled them:
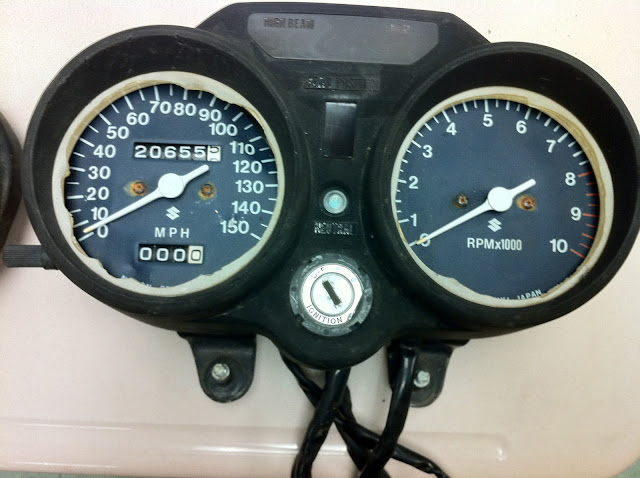

After separating the gauges, the housings had to be dealt with. There was no way I was riding w/ a set looking like that!

So I removed the gauge from the housing. There's glue around the back edge that needs cut through, then the gauge pulls out.

Then the gauge just pulls out. The speedo needs the knob removed first in order to pull it through (small Phillips screw in end).
Since I was installing the white-faced decals that I had made up on the faces, (and they needed straightening up!), I removed the two screws and pulled the needle off.

There's no need to worry about orientation when reinstalling the gauge into the housing. There's a tooth that locates each gauge respectively. (It's hard to see in the picture, but it's the green part).

I then took the housing(s) to my verticle belt sander and flattened out and removed the protruding leftovers of the lens. Providing a perfect surface for the new glass.

 (You can see I did this one still assembled).
I then wiped the housing down w/ paint prep, and when it dried, sprayed it black with the Plasti-dip. I didn't want the white edges to show and also the old lens leftovers to be visible, plus, I like the black look.

Here they are after: (insides will be wiped out and returned to white for maximum light reflection).

The gauge's were refaced and I used a thin bead of black gasket maker to seal them into the housings. I used:

I installed the new white faced gauge assembly into the cluster to see how it looks. I'm using the older needles w/ the chrome centers and bright tips. It was concern brought up way back whether the needles would be visible on a white background -you decide.
I also zeroed the mileage. I controversial topic I'm sure, but it's currently titled TMU (Total Mileage Unknown #4) and also the zero mileage wouldn't be any different than buying a new speedo and installing it. When registered, of course it won't be claimed "as new." Pretty easy to do actually. There's a copper clip at the end of the numbers barrel, pull it and the barrel comes out, pull off another e-clip and reset the numbers and reassemble.

I had glass cut to fit the gauges. You'll want 92mm circles (or 3 5/8") -(only $6 for a pair). I then needed to adhere them (seal them) to the gauges.
I had two 3" circles of glass from a botched order of glass due to a ruler failure
I centered them on top of the 92mm circles and sprayed them with 3M Super 77 spray adhesive

Then carefully flipped the glass over, the 3" spare glass pieces fell off, leaving behind a perfect ring of adhesive around the outer edge of the 92mm glass.
I carefully applied them to the gauge housings, then applied pressure until they dried.
While they were curing, the upper cluster needed polishing.
Before:

After:

The gear selector display was also polished up (inside the cluster) and installed. I also installed the '72's lock cylinder (after it's mandatory polish), as it's the only one w/ a key!
Here's the whole assembly, all back together, in its glory.


The gauges housing had rough edges and the guts needed gone over.
So, a while back, we disassembled them:
After separating the gauges, the housings had to be dealt with. There was no way I was riding w/ a set looking like that!
So I removed the gauge from the housing. There's glue around the back edge that needs cut through, then the gauge pulls out.
Then the gauge just pulls out. The speedo needs the knob removed first in order to pull it through (small Phillips screw in end).
Since I was installing the white-faced decals that I had made up on the faces, (and they needed straightening up!), I removed the two screws and pulled the needle off.
There's no need to worry about orientation when reinstalling the gauge into the housing. There's a tooth that locates each gauge respectively. (It's hard to see in the picture, but it's the green part).
I then took the housing(s) to my verticle belt sander and flattened out and removed the protruding leftovers of the lens. Providing a perfect surface for the new glass.
(You can see I did this one still assembled).I then wiped the housing down w/ paint prep, and when it dried, sprayed it black with the Plasti-dip. I didn't want the white edges to show and also the old lens leftovers to be visible, plus, I like the black look.
Here they are after: (insides will be wiped out and returned to white for maximum light reflection).
The gauge's were refaced and I used a thin bead of black gasket maker to seal them into the housings. I used:
I installed the new white faced gauge assembly into the cluster to see how it looks. I'm using the older needles w/ the chrome centers and bright tips. It was concern brought up way back whether the needles would be visible on a white background -you decide.
I also zeroed the mileage. I controversial topic I'm sure, but it's currently titled TMU (Total Mileage Unknown #4) and also the zero mileage wouldn't be any different than buying a new speedo and installing it. When registered, of course it won't be claimed "as new." Pretty easy to do actually. There's a copper clip at the end of the numbers barrel, pull it and the barrel comes out, pull off another e-clip and reset the numbers and reassemble.
I had glass cut to fit the gauges. You'll want 92mm circles (or 3 5/8") -(only $6 for a pair). I then needed to adhere them (seal them) to the gauges.
I had two 3" circles of glass from a botched order of glass due to a ruler failure
I centered them on top of the 92mm circles and sprayed them with 3M Super 77 spray adhesive
Then carefully flipped the glass over, the 3" spare glass pieces fell off, leaving behind a perfect ring of adhesive around the outer edge of the 92mm glass.
I carefully applied them to the gauge housings, then applied pressure until they dried.
While they were curing, the upper cluster needed polishing.
Before:
After:
The gear selector display was also polished up (inside the cluster) and installed. I also installed the '72's lock cylinder (after it's mandatory polish), as it's the only one w/ a key!
Here's the whole assembly, all back together, in its glory.
-
imquattro
- To the on ramp
- Posts: 239
- Joined: Tue Jul 19, 2011 9:26 pm
- Country: USA
- Suzuki 2-Strokes: 72/74 GT550
- Location: Muncy PA
Re: GT550 Cafe project
Here's a look at the '74's petcock diaphragm.

It was very leathery and the outer one seemed "stuck" to the center piece. So, I decided to take it apart.
The intent was to take it apart by drilling out the center "rivet" -actually part of the piston, cleaning, re-coating the possibly torn diaphragm, restoring some of its flexability, and reassembling.
So I removed the spring and drilled out the rivet.


Then I carefully separated the assembly:

Here's the problem:
The diaphragm with the piston on it was dry-rotted through.

The outer diaphragm was also in bad shape. It has the flexability and resiliency of a credit card.

So at this point, it's time for a new assembly.
It was very leathery and the outer one seemed "stuck" to the center piece. So, I decided to take it apart.
The intent was to take it apart by drilling out the center "rivet" -actually part of the piston, cleaning, re-coating the possibly torn diaphragm, restoring some of its flexability, and reassembling.
So I removed the spring and drilled out the rivet.
Then I carefully separated the assembly:
Here's the problem:
The diaphragm with the piston on it was dry-rotted through.
The outer diaphragm was also in bad shape. It has the flexability and resiliency of a credit card.
So at this point, it's time for a new assembly.
-
Coyote
- Moto GP
- Posts: 3404
- Joined: Tue Oct 21, 2008 2:41 pm
- Country: USA
- Suzuki 2-Strokes: GT550x2, GT750, GS1000
- Location: Tulsa, Oklahoma
Re: GT550 Cafe project
I made the exact same mistake, I didn't like the white ring at the gauge top so I painted it black. So what's the mistake? The white ring is what diffuses the light on the the gauge face. Now I really can't see them in the dark 
I was born with nothing and still have most of it left.
.
1978 GS1000C
1976 GT550 ongoing money pit.
.
1978 GS1000C
1976 GT550 ongoing money pit.
