OK I started my project and the engine is out it's a early 72 and the engine has never been torn apart that's great, (I tied to post pictures but I don't know how not that good on computers) but its got a standard bore and I"am ready to pull the cylinders I've read as much as I can about getting the cylinders off, made the plate and the tool to clean around the studs, I've cleaned around the studs and I'am going to try something different has anyone tried this? I'am going to pore Evapo-rust on the studs and let it sit for a few days to see if it will get rid of the rust, since the cylinders have never been off it's looks like a tuff job, I"ll let you know how it turns out. Oh and if somebody can tell me how to post pic I will put them up next time.
Smokin[/img]
engine removed
Moderators: oldjapanesebikes, H2RICK, diamondj, Suzsmokeyallan
-
Suzsmokeyallan
- Moto GP
- Posts: 4326
- Joined: Fri Oct 24, 2008 9:11 am
- Location: Mostly Barbados, sometimes Florida and western Canada
- Contact:
Well i wish you luck with your process, the problem is that the stud corrosion is compacted really tight around the lower section of each stud.
When you finally get the cylinder lifted you will see just how it looks around that section.
Its usually a brown dry caked on residue,,,,powerful stuff.
When you finally get the cylinder lifted you will see just how it looks around that section.
Its usually a brown dry caked on residue,,,,powerful stuff.
Two strokes, its just that simple.
69 Suz U70
69 Suz T500
72 Suz GT750 cafe
74 Suz TS250
74 Suz GTXVR project
75 Suz RE5
75 Suz GT750
76 Suz TS400
76 Suz GT750
81 Suz GSX1100
86 Suz RG500x2
88 Hon CR500
93 Hon CBR900RR
98 Suz GSF1200x3
15 Kaw Ninja H2
69 Suz U70
69 Suz T500
72 Suz GT750 cafe
74 Suz TS250
74 Suz GTXVR project
75 Suz RE5
75 Suz GT750
76 Suz TS400
76 Suz GT750
81 Suz GSX1100
86 Suz RG500x2
88 Hon CR500
93 Hon CBR900RR
98 Suz GSF1200x3
15 Kaw Ninja H2
-
Suzukidave

- Moto GP
- Posts: 3980
- Joined: Fri Oct 24, 2008 5:55 pm
- Country: US
- Suzuki 2-Strokes: GT750 x2 97 -1200 Bandit 86 GSXR1100
- Location: Lancaster Pa.
Smokin , you need to sign up to a web hosting site like photobucket http://photobucket.com/ and use there link to post pictures .
the older i get the faster i was
-
smokin
Thanks for the info suzukidave but you can't just copy and past to this form or is there another way without signing up to another web site?
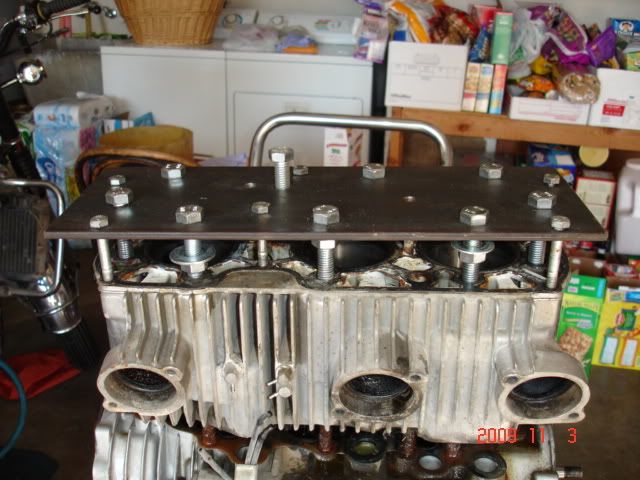
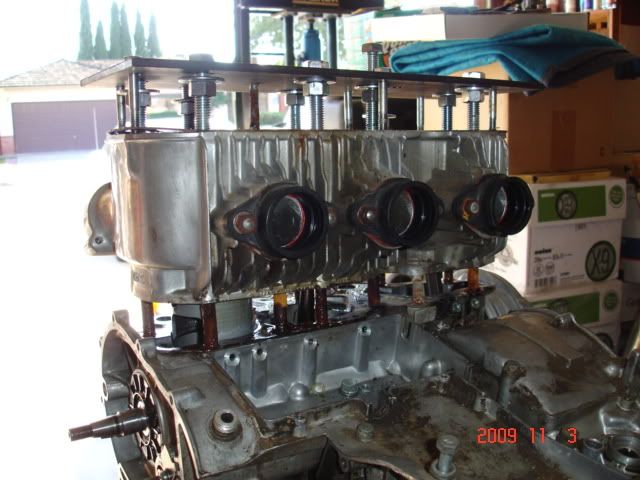
I pulled the cylinders off today wasn't expecting to get them off so soon just wanted to put some pressure on them while they were soaking and they started to come off I don't think it was the evapo-rust that did it what I think is I overheated the engine twice before I took it apart and the heat must have soften up the rust on the studs because the rust was damp, the hard part was when it was half way off I couldn't pull it off or push it down it was stuck and the bolts that pull the cylinders off would go down only so far so what I did was put smaller bolts in the stud holes to extend the bolts and that worked out, those studs were caked with rust I got lucky after reading about how hard of a time everyone was having pulling the cylinders off, dodged a bullet this time.
I pulled the cylinders off today wasn't expecting to get them off so soon just wanted to put some pressure on them while they were soaking and they started to come off I don't think it was the evapo-rust that did it what I think is I overheated the engine twice before I took it apart and the heat must have soften up the rust on the studs because the rust was damp, the hard part was when it was half way off I couldn't pull it off or push it down it was stuck and the bolts that pull the cylinders off would go down only so far so what I did was put smaller bolts in the stud holes to extend the bolts and that worked out, those studs were caked with rust I got lucky after reading about how hard of a time everyone was having pulling the cylinders off, dodged a bullet this time.
-
Suzukidave
- Moto GP
- Posts: 3980
- Joined: Fri Oct 24, 2008 5:55 pm
- Country: US
- Suzuki 2-Strokes: GT750 x2 97 -1200 Bandit 86 GSXR1100
- Location: Lancaster Pa.
-
smokin
-
Tom Garcia
- To the on ramp
- Posts: 334
- Joined: Sat Jan 10, 2009 2:58 pm
- Country: USofA
- Suzuki 2-Strokes: GT250 x 2, GS1100E
- Location: Parma, Ohio

 [/url]
-
smokin
http://i772.photobucket.com/albums/yy1/ ... C00784.jpg http://i772.photobucket.com/albums/yy1/ ... C00793.jpg
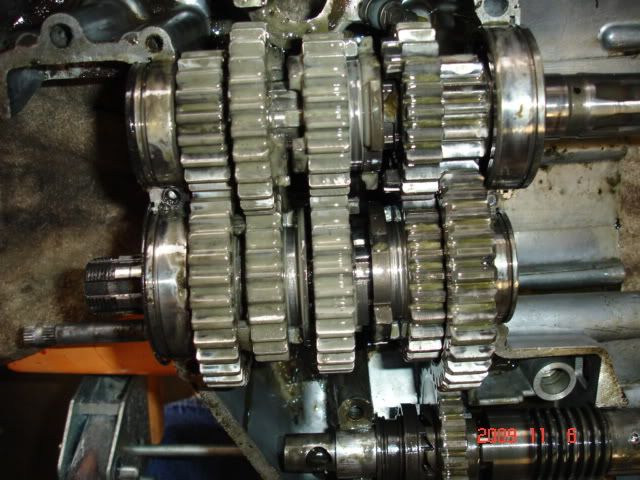
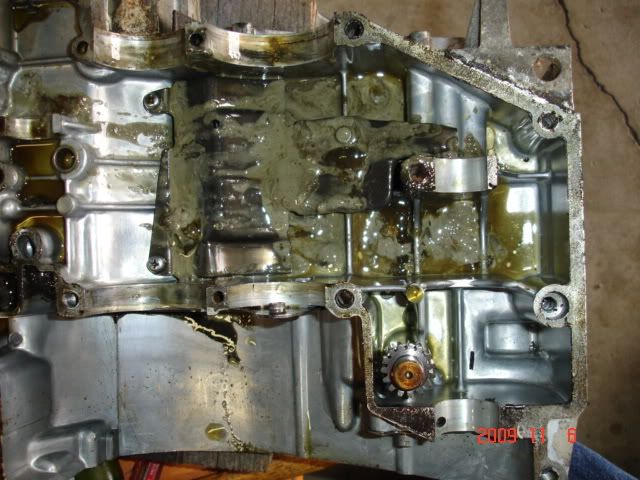
water and oil got mixed in the trany but it doesn't look rusty I'll see what it really looks when I clean it up, should I clean this with simple green?
water and oil got mixed in the trany but it doesn't look rusty I'll see what it really looks when I clean it up, should I clean this with simple green?
-
Suzsmokeyallan
- Moto GP
- Posts: 4326
- Joined: Fri Oct 24, 2008 9:11 am
- Location: Mostly Barbados, sometimes Florida and western Canada
- Contact:
You are one lucky man to have gotten a cylinder that came off so easily, thats probably beginners luck,,,LOL Some engines do not give up their cylinders so easily and actually destroy the lower case by breaking out the studs from the casting because the studs next to them will not move.
That looks like the case joint sealant by the hole in the pump bypass failed, a typical issue on 72s over time. This is because they had a small amount of overlap designed into those castings.
Over time the sealant eventually fails there and the coolant leaks into the transmission through the space.
Later engines had a larger overlap and an o-ring installed to help prevent this issue.
I also have a 72 case and i need to think about an 'improvement' to the joint area to gain some extra material around that spot before its assembled.
For the gear cleaning of the gooey mixture thats on there id try washing them off in some simple green as you suggested first, then use some compressed air.
Then soaking them in some kerosene next to remove any remaining oil and water residue, then blowing with compressed air again.
Naturally some oil goes on after that for protection if they look clean enough.
Two strokes, its just that simple.
69 Suz U70
69 Suz T500
72 Suz GT750 cafe
74 Suz TS250
74 Suz GTXVR project
75 Suz RE5
75 Suz GT750
76 Suz TS400
76 Suz GT750
81 Suz GSX1100
86 Suz RG500x2
88 Hon CR500
93 Hon CBR900RR
98 Suz GSF1200x3
15 Kaw Ninja H2
69 Suz U70
69 Suz T500
72 Suz GT750 cafe
74 Suz TS250
74 Suz GTXVR project
75 Suz RE5
75 Suz GT750
76 Suz TS400
76 Suz GT750
81 Suz GSX1100
86 Suz RG500x2
88 Hon CR500
93 Hon CBR900RR
98 Suz GSF1200x3
15 Kaw Ninja H2
-
smokin
[img]http://i772.photobucket.com/albums/yy1/ ... C00795.jpg[/img]
yah I know I got lucky I hope it last, I was looking at that bypass hole and was wondering if you permatex an o-ring over it or put a short tub just big enough to hold the o-ring in place what do you think.
Thanks Tom for the help with the pics.
yah I know I got lucky I hope it last, I was looking at that bypass hole and was wondering if you permatex an o-ring over it or put a short tub just big enough to hold the o-ring in place what do you think.
Thanks Tom for the help with the pics.
-
Suzsmokeyallan
- Moto GP
- Posts: 4326
- Joined: Fri Oct 24, 2008 9:11 am
- Location: Mostly Barbados, sometimes Florida and western Canada
- Contact:
Actually i was thinking of increasing the size of it so theres more overlap to put the case sealant onto.
Again theres only two realistic ways to do this, welding a bead of aluminum around it which will be technical and has the possibility of distorting the case, OR to apply some good old JB weld.
Ill probably go the JB weld route and add some all around the section on both halves to enlarge it, then file and sand the areas to make it back smooth and level.
Done right it will be as good as it gets besides the welding route.
Putting an o ring on it will create trouble for the case halves and it will crush and split open making the leak worse.
On the newer cases the whole section is bigger and has a recess for the o-ring to sit into.
Two strokes, its just that simple.
69 Suz U70
69 Suz T500
72 Suz GT750 cafe
74 Suz TS250
74 Suz GTXVR project
75 Suz RE5
75 Suz GT750
76 Suz TS400
76 Suz GT750
81 Suz GSX1100
86 Suz RG500x2
88 Hon CR500
93 Hon CBR900RR
98 Suz GSF1200x3
15 Kaw Ninja H2
69 Suz U70
69 Suz T500
72 Suz GT750 cafe
74 Suz TS250
74 Suz GTXVR project
75 Suz RE5
75 Suz GT750
76 Suz TS400
76 Suz GT750
81 Suz GSX1100
86 Suz RG500x2
88 Hon CR500
93 Hon CBR900RR
98 Suz GSF1200x3
15 Kaw Ninja H2
-
tz375

- Moto GP
- Posts: 6204
- Joined: Mon Nov 03, 2008 10:47 am
- Location: Illinois
Allan,
What's with you and JB weld? Put it down and let's get back to doing things right the first time...
Seriously though, I understand that the design was poor and you are suggesting improvements, but there's another way.
Smokin,
A much cleaner idea is to just make the most of what's there already, and use the best materials and techniques.
Clean up both case halves and take time to lightly countersink all the bolt and stud holes.
Get a tube of bearing blue and apply to the upper sealing surface of the lower case half. Lightly bolt the two halves together.
Remove the top half and look for evidence of high spots or low spots and clean them up.
I use a new flat file, lubed with WD40 and cross file lightly across the two surfaces. You will quickly see the high spots coming back down. Just take your time and go slowly and evenly. The trick is a light touch and develop a "feel" for what the metal is telling you. It will talk to you if you let it. It has a story to tell. Your job is to learn to listen with your fingers as well as looking.
Then clean the case halves again and wipe with a good solvent and wipe clean with a clean rag.
Insert the shafts etc and wipe the mating surfaces again - they must be clean of dist and oil and oil from your fingers.
Get a tube of Hylomar SQ32M (it has been replaced with a new name, but it's the same stuff) from http://www.hylomar-usa.com/
Apply that with a stipple brush to one face.
Allow to dry.
If the surface is not clean, the Hylomar will not coat the surface (good check)
Put on the top case and progressively bolt up in sequence.
I first used Hylomar a long time ago when I worked on Aero Engine overhauls at Rolls- Royce as part of my training, and it has been my sealant of choice since then. If you can't get that, use some 3 Bond, but Hylomar is much better.
Follow the process and it will not leak unless some part of the face is missing or the bearings are standing on the pins.
What's with you and JB weld?
Seriously though, I understand that the design was poor and you are suggesting improvements, but there's another way.
Smokin,
A much cleaner idea is to just make the most of what's there already, and use the best materials and techniques.
Clean up both case halves and take time to lightly countersink all the bolt and stud holes.
Get a tube of bearing blue and apply to the upper sealing surface of the lower case half. Lightly bolt the two halves together.
Remove the top half and look for evidence of high spots or low spots and clean them up.
I use a new flat file, lubed with WD40 and cross file lightly across the two surfaces. You will quickly see the high spots coming back down. Just take your time and go slowly and evenly. The trick is a light touch and develop a "feel" for what the metal is telling you. It will talk to you if you let it. It has a story to tell. Your job is to learn to listen with your fingers as well as looking.
Then clean the case halves again and wipe with a good solvent and wipe clean with a clean rag.
Insert the shafts etc and wipe the mating surfaces again - they must be clean of dist and oil and oil from your fingers.
Get a tube of Hylomar SQ32M (it has been replaced with a new name, but it's the same stuff) from http://www.hylomar-usa.com/
Apply that with a stipple brush to one face.
Allow to dry.
If the surface is not clean, the Hylomar will not coat the surface (good check)
Put on the top case and progressively bolt up in sequence.
I first used Hylomar a long time ago when I worked on Aero Engine overhauls at Rolls- Royce as part of my training, and it has been my sealant of choice since then. If you can't get that, use some 3 Bond, but Hylomar is much better.
Follow the process and it will not leak unless some part of the face is missing or the bearings are standing on the pins.
-
Suzsmokeyallan
- Moto GP
- Posts: 4326
- Joined: Fri Oct 24, 2008 9:11 am
- Location: Mostly Barbados, sometimes Florida and western Canada
- Contact:
I just cant win now can i,,,, you can do all of that too Richard but ill just add the JB around the area using a bigger cylindrical shaped piece of material to hold it there till it hardens.
I'll do both sides and then clean it up close to the required joint surface then use my sandpaper and glass ritual to check the case halves for being 100% true and level.
Richard you have not seen my finished JB update so dont write it off just yet,,,LOLOL.
I'll do both sides and then clean it up close to the required joint surface then use my sandpaper and glass ritual to check the case halves for being 100% true and level.
Richard you have not seen my finished JB update so dont write it off just yet,,,LOLOL.
Two strokes, its just that simple.
69 Suz U70
69 Suz T500
72 Suz GT750 cafe
74 Suz TS250
74 Suz GTXVR project
75 Suz RE5
75 Suz GT750
76 Suz TS400
76 Suz GT750
81 Suz GSX1100
86 Suz RG500x2
88 Hon CR500
93 Hon CBR900RR
98 Suz GSF1200x3
15 Kaw Ninja H2
69 Suz U70
69 Suz T500
72 Suz GT750 cafe
74 Suz TS250
74 Suz GTXVR project
75 Suz RE5
75 Suz GT750
76 Suz TS400
76 Suz GT750
81 Suz GSX1100
86 Suz RG500x2
88 Hon CR500
93 Hon CBR900RR
98 Suz GSF1200x3
15 Kaw Ninja H2
