Using modern connectors depends on what level of environmental protection you need. Good place to start is:
http://www.waytekwire.com
For instance, period motorcycle connectors are essentially 'dust proof'. This thread already has links to suppliers for that type. These connectors basically maintain the electrical connectivity and keep the other connectors from hitting each other and shorting out.
Then there are 'splash proof' connectors, a step up. These usually have good protection at the terminal connection against moisture, but not on the backside of the wire entry into the connector.
Then there are immersion proof, sometimes stated as equivalent to a euro std. IP67/68. These connectors have a rubber sealing element where the male and female connectors meet, and also individual wire rubber seals where the wires enter into the backside of the connector. These connectors may also have a TPA (terminal position assurance), which is a locking device to keep the male and female terminals together.
There are three manufacturers of these type of immersion proof connectors:
Tyco/Amp, Amp Junior Power Timer connectors. These are the king of the bunch, used for OEM connectors especially in Europe for critical connections such as fuel injector and lighting connection. Bad news is that they are very hard to purchase in small quantities. Another big issue is that the male plugs are only available in 2 or 3 wire connector varieties. The wire seals and gaskets are a silicone rubber and will probably last forever.

Next up is Delphi Metripack 280 series. These are very nice, having much of the same advantages of the AMP series, but the connector pitch (spacing between wire connectors) is larger, so that the connectors are very bulky, perhaps too bulky for motorcycle service. Delphi also has other pitch sizes (150 & 610). As you would expect, these connectors are often seen on modern US domestic autos. I don't like these connectors as much as the housings are not glass filled nylon like the AMP connectors, and the latches are susceptible to breaking. Still the connectors are generally available.
http://delphi.com/manufacturers/cv/conn ... onnectors/

Next is Molex MX150/150L series. This connector design should not be confused with the generic term for molex connector (used to connect your PC's power transformer to your motherboard). The MX150 series main advantage is that instead of wire seals for each individual wire, there is a gasket built into the backside of the connector to provide moisture/water protection. So instead of having to crimp a little rubber seal to each wire when you crimp the connector to the wire, you just crimp the connector and insert into the connector til it snaps in place. I feel these are about the best in terms of performance, availability, cost and durability (glass filled nylon housings). The only disadvantage is that they are a little bulky, not as much as the Delphi 280 though.
http://www.molex.com/molex/products/fam ... connectors

Important thing to know about modern connectors is their current capacity.
Again, the Molex 150 is pretty good, with up to 30A capability, so you can use it for about anything on a motorcycle except for the charging wires.
I have used the Molex connector in demanding applications, most notably for an oxygen sensor next to a catalyst on a VW. High heat, rain, snow, and being totally exposed to the roadway hasn't harmed the connectors one bit.
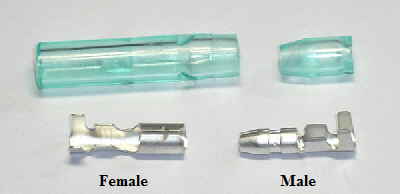
MazerRackham wrote:Is there a more modern type connector that anybody can suggest? These plastic 4-6 prong things look like they will turn into dust at any minute.