I'm going to take two sets of buffalo guages I have and make one really good set. I've dismantled one set so far and I'm going to the powder coater this week to have then finished off nicely. The faces on both guages were in remarkabley good shape. I think having real glass helps.
But it's pretty simple, just a bit tedius. Here's a great link that shows how to go about it.
http://upload.smccloud.com/files/1/gaug ... n%20v1.pdf" onclick="window.open(this.href);return false;
I'll post pics when I get them all back together. Hopefully they'll look like new and be sealed tight.
Gauge Restoration
Moderators: oldjapanesebikes, H2RICK, diamondj, Suzsmokeyallan
-
markj
- To the on ramp
- Posts: 341
- Joined: Sat Oct 18, 2008 10:01 am
- Location: Hudson Valley, NY
-
Suzsmokeyallan
- Moto GP
- Posts: 4326
- Joined: Fri Oct 24, 2008 9:11 am
- Location: Mostly Barbados, sometimes Florida and western Canada
- Contact:
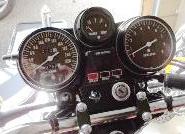
Thats a good job on those Honda gauges and i can see how you went about removing the clamping band. However all gauges are not so easy to open, for example on the GT750 gauges of 73-77 the s/s clamping band is thick in the material used but thin in its clamp profile making it nearly impossible to clamp wit hte hose clamp and pry up easily without severe damage.
Two strokes, its just that simple.
69 Suz U70
69 Suz T500
72 Suz GT750 cafe
74 Suz TS250
74 Suz GTXVR project
75 Suz RE5
75 Suz GT750
76 Suz TS400
76 Suz GT750
81 Suz GSX1100
86 Suz RG500x2
88 Hon CR500
93 Hon CBR900RR
98 Suz GSF1200x3
15 Kaw Ninja H2
69 Suz U70
69 Suz T500
72 Suz GT750 cafe
74 Suz TS250
74 Suz GTXVR project
75 Suz RE5
75 Suz GT750
76 Suz TS400
76 Suz GT750
81 Suz GSX1100
86 Suz RG500x2
88 Hon CR500
93 Hon CBR900RR
98 Suz GSF1200x3
15 Kaw Ninja H2
-
markj
- To the on ramp
- Posts: 341
- Joined: Sat Oct 18, 2008 10:01 am
- Location: Hudson Valley, NY
Your right Allan. I had just used a thin screwdriver and not a clamp and they came off ok. I think I'll be able to reuse them without too much of a problem.
While I didn't do it the hose clamp seems like a good idea. On the next set I'm going to look for a ring at a plumbing supply store that will fit with the guage and hose clamp to keep everything even and see if that works.
I'm going to the powder coaters next week so I should have the guages back together shortly after that.
So many Projects - So little time
-
2STROKECAFE
- On the street
- Posts: 27
- Joined: Thu Oct 16, 2008 5:17 pm
-
markj
- To the on ramp
- Posts: 341
- Joined: Sat Oct 18, 2008 10:01 am
- Location: Hudson Valley, NY
-
markj
- To the on ramp
- Posts: 341
- Joined: Sat Oct 18, 2008 10:01 am
- Location: Hudson Valley, NY
-
markj
- To the on ramp
- Posts: 341
- Joined: Sat Oct 18, 2008 10:01 am
- Location: Hudson Valley, NY
They're done. I'll post pics but they are far from OEM. I just used semi-gloss black for the outer finish. On the inner shells I used flat white since I just couldn't find that flat florescent blue/green that was stock. Putting those bands back on is major P.I.T.A. I ended up using a c clamp and ball peen hammer. The only good thing is that the gauge faces seem to be very fade resistant so all I did was repaint the tip of needle.
If anyone is contemplating doing this themselves I highly recommend getting a set you don't care about to try first. I ruined a speedo figuring out how these are put together. Not a biggy as it was kinda junky to begin with but still.
Allen, you have my sympathies if you're going to do this as a service. I may be one of you next customers when it comes time to redo the clocks on my other buffalo.
So many Projects - So little time
-
markj
- To the on ramp
- Posts: 341
- Joined: Sat Oct 18, 2008 10:01 am
- Location: Hudson Valley, NY
Thanks Allen. You are right about compressing the guage. I used a flat piece of wood covered in masking tape and a c clamp. The face toward the wood and the c clamp with a smaller peice on the other side. That's how I compressed them together. Once I got the rings on I pulled them tight and then used the ball on the hammer to push the ring back in place on the outside. I am worried that the seals between the two outer bodies are really well sealed. They tended to pop out at certain points during reassembly. I have another untouched set and they may be coming your way. All in all it was a learning experience but I'm not sure I'd do it again.
I'm surprised your not getting too many gauges coming your way. Almost any Buffalo needs some gauge rehab by this point.
I'm surprised your not getting too many gauges coming your way. Almost any Buffalo needs some gauge rehab by this point.
So many Projects - So little time
-
tz375

- Moto GP
- Posts: 6213
- Joined: Mon Nov 03, 2008 10:47 am
- Location: Illinois
I pulled twoo stes apart recently and when the tin comes back from powdercoating, I'll have to work out how to assemble them.
I was thinking of having a simple press jig machined out od steel. The lower part would have an ID slightly larger than the gauge and would step out to an ID slightly larger than the ring. The upper jig would be the same . The gauge would be loosely assembled along with the ring and placed on the flat step.
That style I have seen before and would work with rings that are only partly destroyed. Mine have one face lifted and the other is more or less in place.
I'd prefer to make a jig that lightly compresses all the parts together and then rolls the band into place with a 2 step roller. The first would roll it in to say 45 degrees and then the second roller would take the clamp to 90 degrees.
That one is outside my ability to design an manufacture and more expensive than new gauges I suspect.
How do guys like Dennis Quinlan of KTT do it? He's been repairing gauges for ever. I remember he modified a TZ tacho for me back in - hey never mind how long ago it was. ..... and the ring looked almost perfect after he finished.
I was thinking of having a simple press jig machined out od steel. The lower part would have an ID slightly larger than the gauge and would step out to an ID slightly larger than the ring. The upper jig would be the same . The gauge would be loosely assembled along with the ring and placed on the flat step.
That style I have seen before and would work with rings that are only partly destroyed. Mine have one face lifted and the other is more or less in place.
I'd prefer to make a jig that lightly compresses all the parts together and then rolls the band into place with a 2 step roller. The first would roll it in to say 45 degrees and then the second roller would take the clamp to 90 degrees.
That one is outside my ability to design an manufacture and more expensive than new gauges I suspect.
How do guys like Dennis Quinlan of KTT do it? He's been repairing gauges for ever. I remember he modified a TZ tacho for me back in - hey never mind how long ago it was.
-
markj
- To the on ramp
- Posts: 341
- Joined: Sat Oct 18, 2008 10:01 am
- Location: Hudson Valley, NY
Here's a link I found helpful. For me getting the bands off is what caused any visible damabe. I used wood blocks, a clamp and a ball peen hammer to get them on. Belive it or not it worked pretty well. Having something that would systematically press it in place would be ideal but a semi circular pair of plyers shaped to the circumferance of the guage would work fine to. You could make them out of plate metal and then weld them to some plyers. Have a protective coating on one end and then just push and crimp. Just a thought.
http://upload.smccloud.com/files/1/gaug ... n%20v1.pdf
Edit - Duho I just realized I posted this at the start of this thread a while back.
http://upload.smccloud.com/files/1/gaug ... n%20v1.pdf
Edit - Duho I just realized I posted this at the start of this thread a while back.
So many Projects - So little time
