I use a simple gauge light with alligator clips. It is attached to the coil and ground and when the DYNA "opens" the light goes ON. Mine senses the change in the circuit when the DYNA triggers the system. At that point the power is no longer flowing through the DYNA S module so it is available to light the lamp.
If the bike's battery were disconnected and the test light has its own battery, then it would go off when the points break. That all makes sense, but I found a simple lamp holder and leads from a speedo/idiot lamp to much easier to construct.
GT550 budget build
Moderators: oldjapanesebikes, H2RICK, diamondj, Suzsmokeyallan
-
tz375

- Moto GP
- Posts: 6213
- Joined: Mon Nov 03, 2008 10:47 am
- Location: Illinois
-
Cragdog
- To the on ramp
- Posts: 267
- Joined: Mon Oct 14, 2013 2:25 pm
- Country: USA
- Suzuki 2-Strokes: GT550L, PE250B, RM250N
- Location: Southern California
Re: GT550 budget build
No, carbs were dried before assembly.Coyote wrote:I hope you didn't use compressed air after the carbs were assembled. Compressed air, especially blown into the fuel inlet will collapse the floats. They loose their surface area and don't shut off the fuel anymore. The carbs overflow. Normally, the floats need to be replaced.
I can't recall if I did this or something similar.. Either way I have more carb work ahead of me so I will take this step when working on them this weekend.Suzukidave wrote:You may have done it while cleaning the carbs but just didnt list it .. but a good idea is to squirt spray carb cleaner through all the tiny ports that go through the carb body into the venturi , there should be a equal flow out the tiny ports on each carb when you spray through them .
In regards to questions about the timing method, I am becoming more confused, I thought I had done it properly but now ya'll are making me second guess at it.
Perhaps I do not have a thorough enough understanding of the points system. I am sure someone here knows definitively how it works, but here are my ponderings:
Let's take "C" (the center cylinder system) for an example of timing.
When "C" approaches the timing mark through the timing window on the points plate, the center piston should be around TDC. When the marks line up through the window exactly, the point should just have begun to open, which tells the ignition coil for the center cylinder to fire the spark plug and ignite the compressed mixture thus sending the piston on its downward travel.
If I have this wrong someone please enlighten me!
Thanks again everyone for your interest in my project and helping me to try and get this sweet machine running once again.
-
Suzukidave

- Moto GP
- Posts: 3980
- Joined: Fri Oct 24, 2008 5:55 pm
- Country: US
- Suzuki 2-Strokes: GT750 x2 97 -1200 Bandit 86 GSXR1100
- Location: Lancaster Pa.
Re: GT550 budget build
Yep reads like you have a good grasp on the ignition and seeing the picture you posted with the assembly fairly centered on the mounting screws i would say you should have things close enough to have a start up . Looks like my guess was correct that you are useing a test light and not a timing light . If you dont own a timing light this may be another good piece of equipment to add to your tool box 
the older i get the faster i was
-
Cragdog
- To the on ramp
- Posts: 267
- Joined: Mon Oct 14, 2013 2:25 pm
- Country: USA
- Suzuki 2-Strokes: GT550L, PE250B, RM250N
- Location: Southern California
Re: GT550 budget build
Thanks Dave, perhaps you could help me understand the difference between the two tools and what the "timing light" does that the test light does not?Suzukidave wrote:Yep reads like you have a good grasp on the ignition and seeing the picture you posted with the assembly fairly centered on the mounting screws i would say you should have things close enough to have a start up . Looks like my guess was correct that you are useing a test light and not a timing light . If you dont own a timing light this may be another good piece of equipment to add to your tool box
Thanks again!
-
Suzukidave
- Moto GP
- Posts: 3980
- Joined: Fri Oct 24, 2008 5:55 pm
- Country: US
- Suzuki 2-Strokes: GT750 x2 97 -1200 Bandit 86 GSXR1100
- Location: Lancaster Pa.
Re: GT550 budget build
Here is a video of a timing light being used on a 4 stroke Honda but it works the same on the 2 stroke you just need to go to each spark plug wire to test each point https://www.youtube.com/watch?v=-YTb6JGCXH0" onclick="window.open(this.href);return false;" onclick="window.open(this.href);return false; the basic timing light is all you would need .
the older i get the faster i was
-
Cliff

- To the on ramp
- Posts: 476
- Joined: Sun Dec 14, 2008 9:34 am
- Country: Canada
- Suzuki 2-Strokes: Original owner GT550L
- Location: Whitby, Ontario
Re: GT550 budget build
You don't have to disconnect anything with the timing light, and you're checking the timing with the engine running! Takes all of about 5 minutes to check/adjust all three cylinders! I know, been doing it once a year for 40 years!!Cragdog wrote:Thanks Dave, perhaps you could help me understand the difference between the two tools and what the "timing light" does that the test light does not?Suzukidave wrote:Yep reads like you have a good grasp on the ignition and seeing the picture you posted with the assembly fairly centered on the mounting screws i would say you should have things close enough to have a start up . Looks like my guess was correct that you are useing a test light and not a timing light . If you dont own a timing light this may be another good piece of equipment to add to your tool box
Thanks again!
-
Coyote

- Moto GP
- Posts: 3404
- Joined: Tue Oct 21, 2008 2:41 pm
- Country: USA
- Suzuki 2-Strokes: GT550x2, GT750, GS1000
- Location: Tulsa, Oklahoma
Re: GT550 budget build
Perhaps I should clarify. Yes, the light I use is a simple continuity tester. This method of timing is known as static timing. It get things close. Very close. After the bike is running, I DO double check with a regular automotive timing light and tweek as necessary. Usually, further adjustment is minimal, if needed at all.
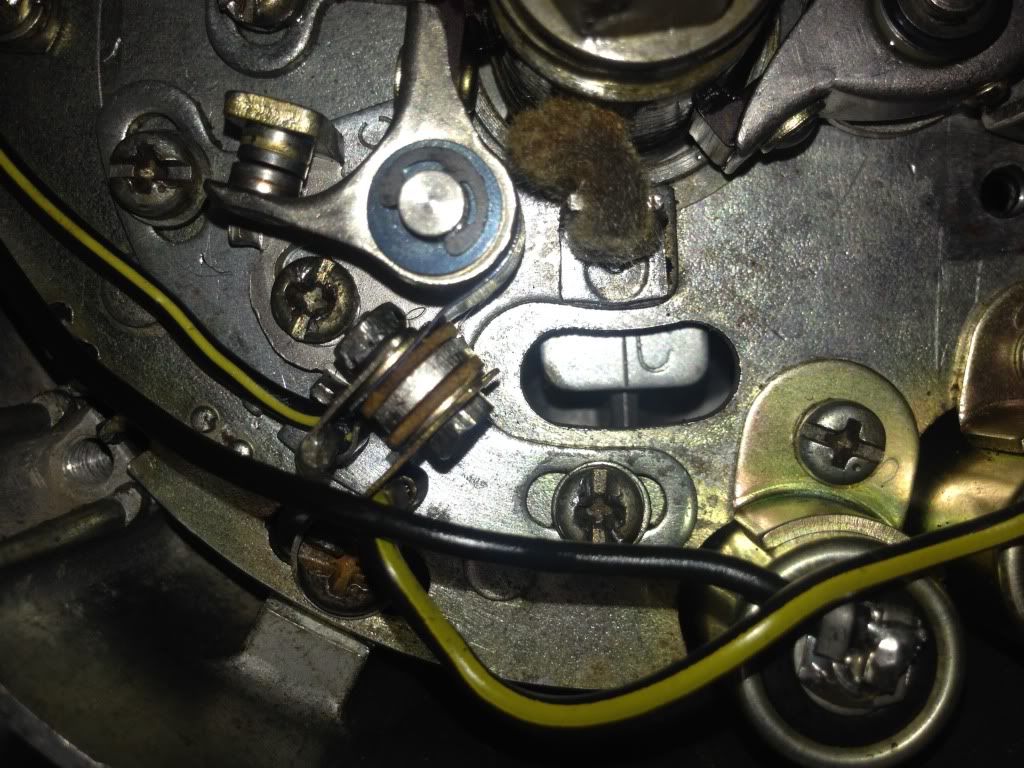
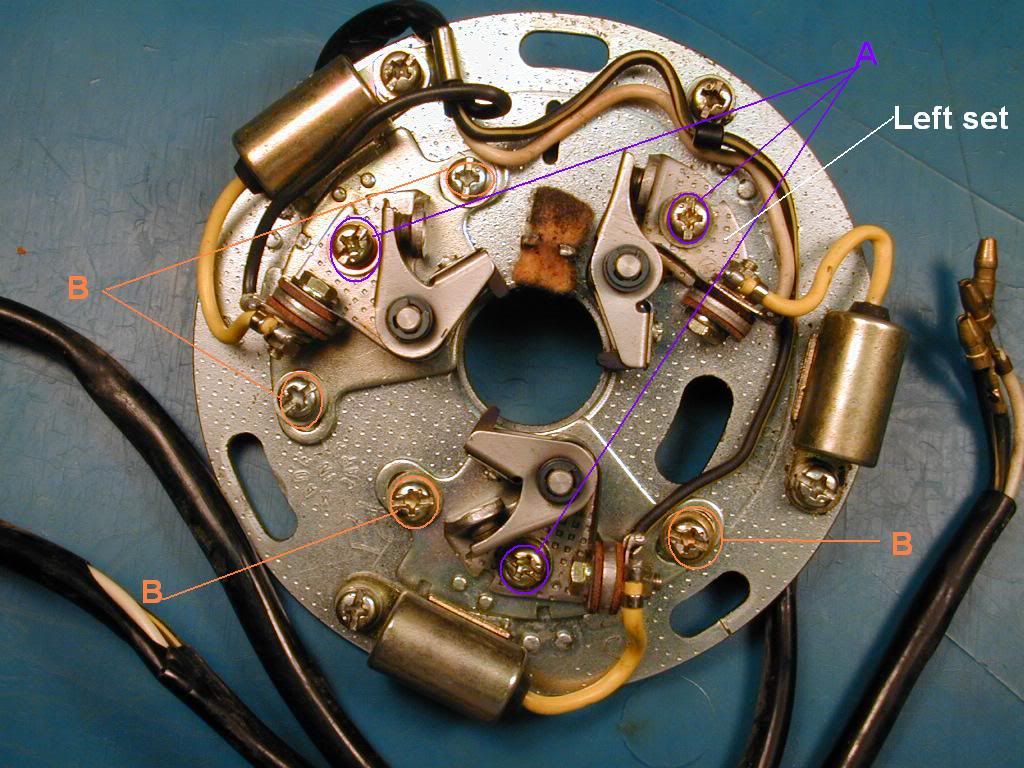
Cragdog, your method is correct. Just remember there are 2 steps to perform and they must be done in order. First you must gap the points. This is done with screws 'A', and only screws 'A'. Here .014 is optimal but .012 - .016 is acceptable. You gap all three before you proceed with timing.
Now you MUST start the timing process with the left set. This is because the entire plate must be rotated to set the 'fire' at the mark. Rotating the plate affects the C and R positions as well, so you must start with the left. Then the C and R timing is then performed with screws 'B'. Loosen then snug those screws. Use a flat blade screwdriver to pry those points to where 'fire' (points just opening) occurs on the appropriate mark. Always double check as things have a tendency to move when tightened down.
This a very clear picture I made up myself. The one in the Clymer manual is nearly impossible to read, so I made my own. This is a Denso ignition, but it makes no difference. The steps are exactly the same for the Kokusan ignition. Easy to tell them apart. Denso condensers are parallel to the plate. Kokusan condensers are perpendicular to the plate. Hope this helps all!

I was born with nothing and still have most of it left.
.
1978 GS1000C
1976 GT550 ongoing money pit.
.
1978 GS1000C
1976 GT550 ongoing money pit.
-
Cragdog
- To the on ramp
- Posts: 267
- Joined: Mon Oct 14, 2013 2:25 pm
- Country: USA
- Suzuki 2-Strokes: GT550L, PE250B, RM250N
- Location: Southern California
Re: GT550 budget build
Great information guys, thank you! I have the carbs off again this morning to inspect them and see if I missed anything in there. I will double check my static timing as well and use the timing light once I get the motor to idle freely. 
-
Cragdog
- To the on ramp
- Posts: 267
- Joined: Mon Oct 14, 2013 2:25 pm
- Country: USA
- Suzuki 2-Strokes: GT550L, PE250B, RM250N
- Location: Southern California
Re: GT550 budget build
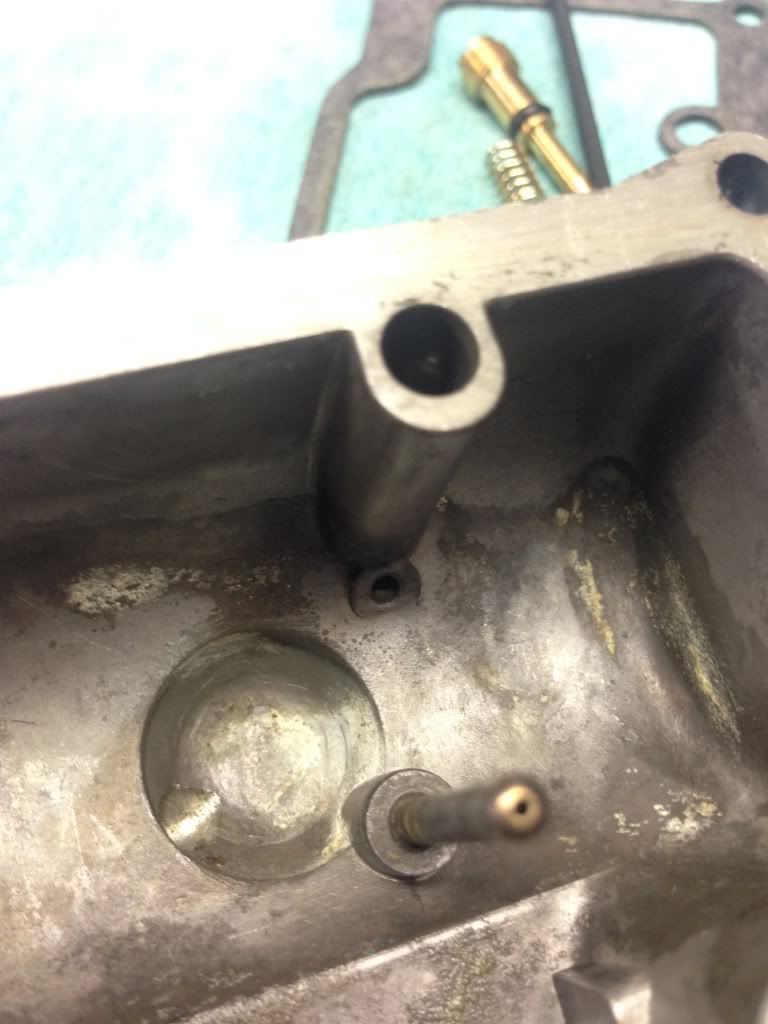
So I spent the whole day taking my carbs apart, cleaning every part with spray carb cleaner, dried with compressed air, then reassembled them. I found that the passages in the float bowls that are a part of the idle system were still a little gunked up, so I cleaned those out better until they allowed passage freely through the system. I reset the float levels and put everything back together.

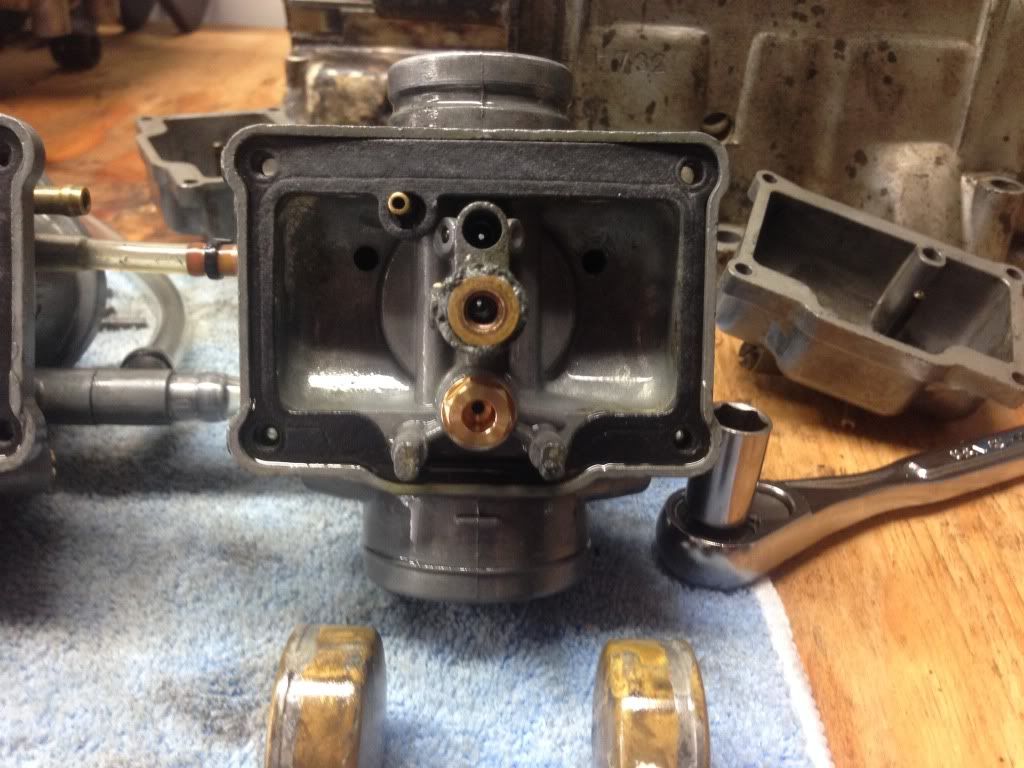
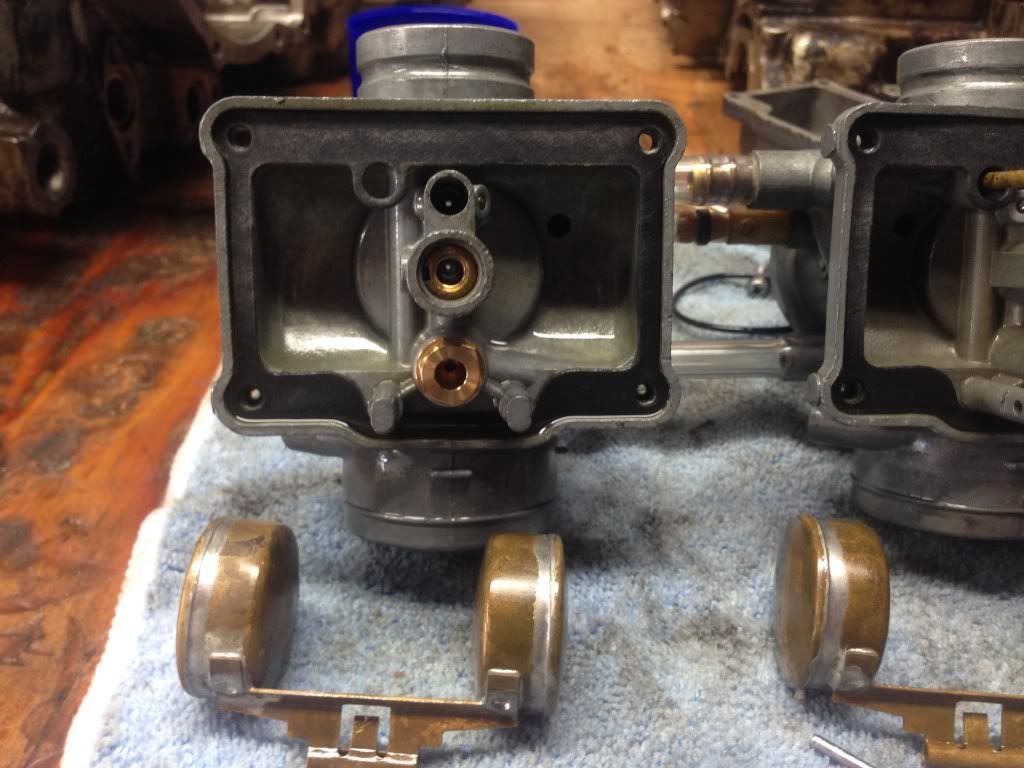
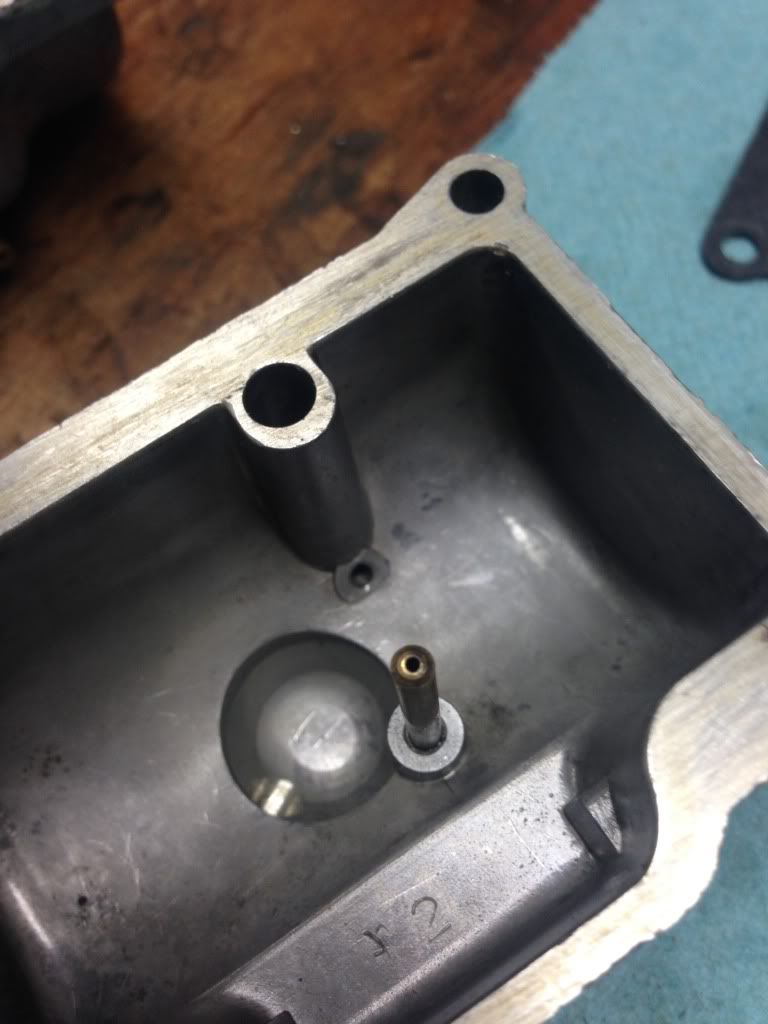
These are the passages that were still a bit clogged, the ones in the upper portion of the pic.
Update! I swapped out the coil pack and it runs much better, seems like the one before was only firing one cylinder, this other one fires left and center, so I will try swapping out the one good one from the earlier set and incorporate it into this other set so I have three properly working coils. Should be firing all three when I get that done. She is getting close now!
http://youtu.be/vSgtm_rFVh4
It was so smokey I couldn't handle being near it, had to let it all air out for a while. Officially idling now though which is a great feeling.
-
pearljam724
- AMA Superbike
- Posts: 1681
- Joined: Tue Jul 24, 2012 11:45 pm
- Country: U.S.
- Suzuki 2-Strokes: 75- GT 550 / 76- GT 750
- Location: SW PA
Re: GT550 budget build
Congrats. As you stated it sounds like it's firing on 2 now. Don't get discouraged. You will sort it out. These bikes are extremely easy to sort out and work on. You just have to jump through all of the hoops in order to get to that point you want to be. As far as the smoke. That is expected from it setting so long. I suggest, getting the bike fairly warm and gently wrench on the throttle several times to clean out the over abundant amount of oil. I'd do this without the baffles installed to clean out the pipes. If you start and run the bike often enough. The smoke will eventually die down quite a bit. These bikes don't like to sit for long periods for several reasons. The most important thing is to run a guitar string through all jet holes and bowl cavities. You have to remove all jets to clean and be sure to add an inline fuel filter and properly seal the gas tank or you're wasting time on cleaning the carbs. Cleaning other carb items isn't very important. Compared to jet holes and bowl cavities. Your floats appear to be in very good condition. Man, your camera takes nice pics. Lol !
Last edited by pearljam724 on Sat Dec 28, 2013 11:02 pm, edited 1 time in total.


-
Cragdog
- To the on ramp
- Posts: 267
- Joined: Mon Oct 14, 2013 2:25 pm
- Country: USA
- Suzuki 2-Strokes: GT550L, PE250B, RM250N
- Location: Southern California
Re: GT550 budget build
Thanks pearljam724, what sucks is after I took the coils off that we're firing on 2 cylinders, I cleaned them a bit with a wire brush, and now it won't start at all again like it's getting zero spark.. Sooooo, back to square one. I might just buy a new coil set at some point, but they're so damn expensive!!!pearljam724 wrote:Congrats. As you stated it sounds like it's firing on 2 now. Don't get discouraged. You will sort it out. These bikes are extremely easy to sort out and work on. You just have to jump through all of the hoops in order to get to that point you want to be. As far as the smoke. That is expected from it setting so long. I suggest, getting the bike fairly warm and gently wrench on the throttle several times to clean out the over abundant amount of oil. I'd do this without the baffles installed to clean out the pipes. If you start and run the bike often enough. The smoke will eventually die down quite a bit. These bikes don't like to sit for long periods for several reasons. The most important thing is to run a guitar string through all jet holes and bowl cavities. You have to remove all jets to clean and be sure to add an inline fuel filter and properly seal the gas tank or you're wasting time on cleaning the carbs. Cleaning other carb items isn't very important. Compared to jet holes and bowl cavities.
Thanks for the encouragement.
-
pearljam724
- AMA Superbike
- Posts: 1681
- Joined: Tue Jul 24, 2012 11:45 pm
- Country: U.S.
- Suzuki 2-Strokes: 75- GT 550 / 76- GT 750
- Location: SW PA
Re: GT550 budget build
Don't give up on those coils just yet. Remove the spark plug boots. Trim a millimeter or two from each coil lead wire that feeds into the boots. That will eliminate some possible oxidation in the wiring. Put the boots back on the wire leads and dab some electrical grease inside the boots. These bikes often drop a cylinder. Under that circumstance, it's always an electrical issue. Ground the wire from the coil that is not firing to the frame and see if it is getting spark. If the battery does not hold a full charge. These bikes often will not fire all cylinders. You can't assume the battery is o.k. if the bike starts and runs. You have to properly test the battery with an ohmmeter. Unlike modern bikes, these bikes require a battery in very good condition. Test it. The battery is often the culprit when a cylinder is not firing.
-
Cragdog
- To the on ramp
- Posts: 267
- Joined: Mon Oct 14, 2013 2:25 pm
- Country: USA
- Suzuki 2-Strokes: GT550L, PE250B, RM250N
- Location: Southern California
Re: GT550 budget build
Okay, will do. The battery was new a month ago, and has been on a trickle charger when it's not in use so I doubt that is the issue. I have a multimeter and frequently check its charge before attempting to start and it's usually 12.3-12.7v. Thanks for all your help with this, I will get back at it tomorrow with more updates!pearljam724 wrote:Don't give up on those coils just yet. Remove the spark plug boots. Trim a millimeter or two from each coil lead wire that feeds into the boots. That will eliminate some possible oxidation in the wiring. Put the boots back on the wire leads and dab some electrical grease inside the boots. These bikes often drop a cylinder. Under that circumstance, it's always an electrical issue. Ground the wire from the coil that is not firing to the frame and see if it is getting spark. If the battery does not hold a full charge. These bikes often will not fire all cylinders. You can't assume the battery is o.k. if the bike starts and runs. You have to properly test the battery with an ohmmeter. Unlike modern bikes, these bikes require a battery in very good condition. Test it. The battery is often the culprit when a cylinder is not firing.
-
pearljam724
- AMA Superbike
- Posts: 1681
- Joined: Tue Jul 24, 2012 11:45 pm
- Country: U.S.
- Suzuki 2-Strokes: 75- GT 550 / 76- GT 750
- Location: SW PA
Re: GT550 budget build
Doesn't matter if the battery is new or it has been on trickle. I made that same mistake not too long ago. You also have to check the voltage at 3k rpm, once the bike is turning over, higher revs and all lighting on and off. A new battery can have a bad cell. Trust me, you have to check all of those phases also. I drove myself nuts last summer. 1 month after I installed a brand spanking new sealed battery. I ruled that out of the equation because it was new. The one thing I ruled out was the one thing causing my problem. Do those tests. Then move onto the coils. New coils are about 90 bucks. But, if you tried 2 sets of coils. I highly doubt the coils are causing the issue of not firing on 1 or 2 cylinders.Cragdog wrote:Okay, will do. The battery was new a month ago, and has been on a trickle charger when it's not in use so I doubt that is the issue. I have a multimeter and frequently check its charge before attempting to start and it's usually 12.3-12.7v. Thanks for all your help with this, I will get back at it tomorrow with more updates!pearljam724 wrote:Don't give up on those coils just yet. Remove the spark plug boots. Trim a millimeter or two from each coil lead wire that feeds into the boots. That will eliminate some possible oxidation in the wiring. Put the boots back on the wire leads and dab some electrical grease inside the boots. These bikes often drop a cylinder. Under that circumstance, it's always an electrical issue. Ground the wire from the coil that is not firing to the frame and see if it is getting spark. If the battery does not hold a full charge. These bikes often will not fire all cylinders. You can't assume the battery is o.k. if the bike starts and runs. You have to properly test the battery with an ohmmeter. Unlike modern bikes, these bikes require a battery in very good condition. Test it. The battery is often the culprit when a cylinder is not firing.
-
Coyote
- Moto GP
- Posts: 3404
- Joined: Tue Oct 21, 2008 2:41 pm
- Country: USA
- Suzuki 2-Strokes: GT550x2, GT750, GS1000
- Location: Tulsa, Oklahoma
Re: GT550 budget build
PJ (that's easier than pearljam724) +1. Agreed, coils rarely go bad. And new batteries look nice, but that's as far as it goes. In my case, I bought a brand new Parts Unlimited lead acid battery;. Filled it with the included acid and charged it up. Installed it in the bike and hooked a battery tender up to it to maintain it. 2 weeks later, the green light on the tender turned red. I took the battery back out and hooked a charger back up on the bench. Would never get much above 12.5 volts. With the ohmeter hooked up to it, you could actually see the voltage drop off as soon as the charger was unplugged. Under 12 in less than an hour. I took the battery to a friend at a bike shop and explained the situation. He said to leave it and he would see what's up. An hour later he called me and said the battery was junk. I said "it's only 3 weeks old. how can it be junk?". He said "trust me. Same situation. What charge it will take falls off immediately".I highly doubt the coils are causing the issue of not firing on 1 or 2 cylinders.
Even though I had bought the battery from Amazon, he got me a replacement on warranty. The new replacement was and still is fine. So like you, I learned that new means nothing.
Cragdog, the battery should take a charge to 13.4 volts. If it's not charging above 12.5, I would be very suspect. In the bike at idle (no lights), it should be 12 - 12.5 volts. At 3K, it should be well over 13 if your charging circuit is working correctly. The idea is to put more juice into the battery than it is using - essentially keeping it topped up.
PJ, yes these bikes are simple and easy to wrench on, but the ignition system is finicky at best. Actually quite barbaric. Everything in the ignition and charging system needs to be top notch, or they will drop a cylinder. Sometimes the non firing cylinder will pick up after the RPM's are high enough that the battery is now getting ample voltage from the charging system. i.e., idles on 2 but runs on all 3 when going down the road. Every connector needs to be clean and tight. Grounds are of the utmost importance and are frequently the source of electrical glitches.
Cragdog, It's a good idea to remove the plug caps and trim off about 3/16. This will expose fresh 'new' wire. While you're at it, go to the nearest automotive parts house and by 3 of the following caps. NGK model LZFH. This is a right angle non resistor cap. The non resistor cap definitely produces a hotter spark than the resistor type. Only around $7 for all three. Let's face it. Resistors were there to prevent radio interference. That issue is pretty much a thing of the past. Do yourself a favor and get the non resistor plug caps. LZFH is the only non resistor plug cap that NGK makes.
Won't start now? did you remember to prime the carbs? If not, it will take a lot of kicking to ever fill those bowls.
I was born with nothing and still have most of it left.
.
1978 GS1000C
1976 GT550 ongoing money pit.
.
1978 GS1000C
1976 GT550 ongoing money pit.
