That fuel tank you have, from what we have seen of the outside, is in very good shape. That makes it rare and valuable and entitled to a little extra labor.
I suggest at least trying the chemical route .....it's just a polyester base filler....plastic. If it gets down to where you can't completely clean out the threads (and how many people have a metric thread chaser that small?) pay a gunsmith a few bucks to do it. If he happens to own a motorcycle, he would probably do it for free.
Your call of course. Get these little details out of the way and you can move on to the 'Main Event'.
Good Luck on whatever you decide.
_____________
______________________
_______________________________
GONE.......WITH A PUFF OF SMOKE AND A BLUR OF SPOKE
I agree that you should try to open the badge holes Try heating a pick with a torch and work the holes Heat should break the bond Im not sure if the thread is #3 or #4 mm
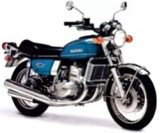
T500R (Stock) T500J (Next Stock Project) T500? (Cafe project 34.6%)
_________________________________________________________________________
I'd rather Burn Rice then Corn!
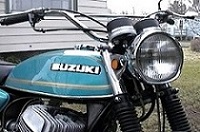
When the time comes that you want install new trim to the fuel tank, here is where I bought mine. I bought 8 feet total. The additional four feet was in case I screwed something up.
Here temporarily installed on my unfinished and not clearcoated yet tank.
I did have to cut just a bit of a notch in the back of the trim to better clear the front hold down tab on both sides to butt it tight to the tank. If you decide to get it, just dry fit first before you start cutting for length....you'll see what I mean around the front tabs.
_____________
______________________
_______________________________
GONE.......WITH A PUFF OF SMOKE AND A BLUR OF SPOKE
Thanks for that info. As you can imagine, I am a little ways away yet. At the moment I am looking for a local source for the heaviest duty paint-stripper I can find. Then I will start the process and see how it goes.
In the meantime I am doing a bit more work on getting the engine stripped.
Looks good. Did you put the cooling holes in the heads?
My head has holes like that too.
Just wondering what the countersunk screw is supposed to be doing. Is that in the cci port?
The screws and bolts I put in to keep junk out of the ports.
Anyone have a trick for rotating the piston circlips so I have enough to pry or get hold of with pliers? I got one piston off no problem, the circlip was easy to access in the gap at the top of the piston. I am having a hard time getting purchase on the circlip on the piston on the other side. Unlike the first side, not much,if any of the circlip is showing at the gap in the piston. I have tried pushing it round further but no luck so far. Just try harder?
A hook and pick set works well for me removing piston circlip. I use a small flathead screwdriver to seat them upon installation after getting one side started with my finger.
You do not have the required permissions to view the files attached to this post.
OK, thanks for that. I have some picks that are a bit on the flimsy side. I will try grinding the tip down on one, so it is a bit sturdier, hopefully that will get a result. Cheers.


 Here temporarily installed on my unfinished and not clearcoated yet tank.