T20 rotor removal
Moderators: oldjapanesebikes, H2RICK, diamondj, Suzsmokeyallan
-
doug rooney
- To the on ramp
- Posts: 229
- Joined: Sun Mar 08, 2009 9:27 am
- Location: Glidden Wi
T20 rotor removal
How do you get that off? Wheel puller? Do I have to take out the 14mm shaft bolt? If so, how do you keep the rotor from turning to do it?
Doug
-
H2RICK
- AMA Superbike
- Posts: 1659
- Joined: Sun Oct 19, 2008 11:07 am
- Country: CANADA
- Suzuki 2-Strokes: GT550A, GSF1200SK6 currently
- Location: Cowtown aka Calgary, Canada
Do NOT/NOT/NOT use a claw type puller on ANY permanent magnet rotor/flywheel (which is the kind you have). You take a chance of actually pulling the magnets and aluminum laminations off of the steel centre arbor of the rotor.
Use the proper centre bolt type puller.....which can sometimes be the rear axle from the same bike.
I usually throw a ball bearing into the hole first before screwing the puller bolt in. Make sure that you screw the puller bolt in at least THREE full turns before it contacts the ball bearing. The bearing will save the end of the crank from getting chewed up by the nose of the puller bolt. The bearing should be as large as possible but still, of course, be able to fit through the hole in the rotor. A little grease on the ball bearing will help to hold it in position in the bolt recess/hole in the end of the crank so that the puller bolt will contact it in a straight line. The grease will also help to lube the end of the puller bolt so less effort is required on the wrench.
Don't worry about the crank/rotor turning while you tighten up the puller bolt. If you want, you can hold the rotor with one HAND while tightening the puller bolt with a suitable wrench in the other hand. The rotor SHOULD pop off the shaft within one turn or so after the bolt contacts the ball bearing/shaft end.
If the rotor does NOT pop off the shaft easily, do NOT attempt to heat the rotor to aid removal. You will remove the magnetism of the magnets with the heat. Do NOT pound on the rotor under any circumstances. This will also cause loss of magnetism.
Instead, leave the puller bolt in place under compression/tension OVERNIGHT. Put a pile of rags on the floor to cushion the rotor/puller bolt when it falls off.
Rotor still attached after all this ??? Oh, oh.....now you have to get hold of a suitably sized slide hammer with the appropriate end bolt. Suzuki has a factory tool for this and your only recourse at this point may be to take it to a shop to let their guys have a go.....unless you know someone with a suitable slide hammer with the proper end bolt.
Good luck with your rotor removal.
If anyone notices that I've missed something, please chime in.
GT550A Mint & Original
H2A Semi-Hot Rod Built From A Basket Case
KZ650C2 Mint & Original...mostly
GSF1200SK6 Bandit...My LD Ride
Additional H2 projects In Boxes.....
MBD Sufferer
H2A Semi-Hot Rod Built From A Basket Case
KZ650C2 Mint & Original...mostly
GSF1200SK6 Bandit...My LD Ride
Additional H2 projects In Boxes.....
MBD Sufferer
-
doug rooney
- To the on ramp
- Posts: 229
- Joined: Sun Mar 08, 2009 9:27 am
- Location: Glidden Wi
-
doug rooney
- To the on ramp
- Posts: 229
- Joined: Sun Mar 08, 2009 9:27 am
- Location: Glidden Wi
Rick, I have it sitting with good pressure on it and breakfree. Looks like I hope for it to pop off eventually.
Part of the ",extra holes" mystery has been solved. After I got a bunch of the gunk off the bottom of the case, many of the holes are NUMBERED! Sheesh, what kind of a mess do I have here???? At least one looks as if there's a broken bolt way down in. No wonder I had so much trouble with idling. What will I find when I get inside!!!!! Wow!
Also see several screws missing and lots of them are boogered up. Somebody that knows less than me had this machine before! LOL!
Nah, it ain't funny!
Doug
-
doug rooney
- To the on ramp
- Posts: 229
- Joined: Sun Mar 08, 2009 9:27 am
- Location: Glidden Wi
-
H2RICK
- AMA Superbike
- Posts: 1659
- Joined: Sun Oct 19, 2008 11:07 am
- Country: CANADA
- Suzuki 2-Strokes: GT550A, GSF1200SK6 currently
- Location: Cowtown aka Calgary, Canada
OK, Doug, great to hear the rotor popped off for you.
FYI, when you go to reassemble it make sure both mating surfaces (inside of rotor arbor AND taper on crankshaft) are TOTALLY CLEAN AND DRY!!!!
No contaminants of any kind !!! No sealants of any kind !!! No locking agents of any kind !!!
BTW, are those studs with nuts and washers on the bottom of the engine or actual bolts with hex heads on the bottom ???
FYI, when you go to reassemble it make sure both mating surfaces (inside of rotor arbor AND taper on crankshaft) are TOTALLY CLEAN AND DRY!!!!
No contaminants of any kind !!! No sealants of any kind !!! No locking agents of any kind !!!
If those numbers are cast into the cases then they are there to enable you to torque up the case bolts in the proper order. With one bolt broken off and gone (partly), hopefully the remainder is not totally seized in the top case half. Sounds like you'll be separating the cases to get at the remains of that bolt for its removal.Part of the "extra holes" mystery has been solved. After I got a bunch of the gunk off the bottom of the case, many of the holes are NUMBERED! Sheesh, what kind of a mess do I have here???? At least one looks as if there's a broken bolt way down in. No wonder I had so much trouble with idling. What will I find when I get inside!!!!! Wow!
BTW, are those studs with nuts and washers on the bottom of the engine or actual bolts with hex heads on the bottom ???
GT550A Mint & Original
H2A Semi-Hot Rod Built From A Basket Case
KZ650C2 Mint & Original...mostly
GSF1200SK6 Bandit...My LD Ride
Additional H2 projects In Boxes.....
MBD Sufferer
H2A Semi-Hot Rod Built From A Basket Case
KZ650C2 Mint & Original...mostly
GSF1200SK6 Bandit...My LD Ride
Additional H2 projects In Boxes.....
MBD Sufferer
-
doug rooney
- To the on ramp
- Posts: 229
- Joined: Sun Mar 08, 2009 9:27 am
- Location: Glidden Wi
Will remember the tip on the rotor. Been busy today taking motor apart. Kind of scary for me as I'm not that good at it. I was told to take pics as I went along which I will start to do when Wife brings camera home.
Those are 2 bolts that were in the bottom (hex heads). 6 larger ones are completely missing. Got the halves apart but haven't taken the parts out yet other than the kick shaft. It wasn't returning and I thought the spring was broke. It's not, have to look at my parts book tomorrow. I think the previous yo-yo had it in wrong so that the spring end wouldnt stay in it's slot.
Had a renegade washer and circlip rattling around also. Took awhile to see where it went. Holds on the "idler" gear?? Partially behind the clutch basket so that's the only reason that didn't fly off. Can't see how that stuff could have worked it's way off if put on right. Dude musta figured..."Goes in here someplace"....TOSS!
Other than the things mentioned, it really don't look that bad in there. I turn the crank with the rods and the bearings seem smooth to me??? Small end roller bearings look new. Pistons do have scoring but the cylinders look better?? Gears look good to my eye. Not sure what a bad center seal is supposed to look like. I have the outer ones but not the centers. (Can't find em)
Will get some pics up tomorrow and see what you boys think. Thanks, Doug
Oh yeah, when I drained the case oil yesterday, it looked like 90% 2 stroke oil. Could be because the missing bolts hold together those critical areas?? Some kid had this thing I'm almost sure and did a half azz rebuild job! I'm being kind to him whoever...maybe should be 1/10 azz!
Doug
-
doug rooney
- To the on ramp
- Posts: 229
- Joined: Sun Mar 08, 2009 9:27 am
- Location: Glidden Wi
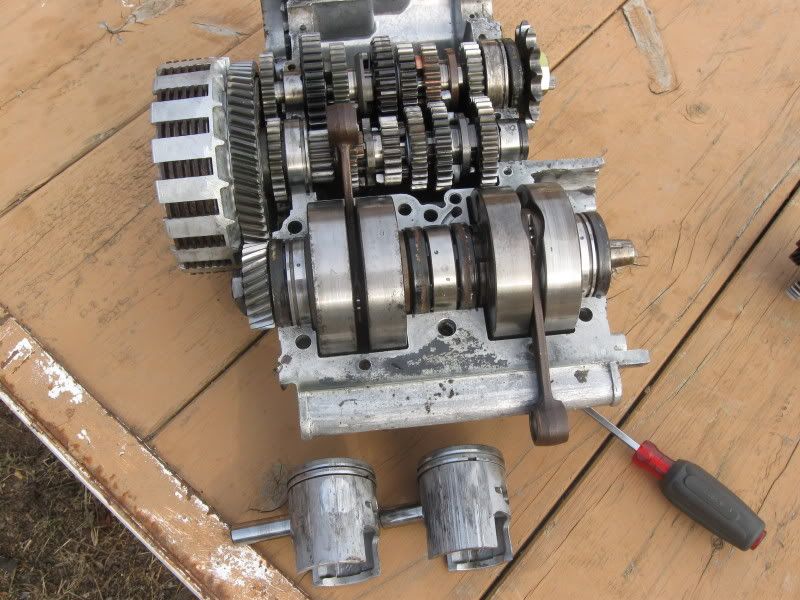
Here it is. The right rod is laying over one of the only 2 bolt holes that came up from the bottom.
Some scoring. What do ya think?

The 2 small bolts that were in the bottom case. Notice there is a dowel pin missing where the one shaft bushing goes??
The lever inside the kick gear is rounded on one side and is wearing on the stop part?? Seems to me it should be on the flat side against the stop but see no way of it doing that. It's like it's in backwards but don't know??


One of the head bolts had no lock washer on it and when I took off the heads I could tell the torque was not the same on both sides.
The 6 missing bolts held the crank seals and bearings tight (Or should have).....Recommendations??
Doug
-
H2RICK
- AMA Superbike
- Posts: 1659
- Joined: Sun Oct 19, 2008 11:07 am
- Country: CANADA
- Suzuki 2-Strokes: GT550A, GSF1200SK6 currently
- Location: Cowtown aka Calgary, Canada
First recommendation, Doug, is to get a parts book. I doubt you'll find a paper one anywhere but try www.zedder.com for a digital version.
You may be able to find a paper version of the early T250-1 or T250-2 parts manual which should be good enough for your purposes since the engines were pretty much identical at that time.
A T500 service manual will be a pretty good substitute for the now non-existent T20 service manual....although zedder might help you with the T20 manual too if you query him. He has a lot of weird stuff.
The T500 and T20 are very similar in design so stuff goes together in a similar fashion.
You may have to haunt fleabay to find those manuals if zedder can't help you.
Another guy who may/may be able to help with parts and/or service manual info is a Brit named Adrian Baker. Check out his website at www.t20suzuki.com. He is a stone Hustler freak.
Let me know how you make out with your "paper chase".
GT550A Mint & Original
H2A Semi-Hot Rod Built From A Basket Case
KZ650C2 Mint & Original...mostly
GSF1200SK6 Bandit...My LD Ride
Additional H2 projects In Boxes.....
MBD Sufferer
H2A Semi-Hot Rod Built From A Basket Case
KZ650C2 Mint & Original...mostly
GSF1200SK6 Bandit...My LD Ride
Additional H2 projects In Boxes.....
MBD Sufferer
-
doug rooney
- To the on ramp
- Posts: 229
- Joined: Sun Mar 08, 2009 9:27 am
- Location: Glidden Wi
Thanks Rick. I have a parts manual remake from New Zealand. It's pretty good. Have a service manual by Suzuki and one by Clymer. The suzuki one I don't think is a shop manual ,though. Didn't have anything about pulling the rotor for instance.
I am a member of Adrian Baker's site also. Think I'll send this link over there to see what he thinks.
Your initial impression just by looking at the uncleaned parts??? Or, no way to tell? Doug
I am a member of Adrian Baker's site also. Think I'll send this link over there to see what he thinks.
Your initial impression just by looking at the uncleaned parts??? Or, no way to tell? Doug
Doug
-
H2RICK
- AMA Superbike
- Posts: 1659
- Joined: Sun Oct 19, 2008 11:07 am
- Country: CANADA
- Suzuki 2-Strokes: GT550A, GSF1200SK6 currently
- Location: Cowtown aka Calgary, Canada
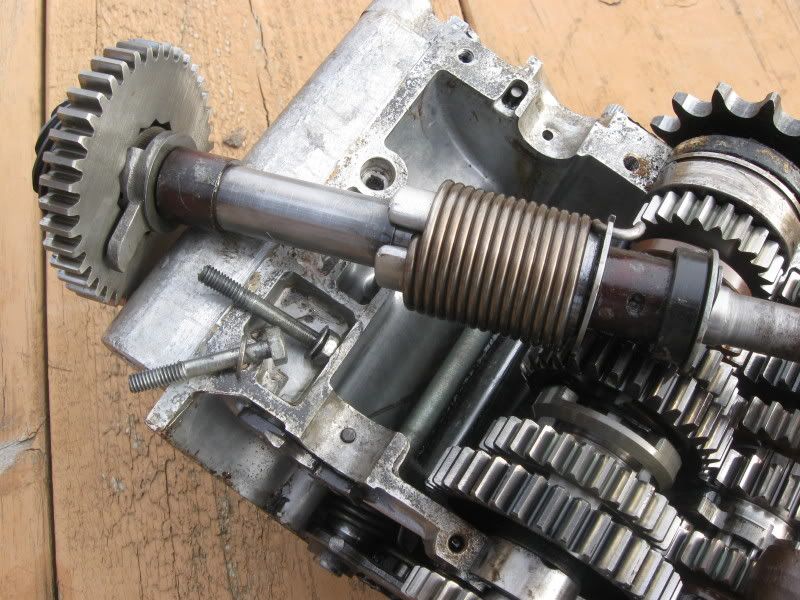
The piston on the left COULD be cleaned up if the opposite side is no worse than the side pictured.....but I, personally, would only do that in an on-road emergency-type situation. The piston on the right is history.
The barrels, of course, will need checking on 6 axes with a bore gauge as per the boilerplate page in the Clymer manual. Watch for erosion in the port areas, especially near the edges of each port.
The gearsets, from what I can see, look to be okay. Shimming/spacing is another story and everything would have to be dismantled and inspected/measured for wear.
The crank and bearings will have to be thoroughly washed up in clean solvent and then all the bearings will have to be "felt" for rough spots. Then you want to set the crank up on a set of vee blocks and get your dial gauge out and start checking runouts. I have no idea what the measurments would be but, again, the T500 manual might give you some help. The big end rod bearings will also have to be carfully inspected for up/down play as well as angular "shake" and side play.
The centre seals will have to be closely inspected in place as much as possible. You can get a good feel for the condition of the seal lips by gently moving them radially on the pin. You want as little radial movement as possible. With a strong light, check the sealing lip(s) for cracks with at least a 10X magnifier. It's a beach to see down in there but it can be done. Small shallow cracks are acceptable....barely. Fewer small cracks are better, obviously. Large deep cracks are NOT acceptable in ANY quantity.
I would probably replace the outboard crank bearings and seals just as a matter of principle.
The fun part will be getting the replacement through bolts for the cases. For myself, I would get all NEW bolts if at all possible.
Case bolts are a lot like engine mount bolts and WILL stretch and weaken over time so should be replaced periodically. Some manufacturers recommend replacement of both sets/types of bolts every time the engine is removed and/or dismantled.
You WILL have to check the case halves to see if any of the sealing surfaces are distorted or have been abused with a file, emery cloth or Scotchbrite. ThreeBond can make up for a lot of bodgery here but best not to take any chances.
On balance, from what I can see (and barring anything weird) the engine certainly looks fixable. I've seen guys bodge together far worse examples and actually have them running and not sounding too bad. Some even actually shift and everything !!!
GT550A Mint & Original
H2A Semi-Hot Rod Built From A Basket Case
KZ650C2 Mint & Original...mostly
GSF1200SK6 Bandit...My LD Ride
Additional H2 projects In Boxes.....
MBD Sufferer
H2A Semi-Hot Rod Built From A Basket Case
KZ650C2 Mint & Original...mostly
GSF1200SK6 Bandit...My LD Ride
Additional H2 projects In Boxes.....
MBD Sufferer
-
doug rooney
- To the on ramp
- Posts: 229
- Joined: Sun Mar 08, 2009 9:27 am
- Location: Glidden Wi
