Page 2 of 3
Posted: Sun Oct 04, 2009 10:25 am
by Suzsmokeyallan
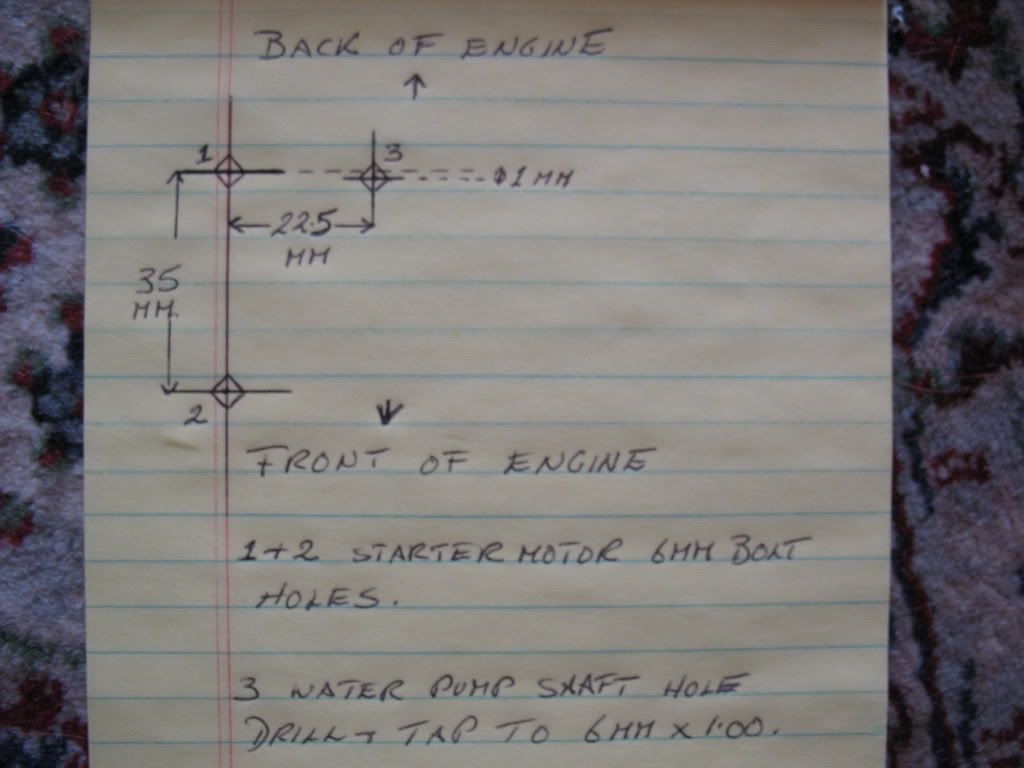
Here's the location of the hole from on top of the case in relation to the two 6mm starter motor bolt holes. I hope this helps anyone who's going to do this modification.
Posted: Sun Oct 04, 2009 10:18 pm
by oldjapanesebikes
I was thinking this would be good to have as a 'sticky' - probably in the Repair Forum ?
Posted: Fri Oct 09, 2009 6:43 pm
by MotoMartin
Allan you are an absolute GENIUS!
I just removed the water pump following this method. I had spent countless hours trying to remove it from the bottom and was dreading pulling the motor completely apart. Once I had drilled the hole, it did n't take more than a few minutes with a punch and hammer to get it out. Thanks a million!
Posted: Fri Oct 09, 2009 7:30 pm
by Suzsmokeyallan
I'm glad to be able to share an idea with Buffalo owners i though was so simple it might just possibly work.
Posted: Sun Oct 25, 2009 9:02 am
by Suzsmokeyallan
I did not check the starter assy and how it needed to get in there once the hole was drilled and a screw or bolt fitted.
HOWEVER at Daves this week when i was visiting him we did an assessment to the idea with a starter motor and found anything protruding would NOT allow the starter to get back in.
There were a few ways to solve this slight issue and i ended up with the easiest one.
I also though of a counter sunk cross head screw as well, but since its a 6mm hole, the countersink is too deep on such a size and you only have 6mm of threaded area in the casing anyways to play with, so scrap that plan.
Soooo the best thing is a stainless steel Allen head grub screw with some loctite 242 blue on it. You can get them in 6mm x1.00 size approx 5 to 6mm long so it will go in flush to the top of the cover and the 242 will keep it locked till you absolutely need to remove it for tapping the pump assy out.
Stainless wont rust either so its best to use that type plus they cost about 2 dollars so its a cheap part.
Posted: Sun Dec 13, 2009 10:09 pm
by Suzukidave
Posted: Sun Dec 13, 2009 10:57 pm
by Suzsmokeyallan
Looking excellent there Dave, and the s/s grub screw is super neat and tidy just as we planned.
Posted: Sun Dec 13, 2009 11:11 pm
by Suzukidave
And the best thing is it only takes a few min to set it up and drill / tap the hole
Posted: Sun Mar 21, 2010 9:28 pm
by tz375
That's a neat solution Allan, for cases where the water pump refuses to come loose.
Re: W/pump cartridge removal idea.
Posted: Thu May 31, 2012 10:19 am
by RING_DING
Looks like I will be doing this procedure this winter! Assuming one should mark the drill bit for a 6mm hole depth, is there any space between the top of the water pump shaft and the casing so that when you drill from the top the drill tip does not hit the top of the pump shaft?
Re: W/pump cartridge removal idea.
Posted: Thu May 31, 2012 12:16 pm
by Suzukidave
There will be a small amount of space between the top of the pump shaft and the case so you will know when you punch thu .. i dont feel the drill touching the top of the hardened shaft would hurt it at all .
Re: W/pump cartridge removal idea.
Posted: Fri Jun 01, 2012 9:31 am
by oldjapanesebikes
RING_DING wrote:Looks like I will be doing this procedure this winter!
I would suggest trying to remove the pump from the bottom first - sometimes they actually do come out relatively easily ....... and then there are those other times where this trick is useful.

Re: W/pump cartridge removal idea.
Posted: Fri Jul 06, 2012 6:54 pm
by Suzsmokeyallan
I'm presently working on the crankcases for the 75 Buffalo engine and will be putting the hole in the upper case before I begin the painting in a few days.
Re: W/pump cartridge removal idea.
Posted: Mon Nov 19, 2012 5:02 pm
by Rassie
Here is another "backyard mechanic" way to get the pump out if you are planning to replace the entire pump and you are not bothered by messing up the shaft where the impeller goes on you can use this trick to get it out. I used a vice grip to make a kind of slide hammer. I used it this weekend to extract my pump that was thoroughly stuck in there. I was planning on using the drill and tap method mentioned here if this did not work. I had to file two small grooves into the shaft to get the vice grip to stick properly and it came out after "whacking" it for a few minutes. I used a larger socket together with a smaller one on the inside to give it some added "weight".


Re: W/pump cartridge removal idea.
Posted: Sat Dec 08, 2012 10:12 am
by Eddie
HI, I LIKE THE IDEA, I WAS WONDERING IS THE HOLE YOU DRILLED IN THE MIDDLE OF THE BUSHING? I MIGHT BE PULLING MY MOTOR OUT (HOPEFULLY NOT!) BUT IF I DO I WAS THINKING I DONT NEED THE MEASUREMENTS IF YOU JUST GOT IT LINNED UP IN THE MIDDLE OF THE BUSHING. I THOUGHT THATS WHAT WAS SAID BIT BY LOOKING AT THE PICS IT LOOKS LIKE YOU WERE DRILLING SLIGHTLY OFF CENTER? ALSO I WAS WONDERING IS THERE ANY CHANCE THAT THE PUMP SHAFT WILL HIT THE SCREW? I HAVE NOT BEEN INSIDE THE GT750 MOTOR SO I HAVE NO IDEA WHAT IT LOOKS LIKE IN THIS AREA OTHER THAN YOUR PICS, AND NOW THAT I SAID THAT I WILL PROBLY FOR SURE BE TAKING MY MOTOR APART! S%$#@T I SHOULD NOT HAVE SAID ANYTHING.......OK NEVER MIND I JUST NOTICED THAT THERE WAS A SECOND PAGE TO THIS! SORRY I AM NOT COMPUTER SAVY,,, I JUST READ ABOUT THE GRUB SCREW AND I JUST SAW THE TRIANGULATION SPECS.......NEVER MIND THANKS!!!!


