Page 1 of 1
Guage needles
Posted: Fri Feb 06, 2009 6:19 pm
by jaybob
Hey guys, what is the best way to remove the needles from a set of guages? From a gt550/380. I've got three sets all with something different wrong with them and I'm trying to get a good set together.
Thanks
Jason
Posted: Sat Feb 07, 2009 10:23 pm
by Suzukidave
MAKING A GAUGE NEEDLE REMOVAL TOOL
For those of you who have ever worked on gauges, you know that this is the part that most of approach with great fear. The needle is press fitted to the armature, and the armature, at that point is needle thin. Most times, if you break that armature, you’re hunting for new gauges.
This is not going to get you out of the woods 100% of the time, but it is a solution most of the time. I’ve used it a few times now, and it has worked flawlessly.
This is a copy of the needle removal tool you get in face-over kits for expensive cages. You can make it with a Dremmel out of a six inch piece of 1/8 inch steel stock. It’s about 6 inches long, and the gap between the teeth is approximately an 1/8 inch
To use it, you place the teeth around the shaft. The space between the teeth should fit around the needle so that the pressure is straight up, not from the side. Position the tool along the side where the screws hold the face. This is reinforced here, and will reduce bending. You can carefully rotate the needle a bit to position it. You will need some cushion under the tool and over the face to protect it. I use a cork backed steel ruler. It protects the face (cork,) while remaining inflexible (steel side to the tool.)
It is amazing that the pressure to remove the needle will, in all likelihood, bend the handle before it separates, and when it does, count on that needle to “ping” into another dimension. For that reason, you might want to do this inside a box. I have also thought about making a shield above the tooth area to keep the needle from launching.
Let me know of your successes and failures with this.
Len
Posted: Sat Feb 28, 2009 11:27 pm
by H2RICK
A pic would be nice Dave.....

Posted: Sun Mar 01, 2009 5:12 am
by Suzukidave
I tried Rick but the comment i grabbed off a PDF file and i cannot seem to get the photos also

but what the tool looks like is a strip of steel bent up slightly on one end that looks like a fork but with just 2 tines that slip under the needle on both sides of the shaft so it can be pried off .
Posted: Sun Mar 01, 2009 8:37 am
by Suzsmokeyallan
Heres a much easier approach, use two square shaft screwdrivers about 6 inches long and having a cross section of about 1/4 on the square.
Place the square portion onto the screws of the face opposing each other and move the ends in on the tapered part of the bit so its under the boss of the needle.
Make it so on the leverage position is above the face about an inch off the sides of the dial by adjusting the tapers position on the boss. Then pry down carefully on the handles so the tapered ends push up evenly on opposing sides of the needle boss.
Since the screwdrivers are opposing each other sometimes you have to place the needle at the 12 oclock position to move the needle itself out if the way before prying.
Do this procedure facing the needle into a cloth so it can fly off and land safely, if it drops on the floor or a hard surface you will chip the paint of the needle.
Posted: Sun Mar 01, 2009 10:18 am
by oldjapanesebikes
Spoons can work sometimes also - rest the backs on the two screw heads on either side of the needle.
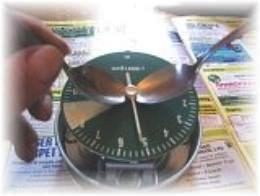
Posted: Sun Mar 01, 2009 10:41 am
by Suzsmokeyallan
Ah quite ingenious,,,,a person whos got alternative uses for cutlery,,,,works just as good too.
The needles are usually on the shaft pretty darn tight, and not surprisingly dont mix them up either, since the fit for each shaft and needle are not the same after initial pressing on in the factory.
Posted: Sun Mar 01, 2009 12:20 pm
by H2RICK
Thank you, guys. Interesting stuff. I have a few old clocks I can practice on so I'll try some of these methods to see what works best for me.
Spoons.....who knew ???


Posted: Sun Mar 15, 2009 6:03 pm
by tz375
FYI, I recently stripped a pair of GT750 gauges and used the "spoons" method. It worked like a charm and left no marks.
Now all I need to do is to work out how to slip a bicycle speedo inside the tacho so I don't need to strip it when the battery dies.
Bike speedos are available for 30-90 bucks from a bike shop or for about $5 off fleabay. So at least experimenting is cheap. For a modern looking bike, nothing beats any of the modern Koso/Acewell/Trail tech devices, but for the old school flat track look, I want it to look basic but to be fully functional and this might just work.
Posted: Sun Mar 15, 2009 8:19 pm
by Suzsmokeyallan
Richard theres a myriad of bicycle speedos out there, the wireless ones from Cateye are very reliable and the battery usually last for about two years.
Posted: Sun Mar 15, 2009 8:29 pm
by Suzukidave
I dont know if it matters to you Richard but most if not all of the battery powered speedo's you cannot see at nite .
Posted: Sun Mar 15, 2009 11:06 pm
by tz375
And you think I have enough brain cells to look where I'm going AND check the speedo at night. Dave, you give me waay too much credit.

If I had any sense I'd forget about trying to use what I have, and just go and buy something that works. After all, that is the American way. Right?