I had this posted once before, but it was lost when our sever went up in smoke. I thought it was worth revisiting.
You can frequently find badges in this condition on ebay. This is one off my 77 Buffalo. First operation is to wash it in hot soapy water - scrubbing with a toothbrush.
Next I carefully covered all the orange metalflake using a tooth pick and general purpose grease. You will see why.
Next I laid out 2 sheets of common printer paper. You wil need this to be perfectly flat. Also you need to moisten the paper with lacquer thinner when the time comes.
Next I shot the entire thing whth rattle can black (Plasti-Kote). When I got this in the sun for the photo, I could see it needed a little more so I gave it a second coat.
Let it dry about 20 minutes. Remember to moisten the paper with lacquer thinner. Then you simply drag the face of the badge accross the paper till all the black is gone. Keep a q-tip handy (also moistened with thinner) to touch up any low spots in the metal.
Here it is right after the previous operation. Now all that is left to do is remove the grease you applied earlier. I let the paint dry a day or two before doing that.
Viola! Almost as good as new!
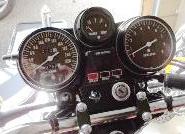
Looked great when installed.
I useed the same paper drag to refurbish my metal ram air emblems. The metal ones were the originals and I wanted to keep them. They are now on Red Zone.
Badge Restoration
Moderators: oldjapanesebikes, H2RICK, diamondj, Suzsmokeyallan
- Coyote
- Moto GP
- Posts: 3404
- Joined: Tue Oct 21, 2008 2:41 pm
- Country: USA
- Suzuki 2-Strokes: GT550x2, GT750, GS1000
- Location: Tulsa, Oklahoma
Badge Restoration
I was born with nothing and still have most of it left.
.
1978 GS1000C
1976 GT550 ongoing money pit.
.
1978 GS1000C
1976 GT550 ongoing money pit.
- Suzsmokeyallan
- Moto GP
- Posts: 4326
- Joined: Fri Oct 24, 2008 9:11 am
- Location: Mostly Barbados, sometimes Florida and western Canada
- Contact:
I tried to find some looking as good as that one you have there on ebay but that was a joke.
All the ones i found with decent glitter are scratched up on the raised parts so i had to use glass to level and sand them first then polish the raised portions after.
Once this was done then i could go about with the rest of the process you used.
All the ones i found with decent glitter are scratched up on the raised parts so i had to use glass to level and sand them first then polish the raised portions after.
Once this was done then i could go about with the rest of the process you used.
Two strokes, its just that simple.
69 Suz U70
69 Suz T500
72 Suz GT750 cafe
74 Suz TS250
74 Suz GTXVR project
75 Suz RE5
75 Suz GT750
76 Suz TS400
76 Suz GT750
81 Suz GSX1100
86 Suz RG500x2
88 Hon CR500
93 Hon CBR900RR
98 Suz GSF1200x3
15 Kaw Ninja H2
69 Suz U70
69 Suz T500
72 Suz GT750 cafe
74 Suz TS250
74 Suz GTXVR project
75 Suz RE5
75 Suz GT750
76 Suz TS400
76 Suz GT750
81 Suz GSX1100
86 Suz RG500x2
88 Hon CR500
93 Hon CBR900RR
98 Suz GSF1200x3
15 Kaw Ninja H2
- oldjapanesebikes
- Moto GP
- Posts: 3229
- Joined: Sat Feb 07, 2009 12:43 am
- Country: Canada
- Suzuki 2-Strokes: GT750(Jx3,L,M,A,B),T500
- Location: Ontario
- Contact:
Coyote - I was just re-reading this as I have a couple of badges that could use a little bit of freshening up - its a good 'how-to', and would work equally well on tank badges also. Thanks !
Like everyone else, I also have a few badges that are fine, other than the orange has flaked away in a few spots - has anyone found a good colour match for the orange glitter ?
Ian
If at first you don't succeed, just get a bigger hammer !