Digital Gear Indicator Replacement Very Inexpensive
Moderators: oldjapanesebikes, H2RICK, diamondj, Suzsmokeyallan
-
oldjapanesebikes

- Moto GP
- Posts: 3229
- Joined: Sat Feb 07, 2009 12:43 am
- Country: Canada
- Suzuki 2-Strokes: GT750(Jx3,L,M,A,B),T500
- Location: Ontario
- Contact:
Re: Digital Gear Indicator Replacement Very Inexpensive
Looks like our admins are on leave ? 
Ian
If at first you don't succeed, just get a bigger hammer !
If at first you don't succeed, just get a bigger hammer !
-
tz375

- Moto GP
- Posts: 6206
- Joined: Mon Nov 03, 2008 10:47 am
- Location: Illinois
Re: Digital Gear Indicator Replacement Very Inexpensive
I just grabbed one off ebay for 5.99 with free shipping. Thanks for pointing that one out.
-
Ebayru
- Around the block
- Posts: 67
- Joined: Sat Oct 02, 2010 7:08 am
- Country: USA
- Suzuki 2-Strokes: 74 GT550, 90 RZ350 (Canadian), 78 DT250
- Location: Asheville, North Carolina
Re: Digital Gear Indicator Replacement Very Inexpensive
tz375,
Let me know how it works out for you.
Did you see that I found out you don't need a voltage regulator? It works fine as it comes.
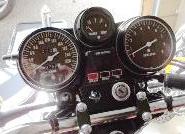
Another thing I would do differently is mount the gauge farther away from the exterior lens. I took great pains to get it as high as I could but suspect it might be better in bright sunlight if it were further down, like the original is. That way the sun wouldn't reflect off the face of the display which makes the unlit segments show and thus the gauge a little less readable in the direct sun. It isn't a big enough problem to change it on my bike, however.
Let me know how it works out for you.
Did you see that I found out you don't need a voltage regulator? It works fine as it comes.
Another thing I would do differently is mount the gauge farther away from the exterior lens. I took great pains to get it as high as I could but suspect it might be better in bright sunlight if it were further down, like the original is. That way the sun wouldn't reflect off the face of the display which makes the unlit segments show and thus the gauge a little less readable in the direct sun. It isn't a big enough problem to change it on my bike, however.
-
Coyote

- Moto GP
- Posts: 3404
- Joined: Tue Oct 21, 2008 2:41 pm
- Country: USA
- Suzuki 2-Strokes: GT550x2, GT750, GS1000
- Location: Tulsa, Oklahoma
Re: Digital Gear Indicator Replacement Very Inexpensive
Got mine today. Only 6 days shipping (including a Sunday) from China! How did you go about mounting this thing? There are no ledges, just a smooth rectangular box.
I was born with nothing and still have most of it left.
.
1978 GS1000C
1976 GT550 ongoing money pit.
.
1978 GS1000C
1976 GT550 ongoing money pit.
-
Ebayru
- Around the block
- Posts: 67
- Joined: Sat Oct 02, 2010 7:08 am
- Country: USA
- Suzuki 2-Strokes: 74 GT550, 90 RZ350 (Canadian), 78 DT250
- Location: Asheville, North Carolina
Re: Digital Gear Indicator Replacement Very Inexpensive
Coyote,
Sorry for the delayed reply, but I was on a cruise and didn't have Internet for a while. I see that you posted the day I left and I got home at 1:30 am today.
I made a bracket out of sheet metal with holes at the mount holes for the old gauge. It takes some cutting bending and drilling. I'm sorry I didn't take pictures during the fabrication, but it was a devise-as-I-went type project so I didn't know if it would be worth documenting when I did it. I drew an outline of the cross section of the gauge on the sheet metal which, as you know, made a rectangle. I then drew an "X" connecting the 4 corners and then cut the metal along the lines making 4 triangles with their bases being the outline of the rectangle. I then bent the triangles about 80% to make something like a spring washer/nut that are used for holding some of the emblems like the ones on the side covers. You can then push the gauge through the rectangle and the sheet metal triangles will grab the side of the gauge.
You'll have to play with it a bit until you are satisfied with the position of the gauge. As I said in a previous post, I wouldn't put it all the way up to the outside lens as I did; I'd keep it down a bit so direct sunlight won't interfere with readability. If you purchased the same one I did, you may have to trim the side of the gauge at the bottom where it hits the vertical section where the other indicator lights are located. Some of the other ones I saw on Ebay were shorter in height and those probably wouldn't need trimming. When I was happy with the positioning I used hot melt glue to lock everything in and on the bottom where the wires emerge from the unit because the wires used on the gauge are pretty fragile at the solder joints inside. I learned that the hard way and had to re-solder two of the wires. They come with some kind of hot melt-like glue at the bottom but it wasn't enough with all the manipulating I was doing while trying to figure out how I was going to install it.
I hope this is understandable. If not, ask me for further clarification.
Shel
-
SW550
- On the street
- Posts: 48
- Joined: Wed Oct 16, 2013 11:01 pm
- Country: USA
- Suzuki 2-Strokes: Past-72/75GT550,73GT750,77,78GS750/79 GS850.
- Location: Rio Rancho, NM
Re: Digital Gear Indicator Replacement Very Inexpensive
Thanks Ebayru,
Just ordered mine for $6.49 w/free shipping.
Just ordered mine for $6.49 w/free shipping.
1974 GT550
-
Ebayru
- Around the block
- Posts: 67
- Joined: Sat Oct 02, 2010 7:08 am
- Country: USA
- Suzuki 2-Strokes: 74 GT550, 90 RZ350 (Canadian), 78 DT250
- Location: Asheville, North Carolina
Re: Digital Gear Indicator Replacement Very Inexpensive
Good luck with it. FYI, it's been 3 years since I installed mine and it's still working perfectly.
-
Suzsmokeyallan
- Moto GP
- Posts: 4326
- Joined: Fri Oct 24, 2008 9:11 am
- Location: Mostly Barbados, sometimes Florida and western Canada
- Contact:
Re: Digital Gear Indicator Replacement Very Inexpensive
Its possible to reuse the oem bracket/mount the old digital display was in, doing so makes life easy.
Two strokes, its just that simple.
69 Suz U70
69 Suz T500
72 Suz GT750 cafe
74 Suz TS250
74 Suz GTXVR project
75 Suz RE5
75 Suz GT750
76 Suz TS400
76 Suz GT750
81 Suz GSX1100
86 Suz RG500x2
88 Hon CR500
93 Hon CBR900RR
98 Suz GSF1200x3
15 Kaw Ninja H2
69 Suz U70
69 Suz T500
72 Suz GT750 cafe
74 Suz TS250
74 Suz GTXVR project
75 Suz RE5
75 Suz GT750
76 Suz TS400
76 Suz GT750
81 Suz GSX1100
86 Suz RG500x2
88 Hon CR500
93 Hon CBR900RR
98 Suz GSF1200x3
15 Kaw Ninja H2
-
pearljam724
- AMA Superbike
- Posts: 1681
- Joined: Tue Jul 24, 2012 11:45 pm
- Country: U.S.
- Suzuki 2-Strokes: 75- GT 550 / 76- GT 750
- Location: SW PA
Re: Digital Gear Indicator Replacement Very Inexpensive
I want one of these. Nice post. Can someone share a link to the Ebay listing ?


-
Suzsmokeyallan
- Moto GP
- Posts: 4326
- Joined: Fri Oct 24, 2008 9:11 am
- Location: Mostly Barbados, sometimes Florida and western Canada
- Contact:
Re: Digital Gear Indicator Replacement Very Inexpensive
Here you go, this one also has a green "N" if you care to use that feature.
http://www.ebay.com/itm/320907030237?ss ... 1423.l2649" onclick="window.open(this.href);return false;
http://www.ebay.com/itm/320907030237?ss ... 1423.l2649" onclick="window.open(this.href);return false;
Two strokes, its just that simple.
69 Suz U70
69 Suz T500
72 Suz GT750 cafe
74 Suz TS250
74 Suz GTXVR project
75 Suz RE5
75 Suz GT750
76 Suz TS400
76 Suz GT750
81 Suz GSX1100
86 Suz RG500x2
88 Hon CR500
93 Hon CBR900RR
98 Suz GSF1200x3
15 Kaw Ninja H2
69 Suz U70
69 Suz T500
72 Suz GT750 cafe
74 Suz TS250
74 Suz GTXVR project
75 Suz RE5
75 Suz GT750
76 Suz TS400
76 Suz GT750
81 Suz GSX1100
86 Suz RG500x2
88 Hon CR500
93 Hon CBR900RR
98 Suz GSF1200x3
15 Kaw Ninja H2
-
pearljam724
- AMA Superbike
- Posts: 1681
- Joined: Tue Jul 24, 2012 11:45 pm
- Country: U.S.
- Suzuki 2-Strokes: 75- GT 550 / 76- GT 750
- Location: SW PA
Re: Digital Gear Indicator Replacement Very Inexpensive
Suzsmokeyallan wrote:Here you go, this one also has a green "N" if you care to use that feature.
http://www.ebay.com/itm/320907030237?ss ... 1423.l2649" onclick="window.open(this.href);return false;" onclick="window.open(this.href);return false;
-
Ebayru
- Around the block
- Posts: 67
- Joined: Sat Oct 02, 2010 7:08 am
- Country: USA
- Suzuki 2-Strokes: 74 GT550, 90 RZ350 (Canadian), 78 DT250
- Location: Asheville, North Carolina
Re: Digital Gear Indicator Replacement Very Inexpensive
When I did my installation, I was afraid to hook up the neutral wire to the display because I was worried that the upper range of the generated regulated voltage might blow elements of the display. I have a voltmeter on my GT and right after starting the voltage is at the upper end of the range and some LEDs will blow from over voltage. My fear may be unfounded for these units, but I decided to take the cautious route since I really dislike "do overs".
-
pull the wire
- On the main road
- Posts: 105
- Joined: Mon Oct 21, 2013 10:04 pm
- Country: united states
- Suzuki 2-Strokes: 73GT750 75GT750 84RZ350 89 FXRS-CONV
- Location: Phoenix, AZ
Re: Digital Gear Indicator Replacement Very Inexpensive
Mine came in the mail last week. Mine still works but at least I have a great back up
Thanks for the great advice!
Thanks for the great advice!
You gotta pull the wire to go fast
-
H2RICK
- AMA Superbike
- Posts: 1659
- Joined: Sun Oct 19, 2008 11:07 am
- Country: CANADA
- Suzuki 2-Strokes: GT550A, GSF1200SK6 currently
- Location: Cowtown aka Calgary, Canada
Re: Digital Gear Indicator Replacement Very Inexpensive
Pull the wire......Do you go out to the old bike nights up at the Pavilions in Scottsdale on Saturday evenings ?? I ask because we are now spending our winters in Mesa and I'll be bringing my 550 along with me this winter and would like to meet more old bike guys in the metro Phoenix area.
GT550A Mint & Original
H2A Semi-Hot Rod Built From A Basket Case
KZ650C2 Mint & Original...mostly
GSF1200SK6 Bandit...My LD Ride
Additional H2 projects In Boxes.....
MBD Sufferer
H2A Semi-Hot Rod Built From A Basket Case
KZ650C2 Mint & Original...mostly
GSF1200SK6 Bandit...My LD Ride
Additional H2 projects In Boxes.....
MBD Sufferer
-
philshort
- Still in the Driveway
- Posts: 3
- Joined: Sun Jun 01, 2014 2:58 pm
- Country: UK
- Suzuki 2-Strokes: GT125EC GT250B GT750 S&L GSX750F GSXR750F
Re: Digital Gear Indicator Replacement Very Inexpensive
I just replicated this, not realising it had already been done.
I got a digital indicator with the N. Rather than use brackets I used a hot air gun to melt the original indicator unit off its mounting. I used a heath robinson affair with 3 small cable ties to hold the indicator into roughly the right position, then fine tuned it by putting the cover back over and checking the position. Once happy with it I smeared black silicone sealant into the gaps between the indicator unit (which is not much more than 1cm square) and the old metal mounting, and made a black silicone cone shape very simiar to the rubber porthole thingy that sat over the original. Once set the silicone holds the indicator firmly in position, and has waterproofed the connections at the same time.
I actually found this thread because I was searching for an answer to my next problem - which colour wire corresponds to which gear?
Incidentally, if you wanted to use the N you would need to run a wire from the Neutral bulb, but if you have a B don't bother - on the indicator unit I have the digits are lit in red but the N comes up in green, and on the B model the mauve colour plastic window renders the green N all but completely invisible.
