tz375 wrote:Take the starter clutch and as Dave said, dump the contents, then machine it down so that all that's left are three mounting tabs and the hub.
Drill the living daylights out of the gear and bolt what's left of those two pieces together.
The one I modified, dropped just over 600 grams on just that part. That's a pound of steel you don't need to carry.
It took me a minute to recognize the starter clutch housing. Looks great and in the words of the Republican Party, I will "Drill Baby Drill" Did I say that out loud...
I think I also need to remove the Breaker Cam Shaft Bearings and block off the opening so I dont flood the break cam housing.
Thank guys. The pictures help a lot. I'll get started on this.
(and of course the entire breaker cam shaft assembly due to the MSD modification)
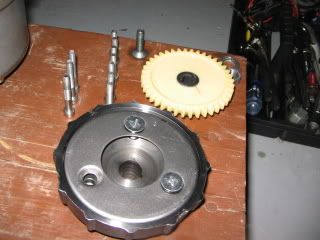
To reduce weight, I modify the following:
3. Starter clutch housing (turned in lather, milled and drilled)
4. Water pump driven gear (turned in lathe and drilled)
Then replace the 3 stock Screw with shorter screws. (Countersink I'm assuming but I dont see counter sink holes in the image above).
Retain the starter clutch housing keyway and use the stock crankshaft nut and lock washer.
Then, remove the two breaker cam bearings from the main housing. I suspect, the easier thing to do is to block the path of the bearing lubricating oil from entering the housing. I'm just not sure yet where the bearing lubricating oil is enterning from but it should become obvious once I remove the main (starter clutch/cam breaker) housing.
With ignition on the right side, you can throw out:
- Points plate
- Drive shaft
- Bearings
- Points cam
You will have to block off the drain hole to the crankcase bottom if I remember correctly, but that's all.
Lightening:
It's hard to remember what I did, but I think I removed the three countersunk screws, threw out the needle rollers and the starter drive gear and the three springs and clutch rollers, and the inner piece plus that pressed tin cover.
Then I milled and drilled the gear, but it could also be thinned as well. The clutch outer was machined down to leave just the three legs.
I used cap head screws. There's nothing behind it now so there's room. And you could get away with Aluminum screws which saves even more precious grams. They are stronger than the nylon gear that they are driving.
You could also move the gear inboard and reverse the plastic waterpump gear.
Or dump the water pump and all of the above parts and run it dry or get a Davis Craig electric boost pump. It's a small electric water pump - it uses very little electric power and weighs less than all the above parts.
A Davis Craig pump would cost about the same as all that machining if you had to pay for it, so think about that as a possible upgrade. Plus it's on a thermoswitch so the chances are it will only kick in on the return run.
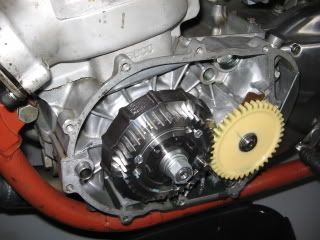
I got curious and went out to the garage to see what I had behind the housing.
Good thing I did. It looks like I had already removed the starter clutch guts and starter clutch gear and put the whole thing back together. Remember, its been over 15 years since I reassembled this engine and my memory is not as good as it was.
The starter clutch housing screws all began to back out. One completely but it looks like it rubbed on the crank seal a bit. Hopefully the seal is ok. I dont want to split the cases.
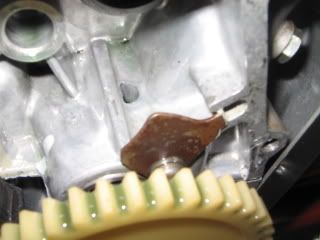
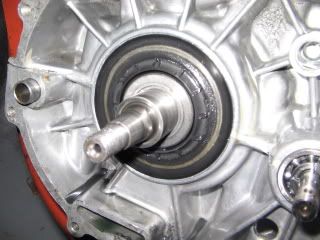
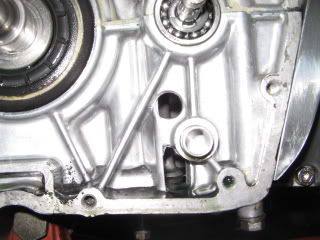
In the second image, you can see a lubrication hole just behind the waterpump gear and the last image shows the interconnection between the crankcase. I guess it works on a splash bath principle to lube the breaker cam bearings. It might be easiest to plug the hole after the bearings are removed...
So...it looks like some lathe and drilling work and some shorter replacement screws with a little Locktite this time around.
Last edited by water cooled on Thu Nov 13, 2008 1:21 pm, edited 2 times in total.
The countersunk screws will come loose if there's no inner part to pull down tight against. All you have to do with the outer case it block off the drain hole and drill a new one one through to that hole you pointed out, so any oil that comes through the bearing/seal/shaft hole will drain back to the transmission.
I have no idea what I was thinking when I put the starter clutch back together...I know better than to assemble parts that way. I can only say that I should have done a more thorough inspection of the engine instead of assuming I did everything correctly so many moons ago.
Now then, I had a little trouble fully understanding your description to deal with the removal of the breaker cam shaft, which opens a (large) flow path into the breaker cam housing for oil to leak.
Oil still needs to lubricate the water pump bearing which I think is the hole in image #2. If both breaker cam shaft bearings are removed, wouldnt an aluminum plug work if it was pressed in place of the smaller bearing and then retained with the stock keeper? \I'm not sure if there is a source for aluminum plugs but it would seem common enough? if not, then I could fab one up to the outside dimensions of the small bearing and press fit in place. Thoughts...
Thats a considerable amount of weight...not just weight but inertial loads acting on the shaft when the engine is trying to increase rpms quickly.
I have a question though. Lightening (or getting rid of) these components would have a bigger impact on a GP machine but for drag racing, it appears that my RPM range is probably going to end up around 65-6800 at launch and roughly 8700-9000 down the track. Once I have an air shifter on the bike, I dont think RPMs will drop as much as they are now by foot shifting. So lightening would always seem like the right thing to do for me but would the net effect be less for drag racing than GP racing?
BTW, is appears from the discoloration of the driver gear that the pin was press fit at a higher temp. Can it just be pressed out or do I need to heat the gear up before pressing it out. Looks like you did this already on yours.