'It can't be that long since I posted an update on my bike.... oh what, December?! Oops' That's pretty much what just went though my mind. So casting my mind back to where we left off...
Having decided that my first attempt at the exhausts were going to cause ground clearance issues, I was looking into running the pipes under the bike, and reducing the diameter of the belly section down a little. This seemed to be a good idea, but as I was continuing to work on the idea I realised that running the pipes under the bike was going to be more complex than I realised, it was going to cause some complication with the chain run and it was going to be messy and awkward to make it work with the side stand. I also took a step back and thought about how I want to use this bike and my riding ability, it will be a bike for Sunday rides on the road and I'm no racer.
With that in mind I went back to the idea of pipes running up the side of the bike, similar to the stock location. Sticking with the smaller diameter belly section I had planned to use for the under bike pipes, I found I'd picked up a good amount of ground clearance, should get the pegs down just marginally before pipes, which will be plenty far enough for me! haha.


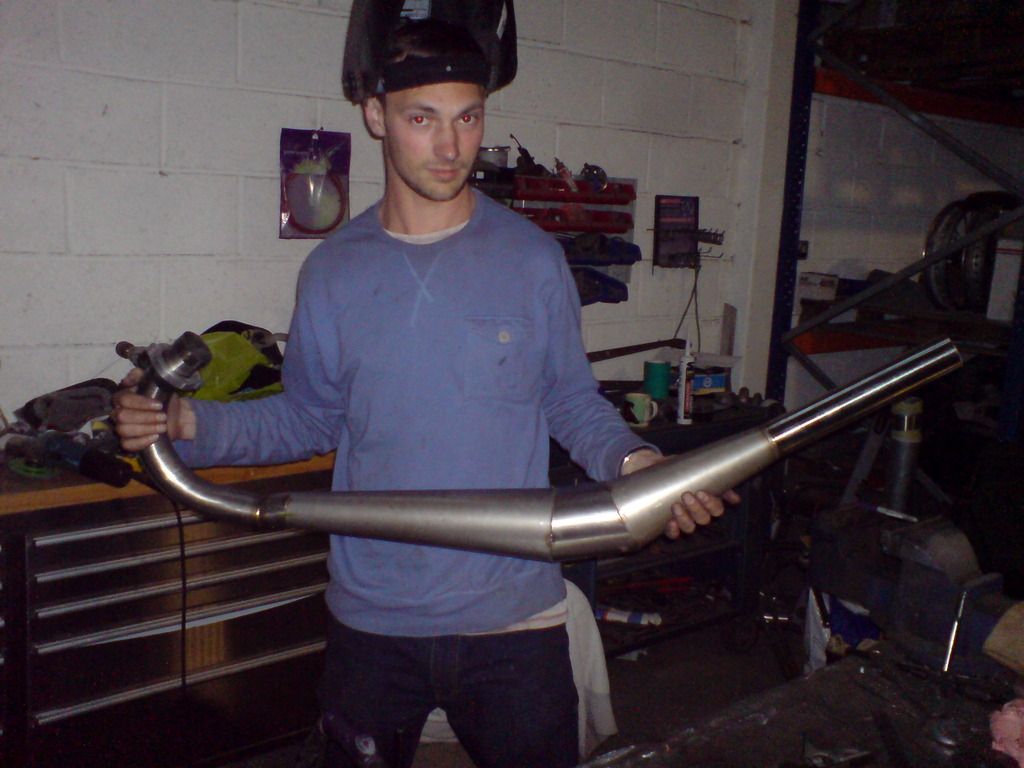
You can also see there my home made silencers. The only silencers I could find on the shelf seemed to have quite small diameter inlets, aimed at 125cc cylinders I would presume, so I made some! Thankfully it's nice an easy in the modern world of internet and eBay to get hold of the various different diameters of tube needed and they aren't complex to make.
Now that I was happy with the design, I seam welded the pipes up properly and then dressed the welds down.


After this I got distracted for a while, by the excitement of taking my ‘modern’ (It’s only 26 years old) bike on a track day for the first time.

With that distraction out of the way, next up was to take a deep breath and then get stuck into the T500 engine. First step was to give the cases a clean up.

On the whole they looked in reasonable condition. They do show some scars from what I would guess is plenty of bits of smashed piston floating about inside the engine, but I dressed any sharp edges down and I think it’ll be fine. I also had to replace one of the locating pins for the gearbox output shaft bearing, as it looks like someone had tightened the cases down with the bearing not over the pin at some stage and mangled it.
Next up was to look at the crank. I measured the clearances and satisfied myself that all that was needed for now was to replace the seals. With that in mind I just separated the centre section, and left the big ends assembles. It came apart without too much drama.

My new crank seals were going to be 3 weeks in the post from Suzuki, so in the mean time it was time to look at the top end. First up I checked the heads for flatness. Bearing in mind that the engine came to me with some stripped threads in the head bolts and a improvised head gasket made from cork gasket material, I figured the heads had not been carefully torqued in the right pattern…. Unsurprisingly the head were quite a way off flat.
I used the old sandpaper on a sheet of glass technique to get a nice clean flat surface on the heads.

Onto the barrels, and once I’d helicoiled the damaged threads and given them a general clean up, it was time to look at the exhaust ports. Back in the winter before I built my pipes I’d settled on the idea that I’d like to do change the exhaust port timing. From the books I’ve read, the intake and transfer ports dimensions suggest the engine making max power around 6,500-7,000 RPM, but the exhaust port seems to be much more conservative than that. This theory seems to be matched by the specs available online for what the TR500 porting was like, where the exhaust port is lifted by a huge amount and comparatively small changes are made to the transfers and intake.
With this in mind, knowing I wasn’t going to be running a lightened/balanced crank and that I wanted a bike with not unreasonable street manners, I decided to keep my intake and transfers stock (which are tuned to 6,500-7,000 RPM) and raise the exhaust port by 3mm to bring it up to a height where it should also be tuned for around 7,000 RPM. Here it is marked out.

And then ground it out. I’ve never done any 2 stroke porting before, but I have done port matching of intake manifold and some minor head porting in car engines before, so I didn’t feel too far out of my depth. I have to say, the nature of working on a 2 stroke cylinder was quite awkward compared, it much be even worse working on something with a smaller bore! Here’s a photo after I’d done the rough shaping and before I did a bit more tidying up and smoothing.

As you can see I had accidentally caught the bore in one spot. I wasn’t too worried though, as I knew that the next step was to send the barrels off to be bored out to second oversize to remove some scoring from the previous piston damage this engine had clearly suffered.

I’ve gone with GT750 pistons, I’d read they are lighter and stronger than the T500 pistons and also aftermarket GT750 pistons are available for very reasonable prices. When I came to assemble the engine I found one issue I’d not seen mentioned anywhere else on the internet, that is that the GT750 pistons have a wider space for the little end bearing, and the GT750 uses little end thrust washers, whereas the T500 pistons don’t use any thrust washers. I purchased some thrust washers to take the side clearance down to match the original T500 space.
It was a busy few weeks waiting for the seals and the next thing on my list was to look at the carbs, obviously with plenty of cups of coffee to help the process.

Jetting wise, I’ve made the best guess I can, and will obviously have to make changes once I can get the bike out on the road. Reading around on the forum I’m seeing that for pod filters and expansion chambers there seems a general suggestion that going up from the stock 30 to a 35 pilot is probably a good move, and for the later carbs going up from the 97.5 main jet to a 115/120 main jet. As my carbs are the earlier type with a 150 main jet, I did a little calculation of the change in area of the jet and think that a 180-182.5 main jet will be roughly the same rise in flow.
Next up I gave the engine covers a quick lick of paint.

Finally the new crank seals arrived


So with the loan of a friends press for a few minutes to press the crank back together I was able to set about truing it and then assembling the bottom end and gearbox.


Pictures are a bit scarce as, like my poor updates to this thread, it had slipped my mind as I was rushing head long towards being able to actually start the bike!
It didn’t take long to get the top end on (aside from waiting for some thrust washing in the post for a day or two) and then the oil pump and carbs on.

I set the ignition timing to 3.1mm, a little less than the stock 3.4mm, bearing in mind that my engine is now in a bit higher state of tune. I’ll keep a close eye on it once I get on the road, as I’m aware my heads probably really need converting to a squish type to match the rest of my modifications. In the short term I figure I can back the ignition timing down further if needs be to keep knock at bay.

The only thing left really was to play with the electrics. I splashed out a little and bought myself a modern digital rev counter and speedo. I like the fact that on first impressions it’s just a simple rev counter, but theres a small digital speedo in there along with the neutral, headlight and indicator lights and a volt meter.

This resulted in many many wires to be messing with!

It wasn’t too bad though, points and carbs, rather than fuel injection as I’ve worked with on cars, rather simplifies the wiring!
With that sorted it’s basically a complete bike! (Excuse the wiring behind the headlight in these pictures which still needed tidying up and shortening)


And so it was time to kick it over and see what happens! As usual it never goes quite a smoothly as it might seem reading one of these build threads, I had a couple of days of chasing up all those little problems which I didn’t spot previously, for example putting fuel in the tank for the first time and finding the fuel tap leaks, or spending a good few minutes kicking the bike over before realising that the plug leads are on the wrong way round… But after much swearing and grumbling at myself it fired up and ran pretty well.
https://youtu.be/Smnkc1RZ00Y
First impressions are that I’m really pleased with how its running, while it’s idling and revving ok, I’m sure there’s jetting improvements to be made, more importantly to me it sounds pretty smooth, no nasty noises from my crank rebuild or anything. The oil lines bled up fine and don’t appear to be getting any fresh bubbles in which is useful.
I took it down for an MOT, which it passed with just an advisory for the loud exhausts! haha. And I’ve sent the paperwork off to get it registered in the UK, so just waiting for that to come back and I can take it for a proper ride.
Prior to this the oldest bike I’ve ridden has been my old 1989 RGV250, which was still light years ahead of this in technology, so from the first short ride down to the MOT place I wasn’t sure of what expect. It was great though, considering I was keeping the engine revs low while it runs in, and only giving it a little throttle, it was shocked at how fast it seems, can’t wait to get it on the pipe and really set it free! The whole bike felt so raw and exciting to ride, I really enjoyed it. Riding at 25 MPH down some residential roads has never been so exhilarating! hahaha.
 [*]
[*] [*]
[*]


