imquattro is a really good guy. I computed with him a lot during and after the build. It's been a little over a year since I heard from him last. Last time he contacted me it was questions about eliminating the SRIS system. Provided the project with some spares I had on hand during the build (carb jets) and some other stuff.
Are you out there Nate?
GT550 Cafe project
Moderators: oldjapanesebikes, H2RICK, diamondj, Suzsmokeyallan
-
Coyote

- Moto GP
- Posts: 3404
- Joined: Tue Oct 21, 2008 2:41 pm
- Country: USA
- Suzuki 2-Strokes: GT550x2, GT750, GS1000
- Location: Tulsa, Oklahoma
Re: GT550 Cafe project
I was born with nothing and still have most of it left.
.
1978 GS1000C
1976 GT550 ongoing money pit.
.
1978 GS1000C
1976 GT550 ongoing money pit.
-
imquattro
- To the on ramp
- Posts: 239
- Joined: Tue Jul 19, 2011 9:26 pm
- Country: USA
- Suzuki 2-Strokes: 72/74 GT550
- Location: Muncy PA
Re: GT550 Cafe project
Hey, I'm here. Just busy with life. Thanks for the props on the bike build. I did eliminate the SRIS system (just replaced the check valves with plugs and sealed the nipples in the intake) smoked a bit more upon startup but no other issues).
I've since sold the bike to a fellow enthusiast who was looking for a unique bike.
Neat to hear someone else ride your bike and see/hear what you're like tooling down the street.
Sad to see it go but I only rode it once this last summer (only to get it inspected) and needed the cash.
It sure was an experience which would have been quite difficult without Chris's help and the others on this forum.
Best wishes to you all!
Btw, I still have a couple sets of new white faced tach/speedo gauge decals that'll fit the GT550/380/500 gauges (I think they're all nearly the same and I have them for both the older and newer style gt550 gauges)
$10 a set shipped
-
tonyb
- On the street
- Posts: 43
- Joined: Wed Feb 05, 2014 2:00 pm
- Country: USA
- Suzuki 2-Strokes: T500, YZ250
Re: GT550 Cafe project
Thanks for the awesome read!!!
-
Coyote
- Moto GP
- Posts: 3404
- Joined: Tue Oct 21, 2008 2:41 pm
- Country: USA
- Suzuki 2-Strokes: GT550x2, GT750, GS1000
- Location: Tulsa, Oklahoma
Re: GT550 Cafe project
Possibly the longest thread ever on this forum, I would love to meet the man. I did try to pitch in all I could.
I was born with nothing and still have most of it left.
.
1978 GS1000C
1976 GT550 ongoing money pit.
.
1978 GS1000C
1976 GT550 ongoing money pit.
-
imquattro
- To the on ramp
- Posts: 239
- Joined: Tue Jul 19, 2011 9:26 pm
- Country: USA
- Suzuki 2-Strokes: 72/74 GT550
- Location: Muncy PA
Re: GT550 Cafe project
Thanks for the kind words.
It was a lot of fun that I really miss.
I'm curious to know how the current owner of the bike is enjoying it, what's lasted and what's needed replaced and reworked.
Ironically, about a month ago, two GT550's appeared in our local scrap yard. Ones a '72, the other is a 73.
Both in VERY rough condition, but it made me revisit mentally and physically the build of mine.
I have tabs on a GS1100E down the street that's been parked for much of its life... Who knows how that will end up...

Ps, thanks Coyote (and others) for all the help and encouragement -priceless.
It was a lot of fun that I really miss.
I'm curious to know how the current owner of the bike is enjoying it, what's lasted and what's needed replaced and reworked.
Ironically, about a month ago, two GT550's appeared in our local scrap yard. Ones a '72, the other is a 73.
Both in VERY rough condition, but it made me revisit mentally and physically the build of mine.
I have tabs on a GS1100E down the street that's been parked for much of its life... Who knows how that will end up...
Ps, thanks Coyote (and others) for all the help and encouragement -priceless.
-
imquattro
- To the on ramp
- Posts: 239
- Joined: Tue Jul 19, 2011 9:26 pm
- Country: USA
- Suzuki 2-Strokes: 72/74 GT550
- Location: Muncy PA
Re: GT550 Cafe project
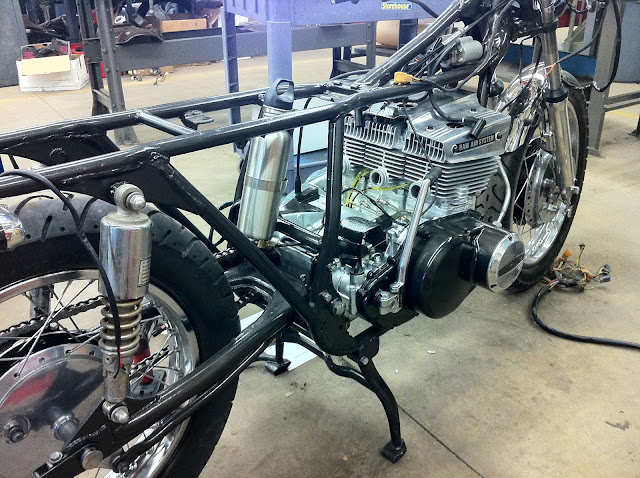
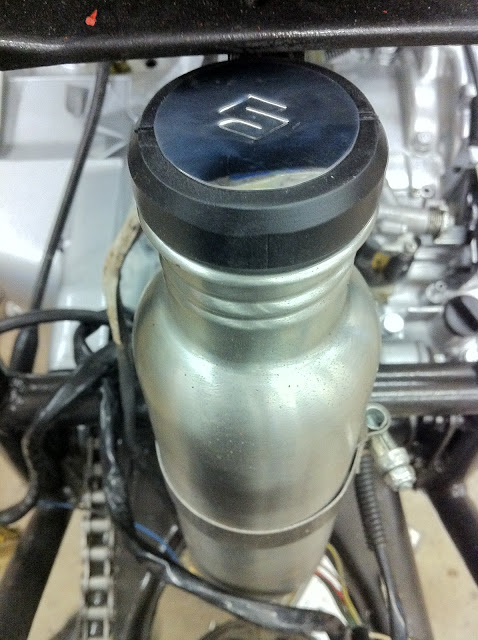
imquattro wrote:A while back, we created an oil tank from a stainless drink bottle and mounted it on a brace behind the engine:
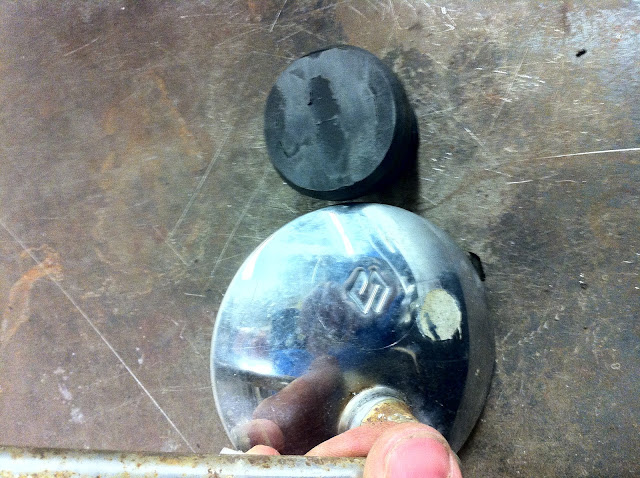
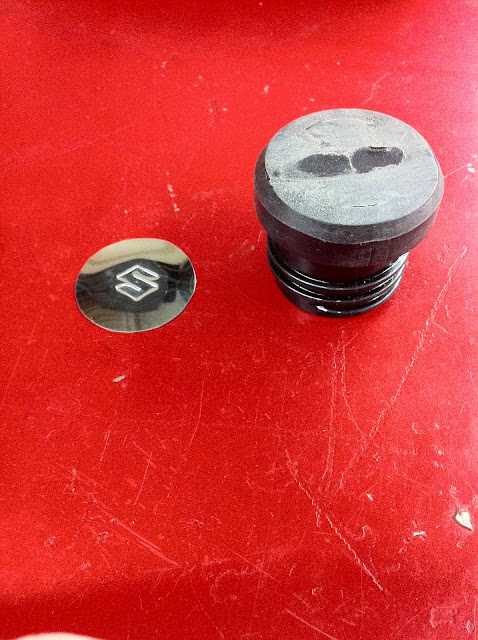
Well, the cap had a loop on the top that 1) interferred w/ any seat pan that'd be made, 2) Didn't breathe or allow air into the tank (and allow oil out respectively) & 3) looked like a drink bottle cap.
So we took the cap over to the belt sander and removed the loop. When doing, so, we found the casting of the plastic was such that there were holes in the portion removed. Yes, it allowed air into the tank, but it also didn't look that great.
So I was thinking.... needs some sort of emblem for the top, 1) to cover the holes visually, and 2.)make it look better:
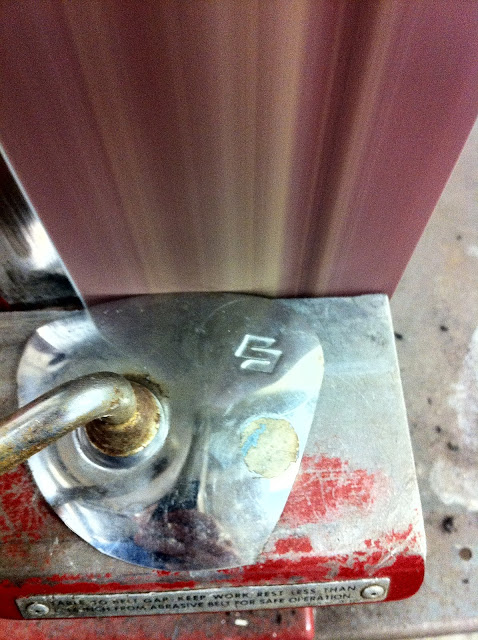
I began looking around through the extra parts I had from the project and saw the "S" Suzuki symbol on the mirror.
I thought, if I could just cut that out, it just might make a perfect fix!
So back to the sander it went:
I had measured the desired size circle that would fit on the cap, found the center of the "S" and using that made circle around the "S" to cut to.
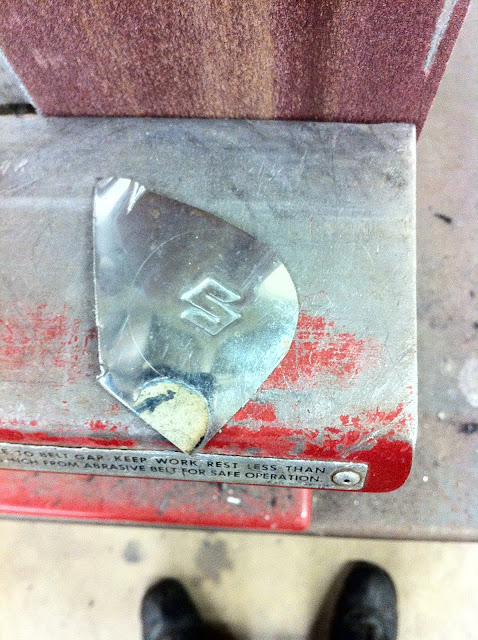
The "S" removed from the mirror assembly:
In order to allow air to enter into the container (and allow oil out), a drilled in the center of the cap.
Then a hacksaw blade was used to slot the cap over the hole, so when the emblem was attached, air could travel down the slot, to the hole, under the cap.
Here it is finished:
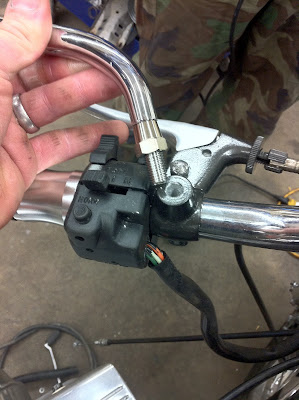
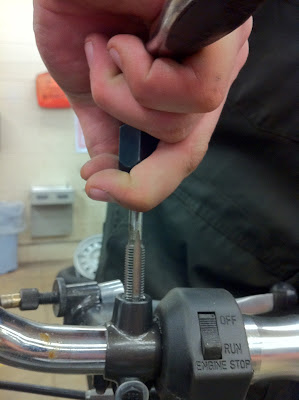
Mirrors were purchased and installed (students had to drill & tap grips out from 8mm x 1.25 to 10mm x 1.25 -practical application of drill/tap chart and application of skills to correctly complete)
Here's a quick couple shots of that starting with a picture taken after one step (of two) drill bits sizes:
Tapping out to 10mm x 1.25:
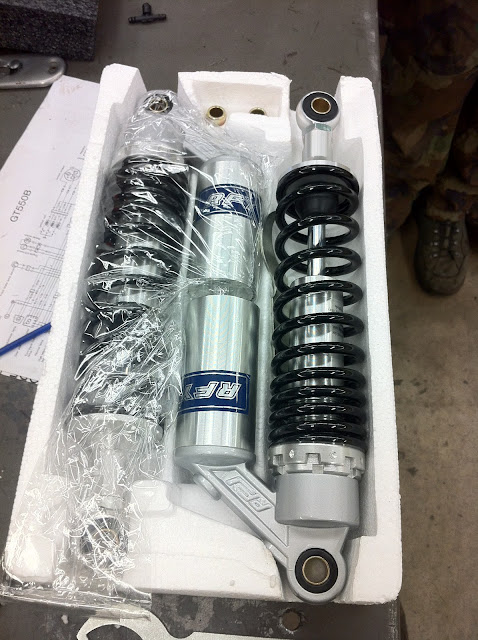
The shocks that were on the "to get" list were also purchased.
While the original ones are in decent shape, they are corroded and too hard to clean/polish without taking them apart (don't know how they come apart). So they're back in storage:
Last I posted, I was exploring the possibility of making a seat bump/tail from a set of old hard side bags that came with the '72. I had cut them down and even gone to fiber glassing the pieces together but the result didn't flow with the shape of the tank & frame, so it was set aside. I had originally thought I was going to have to mold and glass a seat & bump and was hoping to get around that, but oh well. :O)
I have looked through a LOT of DIY pages on making tails/seats:
For instance: http://www.cafematty.com/making-a-cafe-racer-seat/ and will be doing such.
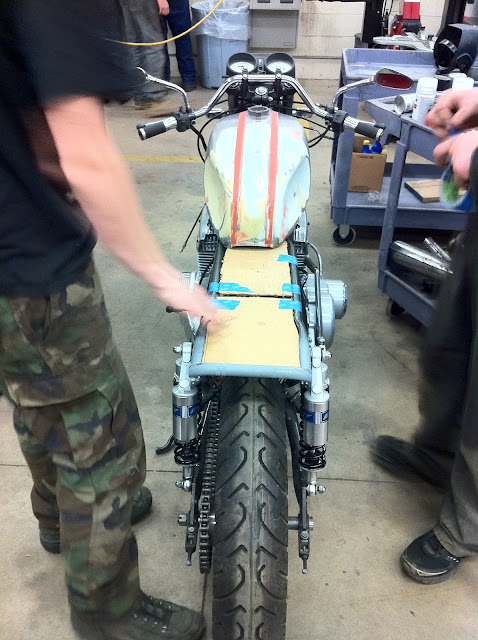
Here the kids are getting the frame ready to start making the tail section.
Couple things you may note from this picture:
New shocks are on
Tank is still not done (and only laying on frame (not straight either))
Installed mirrors
Still using the OE handlebars, upside down & backwards. Deal with it.
Seat/tail creation his week & these:
Whatcha think they are???
(I took the measurements from this site (http://www.caferacer.net/forum/topic.asp?TOPIC_ID=16266) and adapted them to 20ga, fed the measurements into this program: Pulse Rate's "Cone Layout" (http://www.pulserate.com/index.php?content=product" onclick="window.open(this.href);return false;" onclick="window.open(this.href);return false;" onclick="window.open(this.href);return false;" onclick="window.open(this.href);return false;). Which prints them out across 1-4 pieces of paper, which then were aligned together, cut out, and traced onto the sheet metal. Which will then be cut out, rolled on a slip roller & welded (by yours truly), then most likely cut apart, angled/clocked to fit the bike, rewelded, and installed.
(The down pipes from the OE setup will be used and 2" OD pipe tail sections (from a 10' stick at NAPA for $23 -cant go wrong with that price!) rather than rolling 2"x13" tubes from the sheet metal. The sheet metal was only $10.
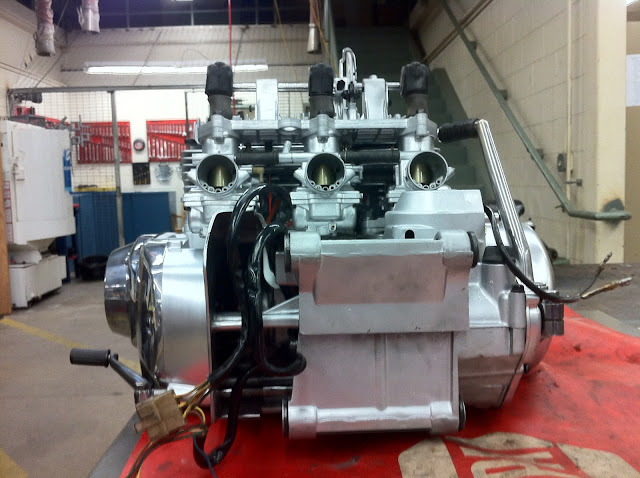
The carbs were rejetted by my Russian (+2 on the main jets, +1 on the pilots) (thanks Coyote!)(+2 on the pilots available if needed).


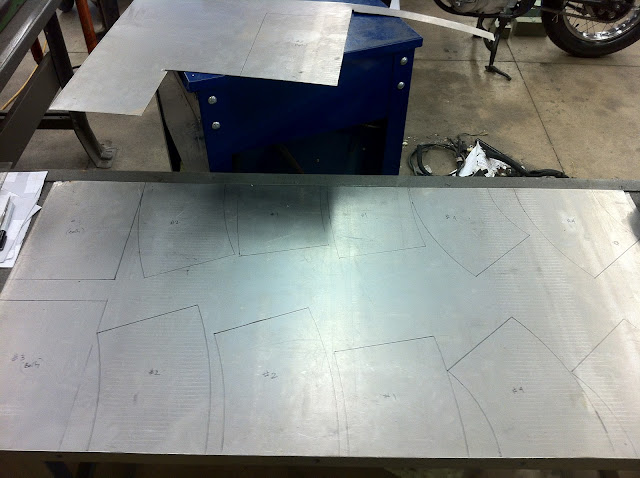

The link to the dimensions is in here ^^^^^
-
ukfan4sure
- On the street
- Posts: 35
- Joined: Mon Oct 12, 2015 12:53 pm
- Country: USA
- Suzuki 2-Strokes: 1973 GT550
Re: It been a while... and things HAVE slowed down but...
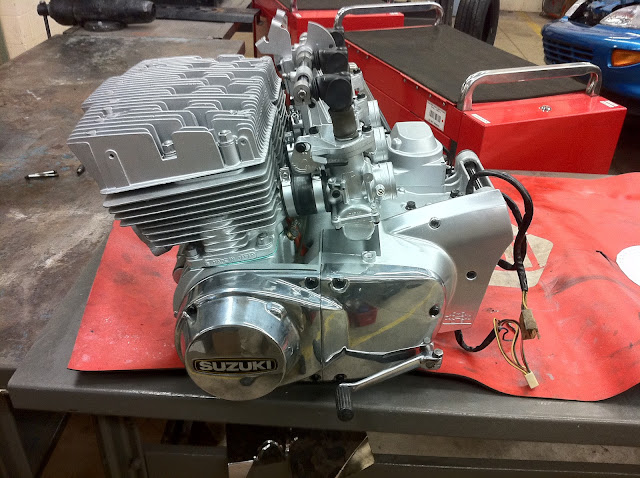
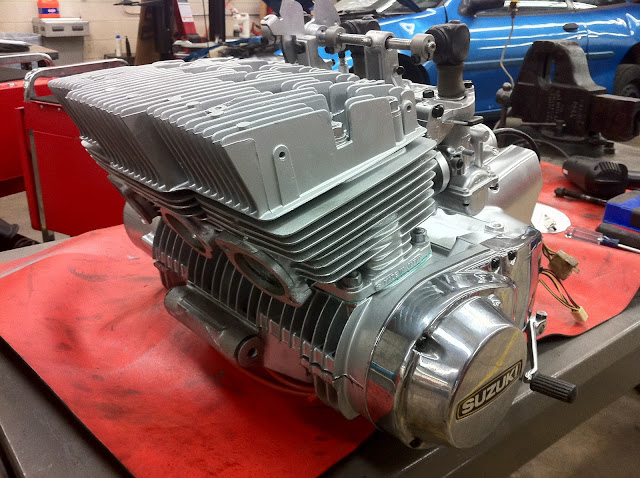
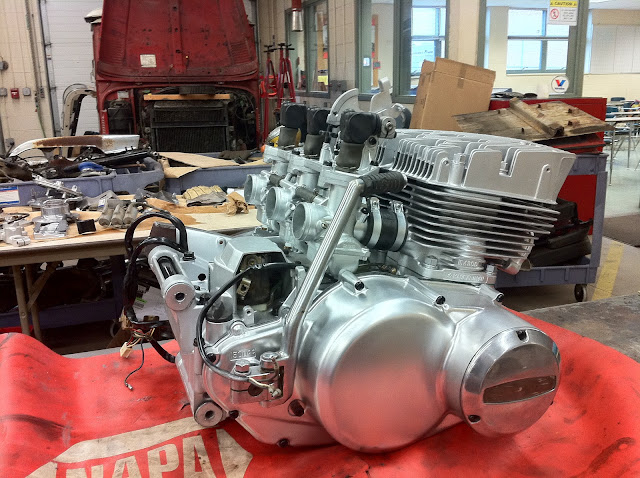
I am noting the cases are painted silver as opposed to polished (or brushed) aluminum. Is this the original finish on this engine? I noted mine were painted but questioned it's originality.imquattro wrote:I was able to get the motor assembled.
After working a bit at truing the wheels I re-laced, I found a local guy who could do them both for $40.$40?! Um, let me think about that..... DONE!
Just picked them up tonight. Look nice.
Picts tomorrow.


Thanks.
-
imquattro
- To the on ramp
- Posts: 239
- Joined: Tue Jul 19, 2011 9:26 pm
- Country: USA
- Suzuki 2-Strokes: 72/74 GT550
- Location: Muncy PA
Re: GT550 Cafe project
Originally only some sort of sealer over clean metal I believe.
-
tz375

- Moto GP
- Posts: 6204
- Joined: Mon Nov 03, 2008 10:47 am
- Location: Illinois
Re: GT550 Cafe project
Upper case half is usually painted silver at the factory and the lower case left bare. Polished cases are coated in clear coat
-
dude99
- Around the block
- Posts: 94
- Joined: Wed Mar 23, 2016 12:53 pm
- Country: Canada
- Suzuki 2-Strokes: GT750
- Location: Just outside of Vancouver BC
Re: GT550 Cafe project
Great read, and a fantastic result to your project here... Gives me hope that I might be able to complete mine on a semi reasonable budget.
Bikes:
1975? GT750 project -the reason I'm here
1978 GS750 -my current ride
1982 GS(X)400 -sold
1981 RD350LC -sold and missed
1979 Honda CB400 hawk -sold and not missed, horrible bike
1975? GT750 project -the reason I'm here
1978 GS750 -my current ride
1982 GS(X)400 -sold
1981 RD350LC -sold and missed
1979 Honda CB400 hawk -sold and not missed, horrible bike
