Just got these in a parts lot I bought off ebay. From a 1975 GT380. Looks like I have my work cut out for me, but I have been successful in the past.
I'll re-post when I get one done so you can see 'before and after'.
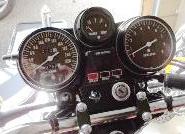
I tested both gages to be sure they worked before putting forth any effort.
Both worked OK so I started with the speedo. Steps were 400 grit, then 600, then 1000, then 1500, and finally 2000 grit followed by plexiglass polish and scratch remover. The whole ordeal took about 45 minutes.
I got it clear alright as you can see. However, these will never be acceptable without a total lens replacement. These lenses are a miriad of a zillion cracks as can be seen in pic #2. Yep, that's the same polished out gage as seen in pic #1.
Looks like you have a bit of work in front of you there Coyote and thanks for posting the pics.
Thats a form of crazing, basically the lens is falling apart due to the materials age and the UV degrading it. Back in those days i dont think the stabilizers were either that good or even there at all.
The buffalo lenses in the 72 plastic gauges can also get a similiar thing in spots on them but its not even near as bad as that.
A glass retrofit is in order with the ritual of cutting away the lens and placing a riser under it to gain needle clearance..
FWIW The lenses on the 73 Buffalo gauges were convex glass, but by 74 and on they switched to flat glass.
Im not sure why they used the convex in the 73 units only, just another one of those things it would seem.
Well, now the the gages are out of the cans, I am free to do what I want. I'm not sure what that is yet. I would like to have the plastic machined out and replace the lens with glass. They don't need to be domed as there is gobs of clearance.
I replaced the lenses on RedZone with Lexan. I won't do that again. They scratch too easily.
So here's the plan. Saturday I took the gage cans to the shop where I used to work. There will be a sacrificial ring made and inserted in the open end. This way it can be chucked without damaging or distorting. It will be indicated square on the white surface adjacent to the lens. Then we will touch off that face and remove one eighth of an inch.
Then all I need to do is have some 1/8" glass cut to fit over the faced off end and glue it on.
My (now Dofin's) GT500 gauges were spider-cracked like those, but I polished them out well enough to see the needles (as you have), and I guess they are still as I left them.
Lane
If you stroke it more than twice; you're playing with it.
Too many bikes, too much time, ENOUGH SPACE, FINALLY! Never enough money.........
I gotta get around to doing this with my 550 lenses. Two years ago I polished the speedo good enough so I could read the numbers, didn't even worry about doing that much to the tach. Started riding it and never did around to finishing the job. :^)
Kevin
Everything Commeth
To He Who Waiteth
So Long As He Who Waiteth
Worketh Like Hell While He Waiteth
REPLACING THE PLASTIC GAUGE LENSES ON THE SUZUKI GT MODELS by Len Klajda
I didn't take any short cuts to this project, because I wanted it air and water tight when I was done, and I wanted it to look like a factory job. I was also concerned that, if I smashed out the old lenses without removing the gauge mechanisms, I might screw 'em up, and I was NOT into spending $250.00 for new ones.
I removed the gauge housings from the cowl. The mechanisms are melted into the PVC case, so chip off the plastic holding it in with an Exacto, all around the base.. just the melted stuff holding the metal in. Work carefully, as these PVC housings are pretty breakable. More on that in a sec....
The speedo has some tricks to it. The trip odometer has a rubber boot which you need to carefully work loose, otherwise it will tear (Good luck trying to find that replacement.) Removing the speedo mechanism is also like a Chinese puzzle. After working at it for 5 minutes and getting frustrated, cussing and swearing and just knowing that they had to get it in there SOMEHOW, I tipped it sideways and it practically fell out. Turns out the metal base has to extend over the edge of the plastic housing before it will come out, then it co-operates easily.
Now you have these plastic cases with the old lenses intact. I took a hammer to get it started, face up, strike it lightly in the center. Removing the rim of the lens is truly tricky, and not for the faint of heart. If the resilience of this crummy lens is strong anywhere, it's strong at the edges. There is also a recessed lip (see pic) that keeps it in place and helps to keep the housing air and water tight. You'll have to carefully pry it out and do your best not to crack the housing or the lip below it. If you take a sharp screwdriver and place it against the remaining ring and tap it lightly toward the center, it will fracture. You can then pull it away with a pair of pliers.If you make a mistake, the good news is that the white plastic PVC housing is a very easy plastic to repair. I used Oatey PVC cleaner (yeah, just the cleaner) to reseal fractures, and Oatey all-purpose PVC Cement for the broken parts. You can find these products at any Lowes/Home Depot. This plastic has such an affinity for this glue that, when repaired, it's like it never happened. Good thing too, as there may be some small pieces (watch where they fly) to glue back into place.
Now that the old lens is removed, I took the housings to a local glass guy, who turned out to be really helpful. He cut two pieces to shape for me out of ¼” glass. I didn’t thing about having it anti glared, but that’s a great idea, if you choose. Now, there is only one issue. The recess for the glass is 3/16”, and stock glass is either ¼” or 1/8”. I wanted it stronger so I had him bevel that 1/16” off of the ¼” glass stock for me. An added benefit to beveling this way is that it also hides the plastic edging and the glue job underneath. With a flat edge glass, when you glue this into place, you will see imperfections through the glass around the edge, making for a sloppy appearance. Beveling hiding the gluing. It also looks really nice when it’s back in the cowling. He also ground the edges of the new lens, so that it would take gluing well. I left the housings, and he took the time to make it a tight fit. The cost was $15.00, plus tax for the both.
When I got them back, I did a trial run, assembling the parts, and I discovered just one little problem. The old plastic glass was domed for a reason. Replacing the domed glass with flat glass restricts the movement of the needle, and prevents the mechanism from fitting back into the housing. To solve this you will have to build up the base. Alternately, you can also build up the base under the glass, but it won’t look as good when it’s finished.
I cleaned the base up, cutting out the remains from the factory melted in mounting with an Exacto blade.
I cut a ring for each gauge out of flat stock PVC to raise up and out the metal base of the gauge mechanism, and allow for the clearance needed to free the needle. I used .080 flat stock PVC and after allot of trial and error, found that using a routing bit on my Dremmel was the best way to cut out the shimming circles. The metal gauge base plate will sit on this ring, creating the clearance needed for the needle operation. Glue it in place with Oatey Cement, making sure to apply enough glue and pressure to get a tight seal with no gaps.
I glued the new glass lenses into the housing with a clear, high strength, slow cure (90 minute) epoxy, applying it to the plastic base, not the glass. If you’re careful with the glue (I used a toothpick, but liberally applied the glue to assure a seal,) you will have a perfect adhesion all around, no mess.
This is also a great time to lube the gauge mechanisms with a quality lubricant, like sewing machine oil, or lock oil. Resist the urge to turn back the odometer. That would be illegal. I also took this opportunity to sand the cowl with a plastic pot scrubber to get off any scuffs, and painted it with Rustoleum Premium Satin black spray paint. It leaves a perfect matte black finish, and it’s a very resilient paint.
Clean the inside of the glass carefully. Clean the metal mating surface of the gauge mechanism well, and carefully epoxy the gauge into place. When dry, I applied a second thicker coat of Epoxy to the entire mating edge to assure a tight, waterproof seal.
The gauges look like new, and with real glass, they will stay that way, for a long time. Email me if you have any other input, or questions. This was really easier than I thought it would be. Don’t be afraid to charge in… just proceed carefully, and you’ll have a like-new gauge cluster!
I was going to post a question on how to clean up the lenses on my 380. I'll try this, and might eventually find a glass shop in the area to replace them for good.
Found this as well, for future reference when someone like me is using the search function.
But my problem is that my speedo is the type 71-72 one with the smooth un-ridged casing and the white plastic back-plate. I do not think that the same procedure applies. Any suggestions as to how the plastic backed casings are split would be appreciated. I need to figure out the trip odometer, as it is plastic with no noticeable screw, and does not appear to attach to anything internally.