Replacing/repairing oil pipe check valves

General discussion about Street two-stroke Suzuki motorcycles.

Moderators: oldjapanesebikes, H2RICK, diamondj, Suzsmokeyallan

buzzer
Around the block
Posts: 58
Joined: Wed Nov 18, 2015 12:38 pm
Country: UK
Suzuki 2-Strokes: GT500, Harley Davidson V-ROD
Contact:

Replacing/repairing oil pipe check valves

Post by buzzer »

I did the first run on my GT500 the other day... just a short run and when I came back I noticed that there was lots of air in the left hand oil pipe, and a little in the right hand. After a bit of reading on here, I came to the conclusion it was either the pipes. or the valves...

I did a search on Ebay and there is a company that make the valves, and interestingly they are only 5 miles away! As it was Bank Holiday I knew I would have to wait a few days, so I took the pipes off and took a careful look a them. they seemed OK, looks like it was the valves then...

I read the instructions from the company on how to replace them, and removed them from the pipes, it was pretty easy from their instructions. So I now had 4 valves sitting on the bench. Three of them seemed OK, but one, I could blow through either way in my mouth so I decided to take it apart.

with it clamped in the vice (soft Jaws) I used a pair of pliers to prize it app apart. it actually came apart easily. as I pulled the ball and spring out, the problem was easy to spot... the ball was actually stuck in the spring! I gave the spring a little tweak to stop the ball going back in and assembled it back together by just tapping the end back in.

before I did this however, I very gently faced off the ball seat by carefully rubbing it on some 2000 grade wet and dry on a piece of glass. It didn't take much...

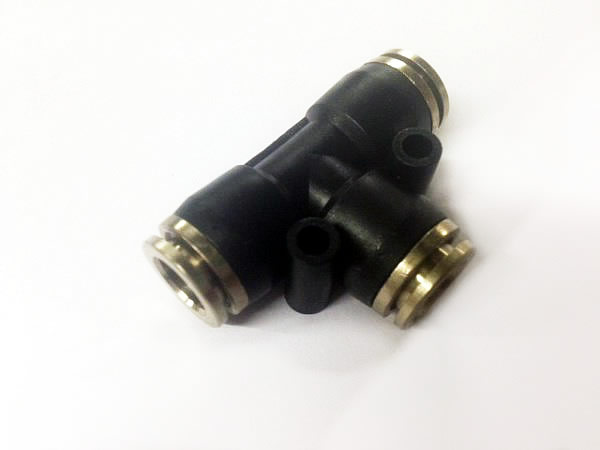
I did this to the remaining three valves (which were actually OK - but it was an opportunity to check them) and put the pipes back on. The result is there is no air or bubbles in the lines any more. Thought I would share this with you guys, just in case no one else has done this! here is a picture of the offending valve, and a link to the sheet from the company that sell them.

http://www.1970sjapmotorbikeparts.co.uk ... ctions.pdf

Image
GT500 Café Racer build website https://jtccc.wordpress.com/" onclick="window.open(this.href);return false;
Drewski
On the main road
Posts: 113
Joined: Sun Aug 16, 2015 8:18 am
Country: UK
Suzuki 2-Strokes: GT750M TS125 TS100 GT750B
Location: East Angular, UK

Re: Replacing/repairing oil pipe check valves

Post by Drewski »

I see on their eBay ad they say "We recommend that you fit all 6 new valves due to standing or misuse in the past 40 plus years"

I've got a NOS spider that I was going to fit to my rebuilt motor and I havn't got a clue how old it is. Does this mean the check valves could be suspect just through age and not use?
buzzer
Around the block
Posts: 58
Joined: Wed Nov 18, 2015 12:38 pm
Country: UK
Suzuki 2-Strokes: GT500, Harley Davidson V-ROD
Contact:

Re: Replacing/repairing oil pipe check valves

Post by buzzer »

after taking one apart I cant see how they would have been affected by age... its a Brass fitting, a ball and a spring. they are easy enough to get off the pipes, and to take apart to check. I guess the critical bit is the pipes, they seem to go brittle and crack. The ball wedged in the spring was probably due to me using compressed air to blow them out during the rebuild.

If I was doing it again, I would use a plastic bottle of solvent to flush them out, and blow them clear by mouth (with a bit of pipe!) or turn the air right down on my compressor.
GT500 Café Racer build website https://jtccc.wordpress.com/" onclick="window.open(this.href);return false;
User avatar
tz375
Moto GP
Posts: 6212
Joined: Mon Nov 03, 2008 10:47 am
Location: Illinois

Re: Replacing/repairing oil pipe check valves

Post by tz375 »

That is an interesting example of a check valve failure caused by incorrect cleaning.

The ball is pushed into the spring but should be free of the spring. Cleaning them with compressed air causes the ball to be shot back and pressed into the spring coils and after that it will never seal correctly.

With a 40 year old bike the possibility always exists that a PO used air to try to clean or seat a valve, so they should all be checked or replaced.
buzzer
Around the block
Posts: 58
Joined: Wed Nov 18, 2015 12:38 pm
Country: UK
Suzuki 2-Strokes: GT500, Harley Davidson V-ROD
Contact:

Re: Replacing/repairing oil pipe check valves

Post by buzzer »

tz375 wrote:That is an interesting example of a check valve failure caused by incorrect cleaning.

The ball is pushed into the spring but should be free of the spring. Cleaning them with compressed air causes the ball to be shot back and pressed into the spring coils and after that it will never seal correctly.

With a 40 year old bike the possibility always exists that a PO used air to try to clean or seat a valve, so they should all be checked or replaced.
It is... and it was probably me that did it... I used the airline to blow the old oil out as part of the rebuild :oops: :oops: :oops: :oops:

soon as I rode it up the road it was clear there was a problem. It only affected one valve though, the other three were OK. Lesson learned.

I have read that many people replace these, when a strip down and clean, is probably all that's needed. I did clean the face where the ball sits with some 2000 wet and dry though on all of them though... they are all working fine now, no air bubbles at all.

I did think that if I needed to replace the pipes at some point I would just use some clear air pipe and some "T" fittings like these. my local factors sells these in 3,4,5 and 6mm sizes, plus the clear pipe to push in them. might help people who are struggling to find originals.

Image
GT500 Café Racer build website https://jtccc.wordpress.com/" onclick="window.open(this.href);return false;
MikeD
On the main road
Posts: 100
Joined: Mon Dec 21, 2015 11:17 am
Country: United States
Suzuki 2-Strokes: 74 GT750
Location: NorCal

Re: Replacing/repairing oil pipe check valves

Post by MikeD »

buzzer wrote: I did think that if I needed to replace the pipes at some point I would just use some clear air pipe and some "T" fittings like these. my local factors sells these in 3,4,5 and 6mm sizes, plus the clear pipe to push in them. might help people who are struggling to find originals.

Image
what is this thing ^ ? My google-fu didn't turn up an image match
tricky1962
To the on ramp
Posts: 237
Joined: Wed Jul 18, 2012 10:46 am
Country: United Kingdom
Suzuki 2-Strokes: T500J
Location: Eastbourne

Re: Replacing/repairing oil pipe check valves

Post by tricky1962 »

A T-connector for compressed air lines
User avatar
akendall1966
To the on ramp
Posts: 242
Joined: Sat Jun 28, 2014 1:22 am
Country: United Kingdom
Suzuki 2-Strokes: T500_MKIII

Re: Replacing/repairing oil pipe check valves

Post by akendall1966 »

4mm nylon pneumatic tube is pretty close and heat forms nicely. Here's the replacement set I made for myself
Image
buzzer
Around the block
Posts: 58
Joined: Wed Nov 18, 2015 12:38 pm
Country: UK
Suzuki 2-Strokes: GT500, Harley Davidson V-ROD
Contact:

Re: Replacing/repairing oil pipe check valves

Post by buzzer »

akendall1966 wrote:4mm nylon pneumatic tube is pretty close and heat forms nicely. Here's the replacement set I made for myself
Image
Fantastic! how did you make the junction pieces?
GT500 Café Racer build website https://jtccc.wordpress.com/" onclick="window.open(this.href);return false;
MikeD
On the main road
Posts: 100
Joined: Mon Dec 21, 2015 11:17 am
Country: United States
Suzuki 2-Strokes: 74 GT750
Location: NorCal

Re: Replacing/repairing oil pipe check valves

Post by MikeD »

lots of these fittings in Amazon @ Industrial & Scientific -> Hydraulics, Pneumatics & Plumbing -> Fittings -> Tube Fittings -> Push-to-connect Fittings

looks like they run about $3 to $5 with various in-line or T options available.

how much line pressure does the GT pump produce?
buzzer
Around the block
Posts: 58
Joined: Wed Nov 18, 2015 12:38 pm
Country: UK
Suzuki 2-Strokes: GT500, Harley Davidson V-ROD
Contact:

Re: Replacing/repairing oil pipe check valves

Post by buzzer »

MikeD wrote:lots of these fittings in Amazon @ Industrial & Scientific -> Hydraulics, Pneumatics & Plumbing -> Fittings -> Tube Fittings -> Push-to-connect Fittings

looks like they run about $3 to $5 with various in-line or T options available.

how much line pressure does the GT pump produce?
I would say the pressure in the pipes is negligible.... these Pneumatic pipes and fittings can stand hundreds of PSI. the push fittings are great as well, just make sure you cut the pipes cleanly with a knife.
GT500 Café Racer build website https://jtccc.wordpress.com/" onclick="window.open(this.href);return false;
User avatar
akendall1966
To the on ramp
Posts: 242
Joined: Sat Jun 28, 2014 1:22 am
Country: United Kingdom
Suzuki 2-Strokes: T500_MKIII

Re: Replacing/repairing oil pipe check valves

Post by akendall1966 »

buzzer wrote:Fantastic! how did you make the junction pieces?
Junction are made from 10mm nylon sheet cut into rectangles and drilled tubes are glued in pump line has a piece of 6mm tube glued over the 4mm tube and to the block as strain relief.

Ade
buzzer
Around the block
Posts: 58
Joined: Wed Nov 18, 2015 12:38 pm
Country: UK
Suzuki 2-Strokes: GT500, Harley Davidson V-ROD
Contact:

Re: Replacing/repairing oil pipe check valves

Post by buzzer »

akendall1966 wrote:
buzzer wrote:Fantastic! how did you make the junction pieces?
Junction are made from 10mm nylon sheet cut into rectangles and drilled tubes are glued in pump line has a piece of 6mm tube glued over the 4mm tube and to the block as strain relief.

Ade
Brilliant! thanks for that, I love seeing stuff like this made!
GT500 Café Racer build website https://jtccc.wordpress.com/" onclick="window.open(this.href);return false;
User avatar
joolstacho
To the on ramp
Posts: 395
Joined: Sun Jul 13, 2014 7:55 pm
Country: Australia
Suzuki 2-Strokes: AS50, GS500, GT500, ex GSXR750 slabbie
Location: Greendale Vic, Australia
Contact:

Re: Replacing/repairing oil pipe check valves

Post by joolstacho »

Excellent stuff buzzer.
diamondj
Road race school
Posts: 785
Joined: Tue Oct 14, 2008 11:00 pm
Location: Wharton, NJ USA

Re: Replacing/repairing oil pipe check valves

Post by diamondj »

akendall1966 wrote:
buzzer wrote:Fantastic! how did you make the junction pieces?
Junction are made from 10mm nylon sheet cut into rectangles and drilled tubes are glued in pump line has a piece of 6mm tube glued over the 4mm tube and to the block as strain relief.

Ade
Looks good - what glue did you use to put the 6mm bracing in?

Jim
Post Reply