Page 1 of 4
Project GT550 - The Earwig.
Posted: Mon Mar 23, 2015 6:11 pm
by Alan H
I thought I'd started a post on this, but I can't find it so anyway here it is (again?)
The actual thread is on another forum in the UK and there's lots of pics, which can't be posted on here for different reasons.
It won't be standard, and hopefully will be running in time for my visit to the Isle of Man Classic TT in August.
Clicky linky
It's 5 pages so far and there will be lots more for those who like a long story!!
Links to other relevant threads
HERE and
HERE
It's a hard life having fun sometimes!!
For those who miss the thread meaning - the thread title 'Earwig' is short for 'Ere we go again'.
Sorry, that's just the UK sense of humour that sometimes doesn't translate well!!
Re: Project GT550
Posted: Fri Apr 24, 2015 9:56 am
by Alan H
Just got the paintwork back, so pics and info
HERE for anyone interested.
Hopefully engine back in this week and I can work on getting it all back together and running again in the not too distant future.
I was hoping to skim the head 20 thou and do some other bits, but there isn't 20 thou to play with, so it looks like a bit of twisting, polishing and flowing will have to do.
Re: Project GT550
Posted: Fri Apr 24, 2015 10:01 am
by Desert_75
Paint looks really nice!
Re: Project GT550
Posted: Fri Apr 24, 2015 1:07 pm
by yeadon_m
Alan,
Are you saying that if you skim 20 thou off the head, the pistons may touch?
I have a spare 380 head and I might lightly skim that, for an experiment (keeping the OE head as is) but I must measure before I do.
Cheers,
Mike
Re: Project GT550
Posted: Fri Apr 24, 2015 1:18 pm
by Craig380
On a 380 the pistons only come level with the top of the barrels, and the head gaskets are about 1mm thick. I had 20 thou skimmed off my original 380 head (which almost, but not quite, got rid of the step in the 'bowls' of the heads) and the bike ran perfectly well afterwards with no need for timing or carb adjustments (all stock otherwise). No pinking at all. Sharpened up the mid-range a little up to 5,000rpm ... not a lot, but it was noticeable.
Re: Project GT550
Posted: Fri Apr 24, 2015 3:40 pm
by Alan H
It's just that the 'flanges' don't have much meat on them. I'll get some pics and proper measurements tomorrow.
The early heads could stand a skim, but if there's much taken off the later ones, it looks like the entire underside of the head will be flat.
It might mean that the compression is higher on the late engines. I'll have to get some measurements as I rebuild. Looks like the old type head will have to be dug out from under the bench for comparison too.
Re: Project GT550
Posted: Fri Apr 24, 2015 4:23 pm
by Vintageman
Why shave head 0.020" when you can ->
GT550 use T350 Aluminum gasket
GT380 use T250 Aluminum gasket
Re: Project GT550
Posted: Fri Apr 24, 2015 4:40 pm
by Alan H
305/350 Suzuki gaskets are like rocking horse crap and I don't think they really exist in our dimension whereas a head skim is £30 by a machinist I know!!

Re: Project GT550
Posted: Sat Apr 25, 2015 8:12 am
by Vintageman
Alan H
30 pounds is a good price and even better if you don't have to ship it. Lately, everyone I am hiring is taking forever getting things done... well tis the season.
I wouldn't lie to you that those gaskets fit: same bore-same stud spacing. As far as sealing I have had no problems with aluminum gaskets on T250, T305, T350 or T500 for example sealing… don’t expect an issue sealing on GT…so far so good…time will tell
I do agree 0.020” works well with a GT550 but, I raised my Exhaust port ~1.5mm, even here it is on the verge of pinging But, I have expansion chambers as well they boost compression versus stock pipes so that may be the difference.
I think you said you have done 0.020” in the past on completely stock engine GT550 and has worked well for you.
However, using various thickness gaskets has been a great option to test out ideas in advance. And, IMO if it works they can stay until the next decoke.
Re: Project GT550
Posted: Sun May 03, 2015 12:11 pm
by Alan H
There isn't a spare 20 thou to shave off the head so it looks like going on standard.
Anyway, I took a couple of pics today to check the look - still lots to do obviously!
Barrels on and head just plopped on to stop crap dropping in the engine. Head to paint matt black same as the barrels.

Re: Project GT550
Posted: Sun Nov 01, 2015 2:58 pm
by Alan H
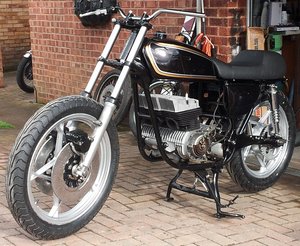
Just to show there is still progress, despite chopping a finger end off a month ago, which tends to upset garage work somehow - and a couple of holidays too. Here's a pic of the current stage of rebuild as of this afternoon.
Purists look away now, and there will be other changes with the front mudguard and rear shocks. It'll have standard exhausts for the road worthiness test (just in case they don't like the 3-1) and I'm going to get a set of spannies made specially to suit the bike exactly. We shall see how good they are when they're done in the new year.

Re: Project GT550
Posted: Sun Nov 01, 2015 4:45 pm
by Coyote
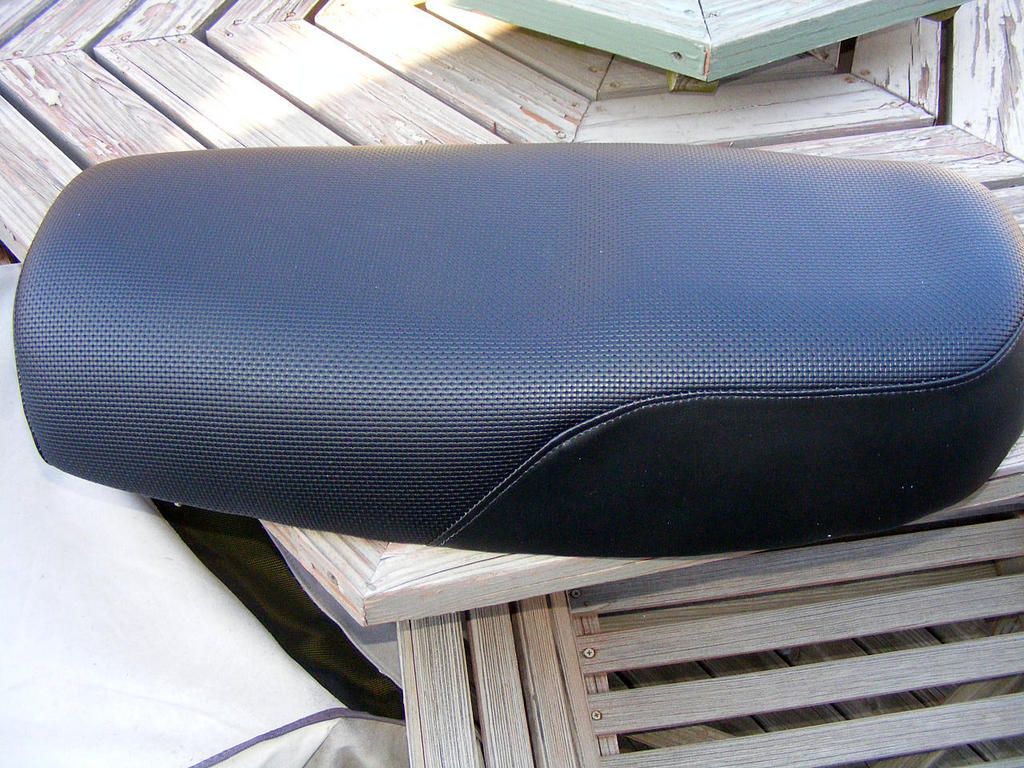
Is that one of those $$$ seats from Vietnam?
Re: Project GT550
Posted: Sun Nov 01, 2015 5:46 pm
by Alan H
Yup. Cost $318 inc P&P (249 + 69) from Vietnam to the UK, or as an alternative, when I spoke to a local company near home, they wanted £500 to do it as they wanted.
So I went with the economy version which is really good quality and fast delivery.
Cheaper now (typical!) and if the quality is the same, a good deal.
I'm going to Hong Kong, Australia, NZ, and Viet Nam in Feb/March next year, but I think the extra baggage would be more!
Must find out where the place is in relation to Da Nang/Hoi An, where we will be landing and staying!!
Hope all the B52s are gone........
I tried rear sets with that seat, but not comfortable, so went with standard footrests and modified brake pedal for the hydraulic disc rear.
Re: Project GT550
Posted: Mon Nov 02, 2015 7:41 am
by Coyote
More info please Alan. All the ones I checked out on eBay looked like the pan was made out of scrap pieces of fiberglass. No hinges or latches of any kind. How much work was it to make it fit? To me that's the sharpest seat around, but the pan looked like a nightmare. I need to do something with my seat unless brand new ugly is your thing.


Re: Project GT550
Posted: Mon Nov 02, 2015 10:35 am
by Alan H
THIS was the site I bought my seat from, but they don't seen to have anything for sale currently, but
HERE seems to be the same kit and allegedly based in California, so the postage will be cheaper for you.
The seat base is steel, it fits well as you can see in the pic, but you have to use the original hinges and lock base. At least they are easily cleaned on the wire wheel and a quick spray of silver paint, they look fine. It goes straight onto the original mounts without any hassle and either use a stainless bolt and nyloc nut, or the correct pin with washer and split pin.
They work out cheaper than original, and several styles available from the same people.
It's a tad cosy for two, but Lynn can always snuggle up or catch the bus! She's only small, so I think the bus will not be an option.
That seat of yours has a good side though, when you sit on it, you can't see much of it! It is 'different', and hopefully you don't slide about on it too much when riding. If your seat pan and foam are OK, there are plenty of decent quality covers available like
THIS, or
THIS, depending on model. I'm sure they must be available over your side of the pond too. I got one for the K and it went on well, although a friend insisted that he did it for me as we do one another favours, and he was an upholsterer in a previous life. I just had the base repaired and new spikes cut. It looks fine.
