Page 1 of 1
Electrolysis started
Posted: Tue Mar 10, 2015 4:37 pm
by Coyote
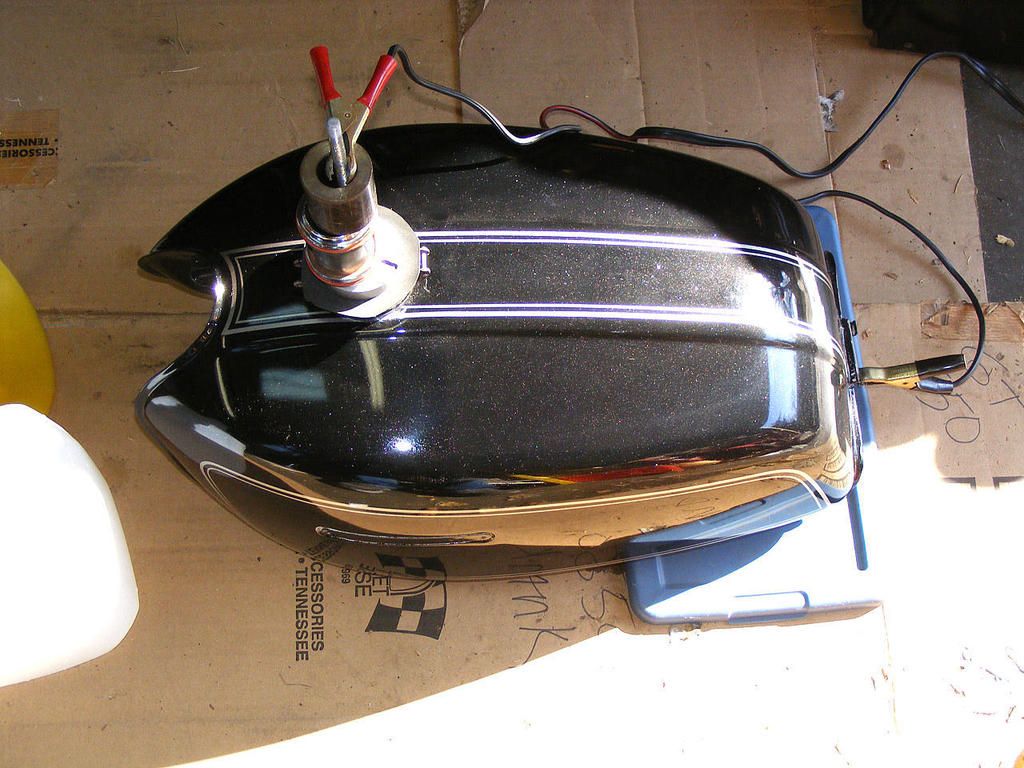
Electrolysis is under way. I am using a piece of flat stock 1/8 x 1/2 x approx 7. The weights on there are counter balance as the weight of the flat stock makes it want to tip. The black line on the cap part is in line with the sacrificial piece. A little to the left then a little to the right tomorrow. I was tempted to bypass this operation as the tank really isn't that bad inside. When I got strong light in there and looked through the petcock hole I could see ample rust on the upper surface inside. So I went for it.
I am using about 3/4 cup of soda and am running at 10 amps. I hope that's too much. My only other continuous rate is 2. That seemed a little low. No explosions YET. Can someone tell me if I have the leads backward?
Re: Electrolysis started
Posted: Tue Mar 10, 2015 6:17 pm
by Coyote
Well, I watched several videos and the leads are correct. I also know for sure now that the GT380 and the GT550 hold exactly 4 US gallons. One of the many errors in the Clymer manual that says 4.5 gallons. It also states the GT550 came with VM carburetors or BS carburetors. The BS carburetors were never used on the 550.
Re: Electrolysis started
Posted: Tue Mar 10, 2015 8:51 pm
by pearljam724
What liquid are you using, vinegar or water ? The marine clean and prep solution POR-15 sells in their kits works amazing. An expansion plug works great in the 550 filler hole. It allows you to avoid wrapping up the tank to protect paint. I was able to turn my tank upside down and leave it that way for over 24 hrs without a drop of solution dripping out. I cleaned that out with hot water 4 or 5 times, sealed with the expansion plug and sloshed it around in all different directions. The marine clean left the metal looking as if it were a brand new tank. Good stuff. I think it's going to be difficult to clean the roof of the tank through electrolysis. Be sure to take before and after pics. I'm interested in seeing the difference.
Re: Electrolysis started
Posted: Tue Mar 10, 2015 10:04 pm
by Coyote
Water and washing soda is in it now. When finished I will rinse a few times with hot water. Then dry it for 2 days with a heat gun in the filler hole -- petcock removed. This leaves a very fine patina of surface rust. The POR-15 goes right over that. I have always done it this way with zero problems. I only buy the tank liner from POR-15. I bought the complete kit the first time. but not anymore. It's a waste of money IMO. Simple Green will clean it and vinegar will prep it, but that step is not really needed. The key to a good job is drying. I dry mine till I'm sure it's dry and dry it for another day.
I saw a good idea today while watching videos. The fellow was preparing to use POR-15 and said he wraps his tanks with plastic wrap so spills won't bother the paint. I never thought of that as I have always lined my tanks as the first operation. This is the only one I have done with a finished outside. To me, that's ass backward One thing for sure, it will ruin a pair of jeans. Ask me how I know.
There was a post a few months ago where a guy lined his tank with POR-15. He waited the recommended 3 days before fueling. Apparently it wasn't dry. His gas turned silver and then it ran through his carbs and coated the jets. What a mess. My guess is the tank wasn't totally dry when he lined it. POR-15 says 3 days before adding fuel. I have always waited weeks - usually months before adding fuel That's because as I said it's the first operation I do on a tank I'm going to use.
So this is my fourth tank lining job. Did the 77 Buffalo I had, an early 380 tank, RedZone's tank and now this. I cover the filler hole and petcock hole with plain old packing tape I know from experience that with the full 1/2 pint can, none of it will get in the filler hole. I rotate the tank several times in every possible direction for 20 - 30 minutes. Then I drain off the excess which is more than half of what I put in. Then I take a cheap sponge brush and do the filler hole with a dab or 2 from what drained out. Then I wait about 6 hours of air drying, grease the 2 petcock bolts and screw them in. They stay there till the liner is totally dry. I learned this after my first job when I had to re-tap the petcock mounting holes.
Re: Electrolysis started
Posted: Wed Mar 11, 2015 2:30 am
by tricky1962
Looking good.
A quicker way of drying your tank after rinsing with water would be to swill some alcohol such as methylated spirits around inside, it will take all the water with it and dry much faster.
Re: Electrolysis started
Posted: Thu Mar 12, 2015 8:14 am
by Coyote
Well the first run was 15 hours. Got some rust on the anode, but not allot. I polished off the sacrificial piece. It originally had a sort of black oxide finish, so I polished that off too. I'm saying polished but what i mean is a wire wheel on my bench grinder. So now the piece went back in the tank for another 15 hour run. I was amazed to get at least 10 times the amount of rust over the first run Thick globs of rust. I guess the black oxide finish on the strap interfered with the first run. So now the anode is back in the tank at the first position. Gonna give it about 10 hours here. and see what / how much I get.. Then I'm going to cut the sacrificial off short and point it toward thr front of the tank for a while.
In the end, it looks like it's take a month to ever rinse it all out. The water is now non transparent brown so I guess there is a lot of rust in suspension
I wonder why the bike company's didn't make tanks with an inspection window. Fuel level at a glance and easily see the condition of the tank insides. My GS1000 has a fuel level gauge on the instrument panel It really works quite well for as crude as it is. Remember the gas caps with a fuel gauge? I haven't seen one of those in decades. Now days all those trick things are digital.
Re: Electrolysis started
Posted: Thu Mar 12, 2015 6:12 pm
by Coyote
Just checked it again after a 10 hour run. STILL pulling a lot of rust. The tank really didn't look that bad to start with. Actually considered using the tank liner right over the lite rust that was in it. Tomorrow i.m going to rinse it out and see how it looks. I doubt i'll do it gain. I'm out of washing soda and the market didn't have any last time I was there. If it looks decent ai'll just force dry it with my heat gun and line it. The liquid in the tank is really nasty. I'm beginning to think most of the rust is in suspension now.
Re: Electrolysis started
Posted: Fri Mar 13, 2015 4:57 am
by Flywheel
I saw your post about wrapping the tank with plastic wrap. Fellow member Jabcb sent this link to me about lining a tank. Check out how they wrap their tank to protect the finish...
http://www.motorcycleclassics.com/mc-ho ... z2j0sdLMVk" onclick="window.open(this.href);return false;" onclick="window.open(this.href);return false;
Re: Electrolysis started
Posted: Fri Mar 13, 2015 7:14 am
by Coyote
Interesting. A bit of an overkill on the wrapping though. It's easy to pour in the POR-15 without spilling it. Rolling the tank around is tedious, but a no brainer. With POR-15, the real mess comes when it's time to drain off the excess. Approximately half of what you put in (the 1/2 pint) come back out. That has to happen at the petcock opening because the filler neck on these old tanks protrudes about 3/4 inch past the tank surface. So it must be drained from the petcock opening. That plus you have to move the tank about to get all you can back out. With POR-15, you need to avoid puddles of liner or it may not cure correctly..
You need to have a disposable tray to drain into and be as neat as possible. The stuff spreads like a disease if you let it and pretty much ruins anything it get on. So before I stat with the liner, I create a place to do the drain operation. Set it up to where it will tilt to the rear and tilt toward the petcock opening. After a few minutes you need to lean the tank forward and slowly roll it back toward the opening to get more excess out. Have some acetone handy to wipe the petcock mounting surface clean. You definitely don't want any drips or bumps drying there, cause once it cures it's like a rock. Compare it to hardened J-B Weld. But once the operations are finished, it does a beautiful job. You NEVER have to fool with it again.
I just cover the openings with plain old packing tape. It won't leak and it's easy to pull off for draining. I use tape on the filler hole as well. I know from experience that no liner gets in there because of the neck protrusion. At the end, paint the filler neck with a bit of what drained out. A cheap sponge works great for that. And finally after about 4 hours, grease up your petcock bolts or any other 6mm bolt and screw them in. Because they a greased, the liner won't stick the them when it hardens. I learned that from experience too. I didn't do that on my first tank and had to re-tap the holes
Re: Electrolysis started
Posted: Fri Mar 13, 2015 1:15 pm
by Coyote
WOW! I'm sold! Drained and rinsed the tank. It's spotless. I couldn't be more impressed. No more expensive chemicals for me. Lots of loose rust particles in the drain water. More flushed out with the rinse. Heat gun in it now. Total run time was 46 hours and cost about a dollar + whatever it took to run the charger.
