
OH NO *)^%$+*#^ $*%##)+=*$ !!!
Moderators: oldjapanesebikes, H2RICK, diamondj, Suzsmokeyallan
-
Coyote

- Moto GP
- Posts: 3404
- Joined: Tue Oct 21, 2008 2:41 pm
- Country: USA
- Suzuki 2-Strokes: GT550x2, GT750, GS1000
- Location: Tulsa, Oklahoma
OH NO *)^%$+*#^ $*%##)+=*$ !!!
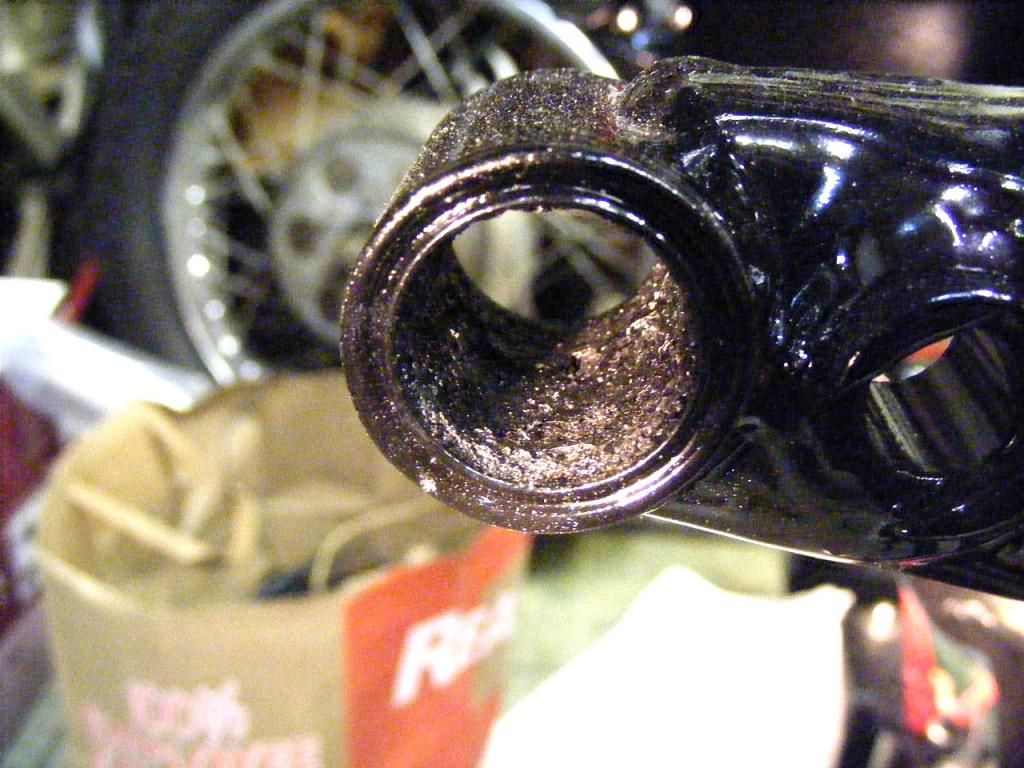
OH NO!. I just now noticed the powder coater knocked the guts out of the muffler hanger bushings. The inner sleeve and the rubber are gone. All that's left is that miserable shell to remove and to try to get new bushings in. I swore I'd NEVER mess with those again and now I have no choice. The foreman must have turned the job over the the shop rookie (idiot). We have always left them in and it has never been a problem. SOB. I need a drink. Good thing I don't have a dog to kick. CRAP!
I was born with nothing and still have most of it left.
.
1978 GS1000C
1976 GT550 ongoing money pit.
.
1978 GS1000C
1976 GT550 ongoing money pit.
-
tz375

- Moto GP
- Posts: 6204
- Joined: Mon Nov 03, 2008 10:47 am
- Location: Illinois
Re: OH NO *)^%$+*#^ $*%##)+=*$ !!!
The fix is easy.
Step 1: Sit somewhere quiet with favorite friend and a couple of drinks. Just enough to be mellow
Step 2: get a good night's sleep
Step 3: with a fresh head and after a good breakfast, grab a hacksaw with a fresh new blade.
Step 4. Place blade through bushing and insert into hacksaw.
Step 5: Take your time to just cut through the outer "sleeve" - or almost through it.
Step 6: collapse the bush with a hammer and small cold chisel.
Step 7: Have a cup of coffee and marvel at your skills as a surgeon.
Step 8: clean up the bore lightly with Dremmel and sanding drum - do not go mad.
Step 9: lightly grease new bush and pull it into place with a couple of sockets and a foot of allthread.
Step 10: Step back, pour yourself a cold beverage and sit back and enjoy it. Be pleased with how easy that was and how skilled you are.
Classic 10 step program.
OK - it should be 12 steps, but I couldn't think of another 2 steps. Maybe have another 2 cold ones
-
joolstacho

- To the on ramp
- Posts: 391
- Joined: Sun Jul 13, 2014 7:55 pm
- Country: Australia
- Suzuki 2-Strokes: AS50, GS500, GT500, ex GSXR750 slabbie
- Location: Greendale Vic, Australia
- Contact:
Re: OH NO *)^%$+*#^ $*%##)+=*$ !!!
Very cool dude, (and yup the extra two will slip down well!)
-
Coyote
- Moto GP
- Posts: 3404
- Joined: Tue Oct 21, 2008 2:41 pm
- Country: USA
- Suzuki 2-Strokes: GT550x2, GT750, GS1000
- Location: Tulsa, Oklahoma
Re: OH NO *)^%$+*#^ $*%##)+=*$ !!!
Step 9 does not work. Last pair I did took 2 full days of work. Collapsed dozens of washers, stripped nuts and even sheared off a couple of grade 8 bolts. Never did get them all the way in.Come to find out the interference fit was nearly .010. That's when I swore I would never do it again. An experience I'd like to forget.
This time I will check everything first. If the press is too much I will machine them down to a reasonable, doable interference fit. I might even slit the bushing OD to give it room to collapse as it is drawn in.
This time I will check everything first. If the press is too much I will machine them down to a reasonable, doable interference fit. I might even slit the bushing OD to give it room to collapse as it is drawn in.
I was born with nothing and still have most of it left.
.
1978 GS1000C
1976 GT550 ongoing money pit.
.
1978 GS1000C
1976 GT550 ongoing money pit.
-
tz375
- Moto GP
- Posts: 6204
- Joined: Mon Nov 03, 2008 10:47 am
- Location: Illinois
Re: OH NO *)^%$+*#^ $*%##)+=*$ !!!
All I can tell you is that it worked for me. The stock bore of that part is pretty rough and needs some clean up. Use a drum sanding roll on a Dremmel for a minute to clean up any high spots and it should be easy to pull in. Don't use washers - use a large socket or thick wall tube on one side and smaller diameter socket on the pushing side.
-
Coyote
- Moto GP
- Posts: 3404
- Joined: Tue Oct 21, 2008 2:41 pm
- Country: USA
- Suzuki 2-Strokes: GT550x2, GT750, GS1000
- Location: Tulsa, Oklahoma
Re: OH NO *)^%$+*#^ $*%##)+=*$ !!!
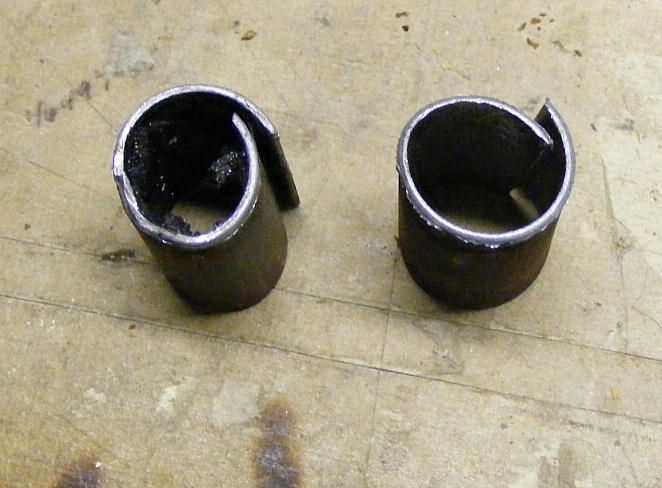
What you are looking at is the inside if the outer shell - not the bore in the bike, I guess that's part of how the rubber is bonded in a bonded bushing. If that was the bore of the bike - I WOULD be pissed. Here's a pic of the last ones I removed. Let the misery begin.

I was born with nothing and still have most of it left.
.
1978 GS1000C
1976 GT550 ongoing money pit.
.
1978 GS1000C
1976 GT550 ongoing money pit.
-
Powderfinger
- On the street
- Posts: 24
- Joined: Sun Jun 08, 2014 7:05 am
- Country: USA
- Suzuki 2-Strokes: GT380, T500
- Location: SWPA
Re: OH NO *)^%$+*#^ $*%##)+=*$ !!!
After you get that bushing out an adjustable reamer will make that hole any size you want.
-
silverstone
- On the street
- Posts: 43
- Joined: Wed Dec 26, 2012 2:10 am
- Country: UK
- Suzuki 2-Strokes: T350 3xT250J 2xT500 H2C,KH500,GT500,KLX250
Re: OH NO *)^%$+*#^ $*%##)+=*$ !!!
Never done this with this type of bush, but you might try putting the bush in the freezer for a couple of days and when you are ready to put the bush in, warm up the mount.
-
pearljam724
- AMA Superbike
- Posts: 1681
- Joined: Tue Jul 24, 2012 11:45 pm
- Country: U.S.
- Suzuki 2-Strokes: 75- GT 550 / 76- GT 750
- Location: SW PA
Re: OH NO *)^%$+*#^ $*%##)+=*$ !!!
Rookie or not. All rubber or plastic pieces must be removed before a powdercoat. Otherwise they cook in the process. That's what happened. They would have needed to be removed prior anyhow. That's why I went with paint.  You should be able to find a grommet, bushing, etc. nearly the same diameter that will serve the same purpose once installed. All it does is reduce vibration from the pipes. I know hardware stores sell hard white plastic bushings. You'll never see what you decide to use with a flat washer covering.


-
Coyote
- Moto GP
- Posts: 3404
- Joined: Tue Oct 21, 2008 2:41 pm
- Country: USA
- Suzuki 2-Strokes: GT550x2, GT750, GS1000
- Location: Tulsa, Oklahoma
Re: OH NO *)^%$+*#^ $*%##)+=*$ !!!
The stock Suzuki bushings are available through Partzilla, $4.09 each. I ordered them this morning.
Here's the deal with the bushings and powder coat. Leave them in place. They will not melt or be harmed in any way. Done it twice with zero problems. That was the plan with this frame, but some fool changed that plan for me. The foreman Dave knows to leave them in, but must not have conveyed that to the operator. The operator is the one that took it upon himself to knock them out.
Alan, I will turn them if they are too large like the last ones. It's hard to hone a short bore like that without getting it bell-mouthed.
I was born with nothing and still have most of it left.
.
1978 GS1000C
1976 GT550 ongoing money pit.
.
1978 GS1000C
1976 GT550 ongoing money pit.
-
Coyote
- Moto GP
- Posts: 3404
- Joined: Tue Oct 21, 2008 2:41 pm
- Country: USA
- Suzuki 2-Strokes: GT550x2, GT750, GS1000
- Location: Tulsa, Oklahoma
Re: OH NO *)^%$+*#^ $*%##)+=*$ !!!
I got the bushing shells out today. Wasn't too bad. About 20 minutes each. I got a little carried away with the hacksaw so one of the frame eyes has a permanent slot in it about 1/16 deep. I doubt it will hurt anything. Still waiting on the replacements. It's amazing how well a new hacksaw blade cuts. Bet this is my first new blade in about 20 years.
I was born with nothing and still have most of it left.
.
1978 GS1000C
1976 GT550 ongoing money pit.
.
1978 GS1000C
1976 GT550 ongoing money pit.
-
Sandman
- Around the block
- Posts: 64
- Joined: Wed Jul 03, 2013 3:59 pm
- Country: USA
- Suzuki 2-Strokes: TS100 TS125 TM125 RM125
- Location: Chicago, IL area
Re: OH NO *)^%$+*#^ $*%##)+=*$ !!!
Coyote wrote:Here's the deal with the bushings and powder coat. Leave them in place. They will not melt or be harmed in any way. Done it twice with zero problems.
You're correct, and that matches my experience as well. Even though conventional advice is to remove that kind of stuff first, they do survive the curing process with no harm. Damn shame you have to go through the trouble to replace them when you didn't have to.
-
Coyote
- Moto GP
- Posts: 3404
- Joined: Tue Oct 21, 2008 2:41 pm
- Country: USA
- Suzuki 2-Strokes: GT550x2, GT750, GS1000
- Location: Tulsa, Oklahoma
Re: OH NO *)^%$+*#^ $*%##)+=*$ !!!
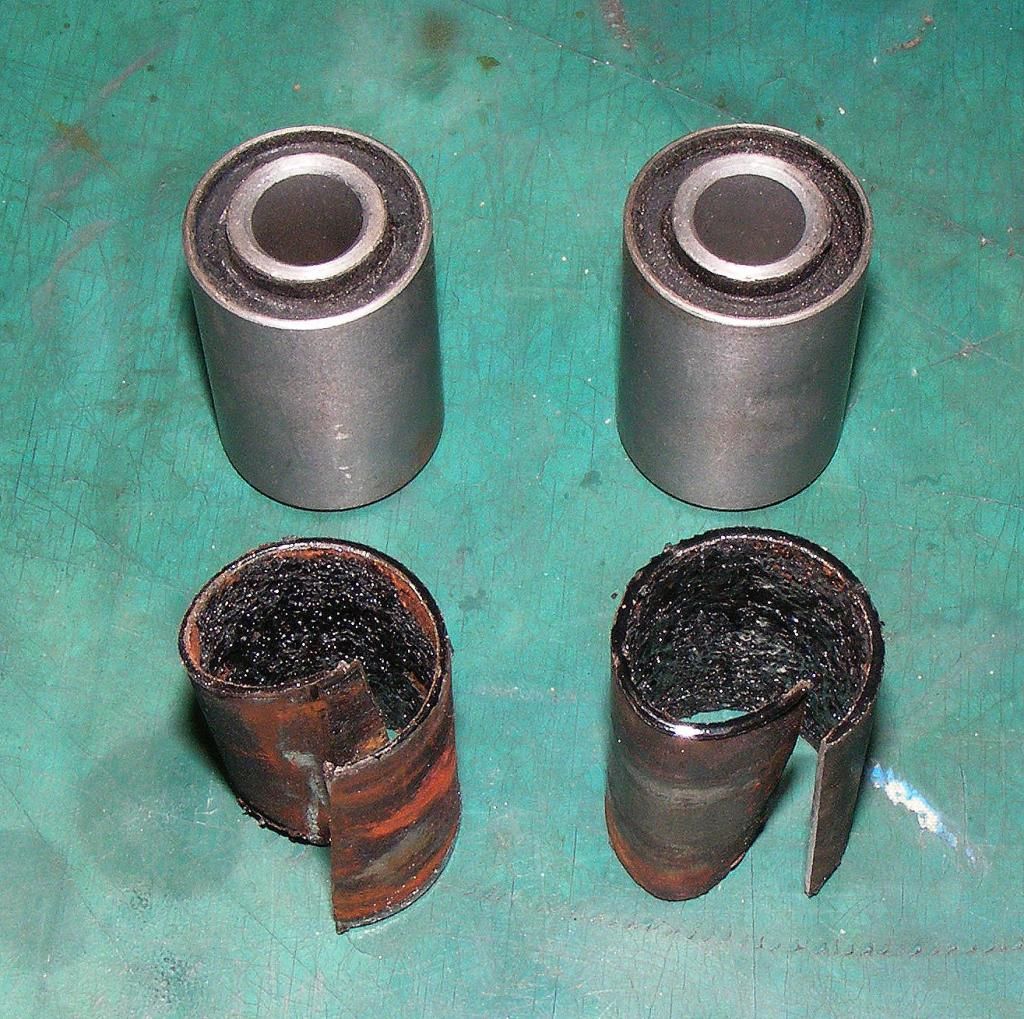
Bushings showed up today. If anything, these might be a little loose. I can press them part way in with my hand. They check the same size as the bore in the bike. May have to smear some sealer or JB weld on them when installing. These must be from a new run. Correct me if I'm wrong but didn't the originals have saw tooth ends on the inner sleeve? These are smooth.
I was born with nothing and still have most of it left.
.
1978 GS1000C
1976 GT550 ongoing money pit.
.
1978 GS1000C
1976 GT550 ongoing money pit.
-
Sandman
- Around the block
- Posts: 64
- Joined: Wed Jul 03, 2013 3:59 pm
- Country: USA
- Suzuki 2-Strokes: TS100 TS125 TM125 RM125
- Location: Chicago, IL area
Re: OH NO *)^%$+*#^ $*%##)+=*$ !!!
Believe they should be smooth- I haven't seen the sawtooth type you're talking about.
-
Coyote
- Moto GP
- Posts: 3404
- Joined: Tue Oct 21, 2008 2:41 pm
- Country: USA
- Suzuki 2-Strokes: GT550x2, GT750, GS1000
- Location: Tulsa, Oklahoma
Re: OH NO *)^%$+*#^ $*%##)+=*$ !!!
The old and the new. I figured out why the last ones were so tight. They made it out of the factory without being finish ground. The finish on the ones that were so tight were as rolled. These have a smooth ground finish on them and as I stated, I can almost push them in by hand. Trying to pull in the last ones was a real nightmare. A couple of dozen severely cupped washers, a handful of stripped nuts, wasted all thread and 3 0r 4 snapped off grade 8 bolts. Never dig get the fully home.

I was born with nothing and still have most of it left.
.
1978 GS1000C
1976 GT550 ongoing money pit.
.
1978 GS1000C
1976 GT550 ongoing money pit.
