
GT550 Cafe project
Moderators: oldjapanesebikes, H2RICK, diamondj, Suzsmokeyallan
-
Coyote

- Moto GP
- Posts: 3404
- Joined: Tue Oct 21, 2008 2:41 pm
- Country: USA
- Suzuki 2-Strokes: GT550x2, GT750, GS1000
- Location: Tulsa, Oklahoma
Re: GT550 Cafe project
Said window
I was born with nothing and still have most of it left.
.
1978 GS1000C
1976 GT550 ongoing money pit.
.
1978 GS1000C
1976 GT550 ongoing money pit.
-
imquattro
- To the on ramp
- Posts: 239
- Joined: Tue Jul 19, 2011 9:26 pm
- Country: USA
- Suzuki 2-Strokes: 72/74 GT550
- Location: Muncy PA
Re: GT550 Cafe project
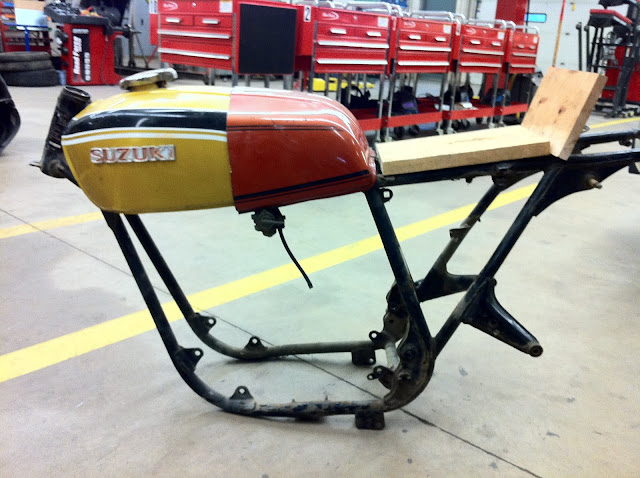
Picture = 1013 words
-
ja-moo
- Yeah Man, the Interstate
- Posts: 554
- Joined: Wed Apr 01, 2009 11:47 pm
- Location: NM USA
- Contact:
Re: GT550 Cafe project
How is that? It's not good for any motor to be revved like that cold....... Would be a good lesson on the don't do it list.imquattro wrote:Lol, he's a dirt bike motorcross racer so it's, I guess, a bad habit he picked up from that.ja-moo wrote:That hurt!You should train your students NOT to rap out a new motor, especally a 2 stroke!
Completely different story on 4 stroke motors.
Visiting from the "K" camp...........
-
imquattro
- To the on ramp
- Posts: 239
- Joined: Tue Jul 19, 2011 9:26 pm
- Country: USA
- Suzuki 2-Strokes: 72/74 GT550
- Location: Muncy PA
Re: GT550 Cafe project
Thanks to Coyote and the picture + using the service manual, we were able to set the spark timing today. First we set the points gap to .012". Then we used a dial indicator (standard SAE increments) and had to convert from metric (3.37mm) to standard which equated to 0.132677165" or 0.1327". We then used the dial indicator to find TDC on the L cylinder and then rolled it CCW 0.1327" which we found to be pretty dern close to the line on the plate/housing lining up. We then adjusted the plate, using a DVOM set to ohms/continuity beep test, to set the points to open at just that setting.
We continued this around to the other cylinders.
Started on the first kick (I actually used my hand reaching over the bike as my battery has an issue and I'm using our jump box as a temp battery. Can't wait to ride this! -but also understand the importance of getting the spark/carbs setup first).
Still smokes more than I expected, too rich running?
Also, WAY louder than I expected. No way I'm going to be able to creep through town on this ride!
Video of idle to follow when home to upload.
-
Coyote
- Moto GP
- Posts: 3404
- Joined: Tue Oct 21, 2008 2:41 pm
- Country: USA
- Suzuki 2-Strokes: GT550x2, GT750, GS1000
- Location: Tulsa, Oklahoma
Re: GT550 Cafe project
You might want to do it over with the gaps set at .015 or .016. where you are at (.012) is bottom tolerance. The slightest bit of wear on the point rubbing blocks and the points will be below bottom tolerance. Also don't forget to put 2 drops of oil on the felt wipers. They make a special oil for this but plain old motor oil will do. Hmmmm. I might get hammered on that one 
I was born with nothing and still have most of it left.
.
1978 GS1000C
1976 GT550 ongoing money pit.
.
1978 GS1000C
1976 GT550 ongoing money pit.
-
imquattro
- To the on ramp
- Posts: 239
- Joined: Tue Jul 19, 2011 9:26 pm
- Country: USA
- Suzuki 2-Strokes: 72/74 GT550
- Location: Muncy PA

-
Coyote
- Moto GP
- Posts: 3404
- Joined: Tue Oct 21, 2008 2:41 pm
- Country: USA
- Suzuki 2-Strokes: GT550x2, GT750, GS1000
- Location: Tulsa, Oklahoma
Re: GT550 Cafe project
AWESOME!!! Sounds like the one over pilots are perfect  What are you going to do for upholstery on the seat? What color are you considering for paint? It's nearly time to RIDE
  You guys did a fantastic on those chambers. They sound great and the motor seems to be very happy with them. Congrats!!!!
I was born with nothing and still have most of it left.
.
1978 GS1000C
1976 GT550 ongoing money pit.
.
1978 GS1000C
1976 GT550 ongoing money pit.
-
imquattro
- To the on ramp
- Posts: 239
- Joined: Tue Jul 19, 2011 9:26 pm
- Country: USA
- Suzuki 2-Strokes: 72/74 GT550
- Location: Muncy PA
Re: GT550 Cafe project
Ok..... I'm OFFICIALLY HOOKED! 0_o
Took it for the first ride today, granted it was in the parking lot (got 3 gears though). Wow....
Rides smoothly, idling through the turns though is interesting with the gallopy 2stroke Harley idle.
Still grinning and giddy.
Replaced the failed LiPo battery (key was left on and discharged it, once discharged, they're non-rechargable!? REALLY?!! 3 year waranty here I come -fingers crossed!) with a 12v 5Amphr trailer battery (small, semi-light, sealed, fits under tail=works).
Used some conduit holders attached to the frame as mounting points for the seatbase/tail. Tail needs light & plate holder & smoothed/shaped/painted.
Coyote, you asked what color scheme I'm going for....
I'm not set on one yet. Frame is hammered black (a dark brown/gold/black) and I was thinking the tank & tail would be neat in that color with either a triple silver stripe set running front to back down them both or red stripes (to match the emblems & UNI filters.) The stripes would be thin, thick, thin.
Or the tank & tail silver w/ black or red striping.
I can't visualize it to determine.
I'll be making the seat this week from 1/8" plywood base w/ closed cell foam & either black leather or black corbin style.
-
imquattro
- To the on ramp
- Posts: 239
- Joined: Tue Jul 19, 2011 9:26 pm
- Country: USA
- Suzuki 2-Strokes: 72/74 GT550
- Location: Muncy PA
Re: GT550 Cafe project
Today, we got the wire/electronic's trays primed/painted and the wiring routed/sorted/installed.

-
imquattro
- To the on ramp
- Posts: 239
- Joined: Tue Jul 19, 2011 9:26 pm
- Country: USA
- Suzuki 2-Strokes: 72/74 GT550
- Location: Muncy PA
Re: GT550 Cafe project
Working on the tail. Body work is NOT my forte. Typically ends with results that I settle for... 


Still not done...
Plus it's not sitting perfectly straight because it's not fastened down (a lot of on/off cycles while fitting & shaping it).
Back tail light area dimensions are 8.5" wide (following the lines) by 4.5" tall -I need tail light options guys! From the side, the back flat area's on an 85° angle to verticle.
Also noted: the rear tire is 1/4" closer to the right than the left. It was laced and trued by a bike shop, is there offset that was missed?
-
Coyote
- Moto GP
- Posts: 3404
- Joined: Tue Oct 21, 2008 2:41 pm
- Country: USA
- Suzuki 2-Strokes: GT550x2, GT750, GS1000
- Location: Tulsa, Oklahoma
Re: GT550 Cafe project
Most likely. It's a little late now, but what should have been done is check the hub to rim offset using a long straight edge before the wheel was unlaced. I usually do this on the brake drum side on the rear wheel. Note that dimension and maintain it when the wheel is relaced. It's easy to get the wheel true radially and axially and be way off where it needs to be in actual position. I don't have a wheel I can check, but maybe someone following this thread does.is there offset that was missed?
Did you unlace all the wheels? If you have a rear wheel that is still together, you should be able the get the dimension from it. Unfortunately it's chain off, tire and tube off to change it. You should be able to see that sighting down the chain from the rear sprocket to the front. Maybe you'll get lucky and can change the wheels position by making new axle spacers.
I was born with nothing and still have most of it left.
.
1978 GS1000C
1976 GT550 ongoing money pit.
.
1978 GS1000C
1976 GT550 ongoing money pit.
-
tz375

- Moto GP
- Posts: 6213
- Joined: Mon Nov 03, 2008 10:47 am
- Location: Illinois
Re: GT550 Cafe project
Most Japanese wheels have no offset. As Coyote mentioned, it's worth checking chain alignment and rim offset now and see if teh wheel was built wrongly or if the spacers need to be modified/swapped out.
-
imquattro
- To the on ramp
- Posts: 239
- Joined: Tue Jul 19, 2011 9:26 pm
- Country: USA
- Suzuki 2-Strokes: 72/74 GT550
- Location: Muncy PA
Re: GT550 Cafe project
The rear wheel has no noticeable offset, and the chain & sprocket all appear to be in line w/ the drive sprocket. My guess is that there's supposed to be some offset in the wheel that I didn't measure (didn't know about that prior to taking it apart) and the rebuilder/lacer/truer didn't build in.
Schools about done (next Thursday's the last day) and shop officially closed this past week. My time since has been spent on organizing the shop & proctoring other instructors finals w/ a smidge of bike work in between.
I thought I had a solution to the fuel petcock deal:

Fuel valve from a Massey Ferguson @ Tractor Supply $24. Has OFF, MAIN & RESERVE feature too + two screens and a sediment bowl.
I took a piece of 1/2" aluminum, cut it to match the OE petcock mounting surface, drilled two holes spaced 44mm apart, drilled a center hole 37/64" for the 3/8"NPT thread tap, tapped the threads, cut a gasket, installed on the tank, mounted on the bike and..... it hits the carb throttle linkage. Looks pretty cool but sigh. :shrug:
At least I have the mounting plate (which they are out of w/ no sign of restocking....) for the universal petcock from PartsnMore.
Worked on the seat a bit. Cut out the pans from two old clip boards. Then traced the shapes onto some foam from Harbor Freight ($6.99 for 4 squares!)

After being cut out, I used the equivalent of 3M Super 90 spray adhesive to attach them to the pans, then bench sanded the edges smooth to match the bases.
Here's a picture of this in mid process: (I found the bottom needed a longer top portion and the picture was also taken before the top seat portion was tapered off.

I then picked up some 1/2" softer foam and used some black leather I had from an old set of Audi seats and wrapped the foam seat bases. (I'll have to get a picture of that up here asap, they're at school).
The then sprayed the tank & tail with high build grey primer and will start blocking them out Monday. I just want to say I'm not happy with how the tail portion came out. It's not proportionally correct nor complimentary in shape to the bike or tank. It's frustrating. I have to remind myself that A)its my first fiberglass project EVER and B)it can be replaced/remade at a later time.

Call me a heretic, cheap, and lazy. Prolly won't even last in the sun long, but the tank badges were in need of cleaning up & many/most of the "replacement" badges used screws instead of pushpin anchors like I had or a good set of matching OE badges was $60+s/h. So I decided to see what I could do w/ mine.
Here's the set I was working with (pulled from former pictures):

I stripped them (the red inner glazing was cracked, yellowed, missing, and altogether haggard) first. Then polished them the best I could considering the many nooks and crannies. Then I just used a red sharpie.

I didn't want to ruin them by painting them as most paints aren't transparent enought to show the reflective style of the originals, the red perm. pen seems to works well.
I'll clear coat them with UV resistant clear coat and *fingers crossed* hope the red stays put during the clear coating.
Schools about done (next Thursday's the last day) and shop officially closed this past week. My time since has been spent on organizing the shop & proctoring other instructors finals w/ a smidge of bike work in between.
I thought I had a solution to the fuel petcock deal:
Fuel valve from a Massey Ferguson @ Tractor Supply $24. Has OFF, MAIN & RESERVE feature too + two screens and a sediment bowl.
I took a piece of 1/2" aluminum, cut it to match the OE petcock mounting surface, drilled two holes spaced 44mm apart, drilled a center hole 37/64" for the 3/8"NPT thread tap, tapped the threads, cut a gasket, installed on the tank, mounted on the bike and..... it hits the carb throttle linkage. Looks pretty cool but sigh. :shrug:
At least I have the mounting plate (which they are out of w/ no sign of restocking....) for the universal petcock from PartsnMore.
Worked on the seat a bit. Cut out the pans from two old clip boards. Then traced the shapes onto some foam from Harbor Freight ($6.99 for 4 squares!)
After being cut out, I used the equivalent of 3M Super 90 spray adhesive to attach them to the pans, then bench sanded the edges smooth to match the bases.
Here's a picture of this in mid process: (I found the bottom needed a longer top portion and the picture was also taken before the top seat portion was tapered off.
I then picked up some 1/2" softer foam and used some black leather I had from an old set of Audi seats and wrapped the foam seat bases. (I'll have to get a picture of that up here asap, they're at school).
The then sprayed the tank & tail with high build grey primer and will start blocking them out Monday. I just want to say I'm not happy with how the tail portion came out. It's not proportionally correct nor complimentary in shape to the bike or tank. It's frustrating. I have to remind myself that A)its my first fiberglass project EVER and B)it can be replaced/remade at a later time.
Call me a heretic, cheap, and lazy. Prolly won't even last in the sun long, but the tank badges were in need of cleaning up & many/most of the "replacement" badges used screws instead of pushpin anchors like I had or a good set of matching OE badges was $60+s/h. So I decided to see what I could do w/ mine.
Here's the set I was working with (pulled from former pictures):
I stripped them (the red inner glazing was cracked, yellowed, missing, and altogether haggard) first. Then polished them the best I could considering the many nooks and crannies. Then I just used a red sharpie.
I didn't want to ruin them by painting them as most paints aren't transparent enought to show the reflective style of the originals, the red perm. pen seems to works well.
I'll clear coat them with UV resistant clear coat and *fingers crossed* hope the red stays put during the clear coating.
-
diamondj
- Road race school
- Posts: 785
- Joined: Tue Oct 14, 2008 11:00 pm
- Location: Wharton, NJ USA
Re: GT550 Cafe project
I think the clear coat is going to make the red of the sharpie run like water but maybe you'll get lucky. You might consider going to the local hobby shop and grabbing a bottle of Tamiya transparent red acrylic paint. They use it to paint turn signal plastics on model cars. It's water based, brushes on nicely, and should give you a similar effect to the sharpie that you can clear coat.imquattro wrote: I stripped them (the red inner glazing was cracked, yellowed, missing, and altogether haggard) first. Then polished them the best I could considering the many nooks and crannies. Then I just used a red sharpie.
I didn't want to ruin them by painting them as most paints aren't transparent enought to show the reflective style of the originals, the red perm. pen seems to works well.
I'll clear coat them with UV resistant clear coat and *fingers crossed* hope the red stays put during the clear coating.
Jim
-
imquattro
- To the on ramp
- Posts: 239
- Joined: Tue Jul 19, 2011 9:26 pm
- Country: USA
- Suzuki 2-Strokes: 72/74 GT550
- Location: Muncy PA
Re: GT550 Cafe project
That is my fear as well. Good suggestion regarding the hobbiest paint.
