Beautiful job, Gordon. The bike certainly reflects the effort and expense you've put into it. Hopefully you'll get your little niggles sorted out soon.
A great job !!!
Bike Finished and Time to Say Thanks
Moderators: oldjapanesebikes, H2RICK, diamondj, Suzsmokeyallan
-
H2RICK
- AMA Superbike
- Posts: 1659
- Joined: Sun Oct 19, 2008 11:07 am
- Country: CANADA
- Suzuki 2-Strokes: GT550A, GSF1200SK6 currently
- Location: Cowtown aka Calgary, Canada
-
tz375

- Moto GP
- Posts: 6204
- Joined: Mon Nov 03, 2008 10:47 am
- Location: Illinois
Gordon,
For that leak I would normally recommend white teflon tape and if that didn't work I'd move to thicker yellow tape for natural gas.
If teflon tape is not sealing it may be a small crack that opens up when under pressure. I'd try to pressurize the system slightly and see if it sprays out of a crack. The cure is welding or replacement.
If it is not cracked, you might want to try a thread locker designed to take up large gaps or a thin layer of silver silicon goo if you can find some or any other color if not.
-
Tom Garcia
- To the on ramp
- Posts: 334
- Joined: Sat Jan 10, 2009 2:58 pm
- Country: USofA
- Suzuki 2-Strokes: GT250 x 2, GS1100E
- Location: Parma, Ohio
-
ilbikes
- On the main road
- Posts: 187
- Joined: Thu Jan 01, 2009 7:59 pm
Guys, again thanks for the kind words and comments. Richard, I just bought what looks to be a good used head. I'll get it in and clean it up, polish it, and have it powdercoated clear as I did with the rest of the engine, then install. I do plan to travel some on this one and leaks just aren't something I want to chance.
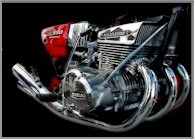
Dave, as for comparisons - the bike is super smooth. It's probably the smoothest engine I have ever ridden, seriously. I don't feel or hear any vibration. The power is all over the range, so the cross-overs and stock porting/exhaust really work the way Suzuki intended.
Now, that was the mechanicals - I applaud them, well done. As for ergonomics, it is again one of the many 70's bikes you "sit on". Much like the Honda CB series. The tank is flat in front of you and the gauges mounted low. You'd have to ride a Kawasaki Late H2, KH500, or Z1/KZ900 to get the sensation of "sitting in" one. I prefer the later. Even my old Yamaha TX650 has the sense of sitting "within", not on top.
Do I like the bike, absolutely. Will I ride it, absolutely. I'm going to install the stock, standard chain/front sprocket and try Richard's fix on the thread sealant. I'll take my time on the replacement head and install it over the next few weeks.
Oh, do you guys re-torque the heads after the first heat cycle? I do my triple Kawasakis, but nothing is mentioned in the Suzuki manual.
Richard, I will try the thread locker.
Thanks
-
Suzukidave
- Moto GP
- Posts: 3980
- Joined: Fri Oct 24, 2008 5:55 pm
- Country: US
- Suzuki 2-Strokes: GT750 x2 97 -1200 Bandit 86 GSXR1100
- Location: Lancaster Pa.
In proper sequence . Should you really back it off first ??tz375 wrote:Gordon,
I would re-torque the head bolts one at a time after a couple of heat cycles. Don't try loosening them all off and torquing them in sequence. Just back each one off and bring it back to spec.
the older i get the faster i was
-
tz375
- Moto GP
- Posts: 6204
- Joined: Mon Nov 03, 2008 10:47 am
- Location: Illinois
Yes.
If you put a torque wrench on a bolt it takes a lot more torque to get it to move than if it is already moving. So you get a false reading. The correct way is to loosen it somewhat and then re-tighten to the appropriate torque setting.
They can be done in sequence but that is less important than teh right procedure.
-
Coyote

- Moto GP
- Posts: 3404
- Joined: Tue Oct 21, 2008 2:41 pm
- Country: USA
- Suzuki 2-Strokes: GT550x2, GT750, GS1000
- Location: Tulsa, Oklahoma
Gordon, you might try this repair. I have had good success with this method
1) Clean and dry the threads on the sensor and the threads in the head. DRY!
2) Put a very light coating of grease on the sensor threads. very thin. A Q-tip will help insure there are no blobs.
3) Mix up a small amount of JB weld and put a thin layer on the threads in the head. Not too much. Use a toothpick.
Finally screw in the sensor and let the JB set up for at least 12 hours. Now back out the sensor. It will come right out because the JB weld won't stick to the greased sensor threads. Let the JB weld in the head harden at least another 12 hours. Now a simple wrap with white teflon tape on the sensor and install it. Good to go!
I have never used this method on a tapered thread but it should work the same as on a straight one.
I was born with nothing and still have most of it left.
.
1978 GS1000C
1976 GT550 ongoing money pit.
.
1978 GS1000C
1976 GT550 ongoing money pit.
-
pjmcburney
- To the on ramp
- Posts: 342
- Joined: Tue Feb 17, 2009 1:20 am
- Country: Australia
- Suzuki 2-Strokes: T20 GT750L RE5A GSX1100S RG500G GSX-R1100N
- Location: QLD
ilbikes wrote:I do have three issues though -
Second is the o-ring chain. While I am using the H2 sprocket I had specially milled to clear the bearing cover, the o-ring chain is so wide that I cannot get it to clear the stock, inner exhaust. It has the slightest bit of contact - just a kiss when you roll the wheel. At speeds, the movement and eventual wear of the chain will eat a hole in the side of the pipe. I think it's back to the standard chain and sprocket. I've tried 2 inner pipes and both have this same exact clearance issue with the o-ring.
Regards,
Gordon
Hi Gordon,
Congrats on a beautiful resto - I'm mighty jealous of your efforts!
As for the chain issue - hmm, that's really kinda weird.
I checked my bike this afternoon and I have approx 10 to 15mm clearance between the edge of the chain and the inner pipe at it's closest point. I too use an o-ring chain and I too have spaced my sprockets out to clear the counter-shaft seal cover behind the front sprocket.
I can think of a couple of things to check:
Determine the series of inner pipe you have - they are different from year to year. Some are slightly longer and consequently the cutout in the pipe for the chain is in a different place.
I have various different sets. When I had a set of later pipes (M - no crossovers) on my bike the clearance was greatly reduced, but still didn't rub. Go figure...
And, take some comparison measurements from the centre of the frame to the inside of each pipe hanger/bracket (the welded bit where the pipes bolt on) to see if there are major discrepancies from one side to the other.
If your bike has taken a fall at some stage it's possible the LHS pipe hanger was/is bent.
A small amount of inward deflection (i.e. barely noticeable to the naked eye) at the end of the bracket would make a large difference to your chain clearance, and you would hardly notice when bolting the pipes up as there is plenty of leeway.
The brackets can be bent back out. I've had to give one of mine a bit of a tweak, but like any serious frame work I recommend it be done carefully.
IMHO, don't give up on the o-ring chain thing yet, I don't reckon the chain is the problem. From a maintenance POV, an o-ring chain is much easier.
Yes, they are wider, but not THAT much. You've gone to lots of effort already with spacers and such - it almost sounds to me like you're going to have dramas with a non o-ring anyway with the situation you've described.
Cheers
Paul
-
ilbikes
- On the main road
- Posts: 187
- Joined: Thu Jan 01, 2009 7:59 pm
Guys, FALSE ALARM - the o-ring chain is not the problem. The H2 sprocket and all that measuring was good information. Everyone should do it.
Allen Wood called me Friday night and suggested the left hanger on the frame may be in too far. Careful measurng and comparisons between the right and left confirmed same. The left side, while showing no physical damage, was about 3/8" inward. The inside of the left bushing housing was in fact closer to the swingarm than the right side. Even the long bolt that goes through both exhaust brackets was pointed inward on the left side - not perpendicular to the bike's center-line like the right one.
This muffler/passenger peg is a rigid and boxed-sectioned piece, not something that will move easily. There is no physical damage and I was able to attach a long lever using the right sized bolts, spacers, and washers in such a way as to not harm the powdercoat.
Everything is working fine - I have a full 1/2" of chain clearance now with the o-ring chain. The water temperature sender leak was quickly fixed by removing a few quarts of coolant, removing the sender, drying all the threads and applying a small amount of 3M yellow adhesive. Darn sure not a drop anywhere!
Thanks again for all the input.
Regards,
Gordon
-
oldjapanesebikes

- Moto GP
- Posts: 3229
- Joined: Sat Feb 07, 2009 12:43 am
- Country: Canada
- Suzuki 2-Strokes: GT750(Jx3,L,M,A,B),T500
- Location: Ontario
- Contact:
-
oldjapanesebikes
- Moto GP
- Posts: 3229
- Joined: Sat Feb 07, 2009 12:43 am
- Country: Canada
- Suzuki 2-Strokes: GT750(Jx3,L,M,A,B),T500
- Location: Ontario
- Contact:
-
ilbikes
- On the main road
- Posts: 187
- Joined: Thu Jan 01, 2009 7:59 pm
-
2STROKECAFE
- On the street
- Posts: 27
- Joined: Thu Oct 16, 2008 5:17 pm
Gordon,
Did you post any info on the H2 sprocket? I did a search but didn't find anything about it. I will eventually need an offset sprocket for one of my projects and it would be nice to use an offset H2 sprocket. Fast from the Past offers them off the shelf. Bike looks fantastic by the way. Really nice job!
Take care,
Bryan
